Category: computers suck
Making cheap HP plotter pens + yet another HP-GL viewer
If you’re running an old plotter, getting pens can be a worry. While there are some companies that might still make them (Graphic Controls/DIA-Nielsen, for one) they are expensive and limited in range. They’re also felt-tip, which means they’ll dry out if not carefully re-capped.
While eBay might supply all things (like these Roland DG plotter pens I scored a couple of days back; fine, black, new old-stock, or these German plotter pens), I also found this:
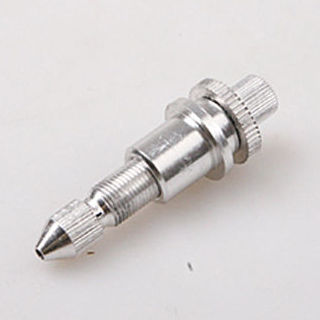 It’s described as “11.5*28MM cutting plotter vinyl cutter pen holder 50mm for Roland holder Pcutâ€. I bought two, and eventually the slow boat from China came …
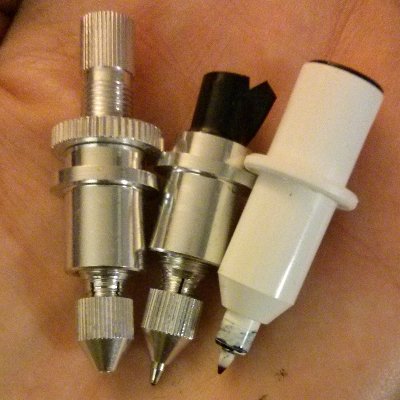
The one on the left is an unmodified pen holder. Well, it’s really a ballpoint-refill holder, as it comes with a (random colour of blue) refill. To modify these to fit into an HP desktop plotter, you will need to:
- Cut ~10 mm from the end of the holder. A Dremel + cutting disk is a satisfying way of doing this. The gap between the knurled bit and the thread seems to be a decent place. Clean up the sharp edges
- As the knurled lock ring will stop the pen engaging in the carriage (my HP-7470A does a lovely little hesitant try… nope; try… nope; try… give up sequence), you’ll have to do without it. Find another way of jamming the threads of the threaded collar in the right place. I used electrical tape, and it’s held so far. Wiser users will use different colours of electrical tape for different pens, ahem …
- Stick the pen refill in and tighten down the collet lightly with pliers. ¡¡¡ Do not try to pull the refill out while it is in the collet !!! (The ballpoint insert will likely pop out, and viscous ink will start to blort out everywhere. Ask me how I know!)
- Snip the end of the refill flush with the end of the pen holder using diagonal cutters. Best to do this directly over a rubbish bin, as pen ink is nasty. Dab off excess ink from the end of the refill, and clean your cutters, too.
- The base of the threaded collar should be around 29 mm from the pen tip, otherwise nothing will plot (if it’s too short) or you’ll poke holes in the paper (if too long). This measurement doesn’t seem to be extremely critical: my Roland pens have it at 28.5 mm, the DIA-Nielsen pens are 28.9 mm. One of my homebrew pens is working at 30½ mm, but then, my basic plotter has no force control, so it may be more forgiving than more elegant beasts.
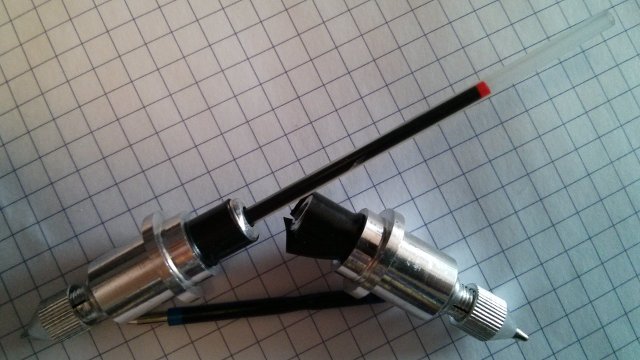
My modified pens look like the above.
The dollar store is a good source of cheap ballpoint pens. I managed to snag 8 retractable red pens for $1.25, and 4 black pens for $1.

(These retractable pens more often than not eject the whole internals across the room when you retract ’em.)
It’s probably a good idea to scribble with the pens a bit before and after modifying them, as they take a while to flow freely. They plot very lightly; the black ink looks more like a faint pencil line.

If you look close up, not merely are the lines very faint, but something else important shows up:

The lines — which should be a constant(ish) distance apart, if the paper has stayed in registration — are showing a varying distance from each other. It looks like the pen points are a little off-centre, so when the pen is swapped out, it gets turned to a slightly different position. This would really only matter for precise work, and I find the effect interesting.
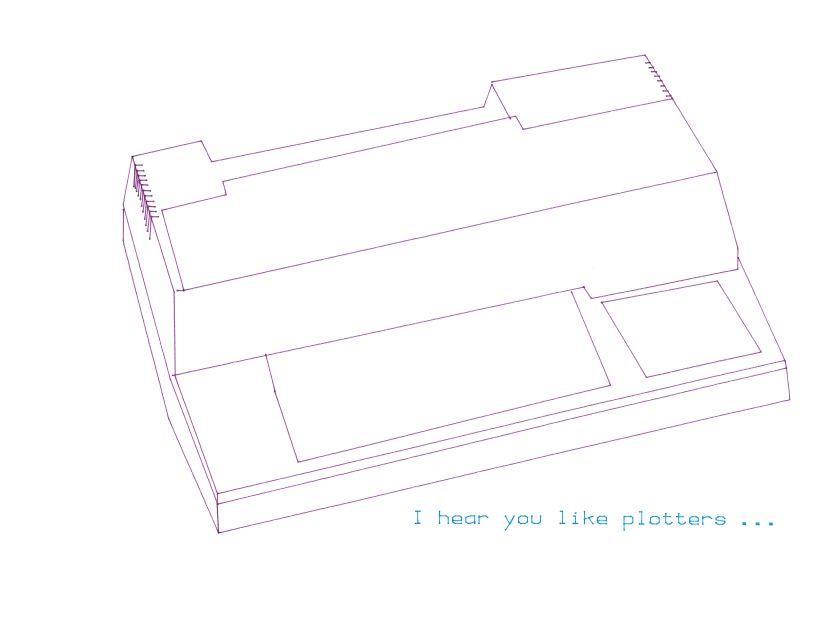
As for the HP-GL viewer? GhostPDL, by the makers of Ghostscript. You’ll have to build it from source, and its documentation isn’t quite where one might want it to be, but it implements a full HP PCL6Â / HP-GL/2 interpreter than can output bitmaps, PostScript or PDF. The SVG graphic below was made using the tools/plot2pdf.sh script to convert HP-GL to PDF, then I used ghostscript to convert that to SVG. Nifty!
 As a bonus, GhostPDL comes with one of the prettiest plotter fonts ever:

More fun with plotters: graphing, simplifying, and random noises …
- If you go to the Incompetech Multi-Color Graph Paper PDF Generator and set the grid spacing to 0.4, 0.8 and 4 lines/cm, you get a nifty HP-GL unit grid with major lines at 1000 units (25 mm), intermediate lines at 500 units (12½ mm) and minor lines at 100 units (2½ mm):

- By a very roundabout route, I used GDAL’s simplify function to half the line count of my hypotrochoid plots with little visible degradation. The optimised page took far less time to plot:


Next time, I’d definitely use Shapely instead of messing about with GIS formats. Who knows, I might even integrate it into Chiplotle. Eventually. (Update: though I have some code that does something …) - Plotters are resolutely electromechanical devices. They turn digital command into analogue output, but my one never sounds too happy doing it. It grumbles, sighs and even moos as it plots. A recent plot sounded a bit like this: .
Pleasantly futile: Dogecoin digging on the Raspberry Pi
I don’t recommend this in any way, but cpuminer will run on the Raspberry Pi. It’s pretty easy to build:
sudo apt-get install build-essential libcurl4-openssl-dev automake git

git clone https://github.com/pooler/cpuminer.git

cd cpuminer/

./autogen.sh

./configure CFLAGS="-march=armv6 -mtune=arm1176jzf-s -mfloat-abi=hard -mfpu=vfp -ffast-math -ffast-math -O3"

make

sudo make install
I’m not convinced that the l33t funroll-l00pz CFLAGS are strictly necessary. Yes, you still only get 0.34 khash/s on a stock Raspberry Pi — which means it would take several days to earn 1Ä (or roughly 0.1¢).
I’m trying to find the most futile computer on which to dig Ä. My BeagleBone Black is (somewhat surprisingly) more than 2× as fast, once you replace the very limited Ã…ngström distribution with Debian. I’m really disappointed that I can’t build cpuminer on my Intel Galileo. Its Yocto distribution is extremely small yet confusing. As the board runs burny hot under no load, I wonder how quickly it would glow white-hot under 100% CPU load.
For all your HP 7470a plotter manual needs
On the off chance you need to control a 30 year old graphics plotter, have I got something for you:
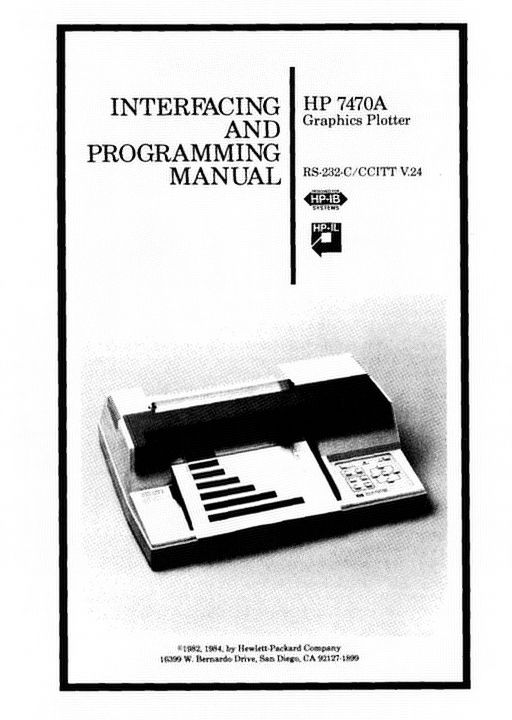
The image links to a scanned copy of the HP 7470A Graphics Plotter: Interfacing and Programming Manual which I found on the web, and cleaned up. The pages have been OCR’d, so it should be searchable.
more plots than mount pleasant


So that’s how the Raspberry Pi camera fits in the CamdenBoss housing …
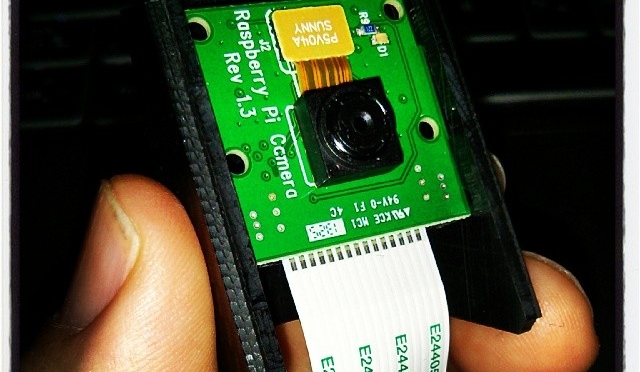
The CamdenBoss Raspberry Pi Camera Enclosure (data sheet, suppliers: RPI CAMERA BOARD – RASPBERRY-PI – ADD-ON BRD, CAMERA MODULE, RASPBERRY PI | Newark element14 Canada, MCM Electronics Carbon Raspberry Pi Camera Case 83-15493 – Micro Center) comes with no instructions. Maybe the lighter coloured ones are easier to work out, but on the faux-carbon one I bought, the little guide slots the board has to slide into are very hard to see.
Given all the warnings about static, I was a little too careful trying to install the camera into the housing. Slip open the camera case, then put the board in at an angle with one side in one slot, then (with a bit more force than I’d like) spring or flex the housing so the other side of the board can click into place. You have to make sure that both sides are fully engaged in the slots before the cover will slide back on.
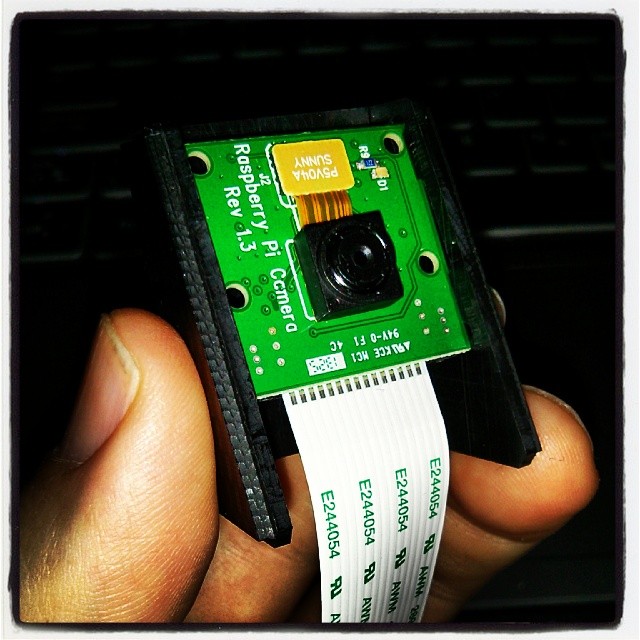
So here it is, all set up:

Oh, sorry; should’ve warned you about the bright pink case and the awesome/appalling Lisa Frank sticker. The sticker is in no way to cover up where I cut the wrong place for the camera connector, nope nope nope …
Wonderful blank Terms & Conditions
I’d just like to go on the record that Intel made me accept these Terms & Conditions when logging on their Space: Makers | Intel Communities site: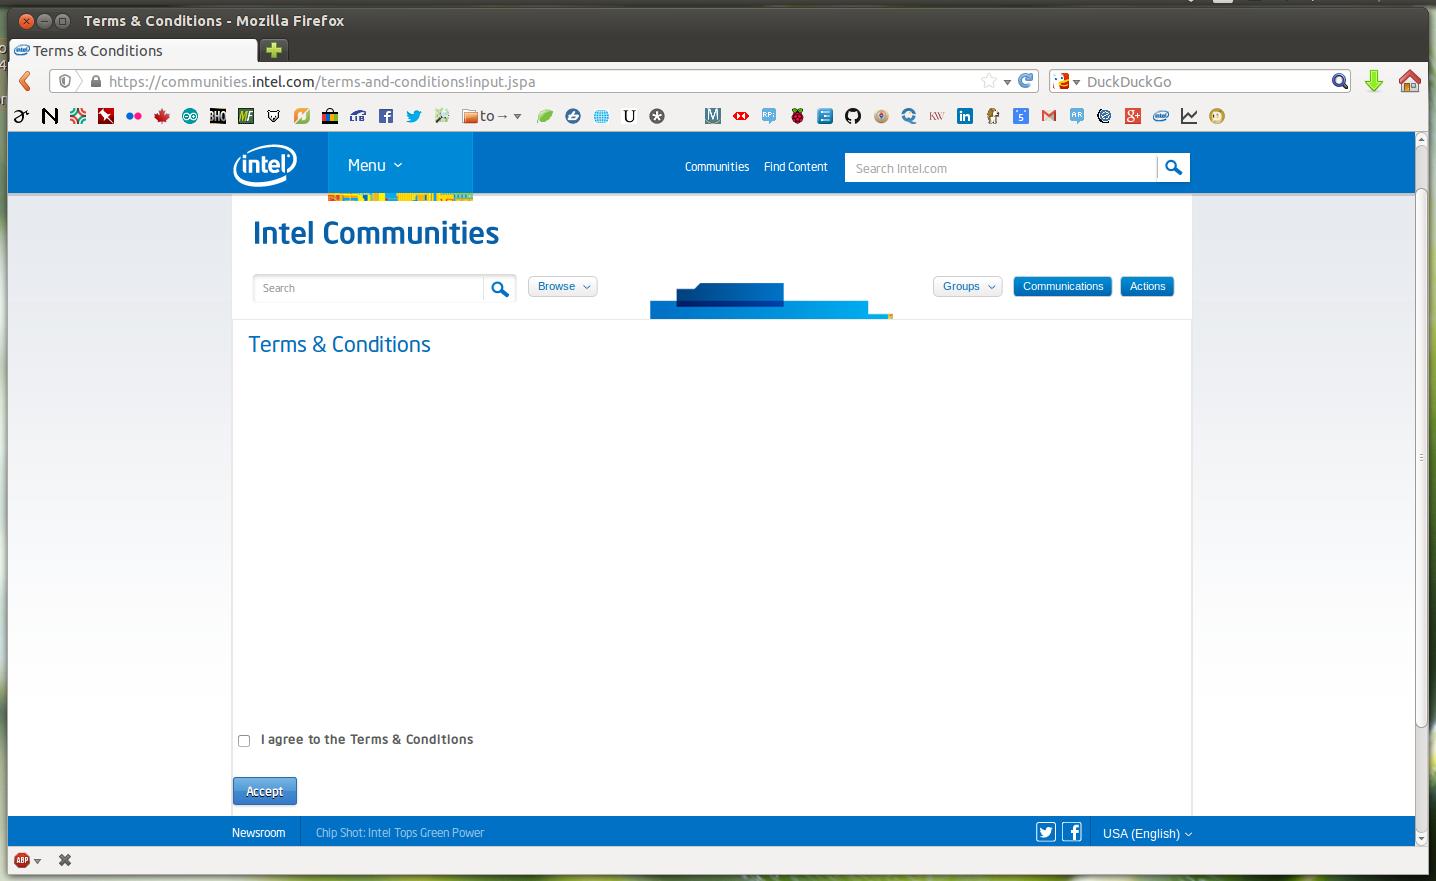 Yup, completely blank. I guess I can do anything I want now, eh?
elementary OS: could be worse
Imagine there’s a really nicely arranged screenshot of elementary OS here. You know, browser arranged just so, dock showing shiny icons, and a coy little dropdown showing that I’m playing music that’s faaaar hipper than you’ll ever be. Got that image? Good. ‘Cos I just spent a ½-hour setting it up, then deleted it in a second of unthought when I cleaned up the elementary OS VM from VirtualBox. Aargh!
elementary OS is a very pretty Ubuntu/Debian distro. It has a very strong visual identity, and is designed and managed by a very small group. This rigidity may annoy the seasoned Linux user, but will likely work in a more logical way if you’re used other OSs. You won’t face jarringly mismatched user interface elements, as still happens with Ubunty/Unity. Linux UX allows too much choice, so you’re never sure which options do what at any given time.
(F’rinstance: Ctrl+Q used to quit programs. Now, Ubuntu wants us to use Ctrl+W, the old close-the-window command. Some programs no longer quit with Ctrl+Q, so you’re left with an awksmash of Ctrl+Q_no-I-meant_W. Don’t make me think!)
A couple of things put me off elementary OS:
- You can’t put files on the desktop. In an effort to be tidy, eOS forbids you putting the stuff you’re working on in the place you’ll see it. This is a major annoyance, but worse things are coming.
- It expects you to pay for it. No, really. They want $10 from you, right from the get-go. While you can get around this (click the “Download†button; it only looks like it’s linked to the payment button), they do something far, far worse:
They use a PayPal pop–under.
Srsly. Gahh. Eww. Pop-unders are the web equivalent of taking a 💩 on an art gallery floor. If they’re low enough to pull that kind of stunt, who knows what leakage lurks under their pretty graphics?
Linking ≠Abuse.
Got this e-mail today. Addresses redacted, but otherwise verbatim:
| Subject: Link removal request |
| From: Rodger Lodge <entrust_____@gmail.com> |
| Date: 14-01-27 08:46 AM |
| To: abuse@my hosting company.com, me, hostmaster@my hosting company.com |
Hi,
We have recently received a notification from Google stating that our website has unnatural links pointing towards it. This has really damaged our rankings on Google and as a result, we’re trying to clear things up.
Our website url is www.entrust.net.
We noticed the following links are pointing to our website from your site:
http://scruss.com/blog/2006/12/
http://scruss.com/blog/2006/12/14/when-you-really-havent-chosen-not-to-trust-citrix-mac-os-x-and-entrust-certificates/
http://scruss.com/blog/tag/citrix/
I appreciate this is inconvenient and isn’t a reflection on your website at all, but if you’re able to remove the links, we would really appreciate it and would be very grateful.
I look forward to hearing from you.
Rodger Lodge
Entrust, Inc.
So, one of the prime security companies (I’m strongly resisting the urge to link to them here, but I’m above that) is using gmail to send out official notices? Why not a securely signed e-mail from their .net domain? That might be more legit. Also, sending me a copypasta response lifted from the “Ultimate Guide to Google Penalty Removal†seems a little … gauche.
If this is for real, then I’m annoyed. I wrote the original article in 2006 in an attempt to help Mac users get work done with a popular remote-access package. I’m not dissing the company in any way: I’m helping people use their products better. Linking is not abuse.
It’s probably just spam, though.
Update: Nope, not spam. Got an apology by e-mail from Nate Plaunt of Online Performance Marketing, saying: “This was an automated email generated by this digital agency and your sites were mistakenly targetedâ€. Still no apology for the e-mail to abuse@…, tho’. That’s never an acceptable first communication.
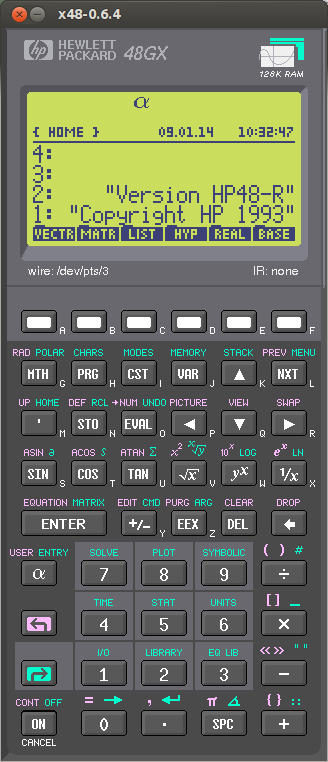
The HP48: the best calculator ever
We had an unscheduled overnight stop in East Lansing last week, and I took the chance to visit the MSU Surplus Store. For $15, they had HP48G calculators, seemingly unused:

They still have a bunch of them: HP 48G Graphic Calculator.
They’re maybe not the quickest (the 4 MHz Saturn processor chugs sometimes, and wanders off to clean up memory when it feels like it), the display is downright chunky these days, but they have everything that a scientific calculator should have. The keys have a good action. It just works. Yes, your smartphone has hundreds of times the processing power, but it’s not specialized to the task. The HP48 is.
If you’re feeling really nerdy, you can run an HP48 (a GX, not the G which I have) under Linux using x48. Jeff has some useful tips on installing x48 on newer ubuntu versions (though you don’t have to do the font thing under Ubuntu 13.10).
 Building it is a small matter of ./autogen.sh ; ./configure ; make ; sudo make install. To run it, you’ll need to install the GX ROM image to ~/.hp48. The first time you run it, I’d recommend running it from the terminal with:
x48 -connFont -misc-fixed-bold-r-normal--13-120-75-75-c-70-iso8859-16 -smallFont -misc-fixed-bold-r-normal--13-120-75-75-c-70-iso8859-16 -mediumFont -misc-fixed-bold-r-normal--14-130-75-75-c-70-iso8859-16 -largeFont -misc-fixed-bold-r-normal--15-140-75-75-c-90-iso8859-16 -reset -initialize -rom ~/.hp48/rom
as the ROM format has an outdated config file which causes it to complain weakly every time you start the emulator.
Scanned manuals are available from HP and archive.org here: HP 48g User Guide, HP 48g Quick Start Guide.
Processing 2.1 + Oracle Java + Raspberry Pi + Serial + Arduino = ☺
Hey! This is very old and there’s an officially supported version out now coming out very soon.
Update for Raspberry Pi 2/Processing 2.2.1/Processing 3.0.5: Raspbian now ships with Java 8, and Processing only likes Java 7. oracle-java7-jdk is still in the repos, so install that, and follow the instructions below. It’s a bit flakey, but when it runs, runs quite fast on the Raspberry Pi 2. You might have more luck running Processing.js or p5.js in the browser.
With Sun Oracle hardfloat Java now available, Processing now runs at a decent clip on the Raspberry Pi. My old instructions are now very obsolete. Here are current, tested instructions for installing it under Raspbian.
[This is a particular solution to installing a Serial/Firmata-enabled Processing 2.1 distribution on a Raspberry Pi. Processing still has issues with other aspects of visual programming (particularly video) that I’m not addressing here.]
A lot of software is installed here, and much of it depends on previous steps. Don’t jump in mid-way and expect it to work.
Update the system
Always a good plan if you’re doing major upgrades:
sudo apt-get update
sudo apt-get dist-upgrade
Install Sun Oracle Java
sudo apt-get install oracle-java7-jdk
Check if the right version is installed as default: java -version should give
java version "1.7.0_40"
Java(TM) SE Runtime Environment (build 1.7.0_40-b43)
Java HotSpot(TM) Client VM (build 24.0-b56, mixed mode)
If you get anything else, you need to make Sun Oracle’s version the default:
sudo update-alternatives --config java
Download & Install Processing
Go to Download \ Processing.org and get the Linux 32-bit version. It’s big; about 100 MB. I’m going to install it in my home directory, so the base path will be ~/processing-2.1. Extract it:
tar xvzf processing-2.1-linux32.tgz
Now you have to remove the included x86 Java runtime, and replace it with the Raspberry Pi’s armhf one:
rm -rf ~/processing-2.1/java
ln -s /usr/lib/jvm/jdk-7-oracle-armhf ~/processing-2.1/java
You should now have a Processing installation that will run, but there’s some more we need to get serial and Arduino support.
Install the java Simple Serial connector
Download jSSC-2.6.0-Release.zip and extract it:
unzip jSSC-2.6.0-Release.zip
Now overwrite the jssc.jar that ships with Processing with the one you just downloaded:
mv jSSC-2.6.0-Release/jssc.jar ~/processing-2.1/modes/java/libraries/serial/library/
(You can remove the jSSC folder now: rm -r jSSC-2.6.0-Release)
Test Processing’s serial support
You’re almost there! Fire up Processing:
~/processing-2.1/processing
and try Perhaps the World’s Most Boring Processing Sketchâ„¢:
// Example by Tom Igoe

import processing.serial.*;

// The serial port
Serial myPort;

// List all the available serial ports
println(Serial.list());
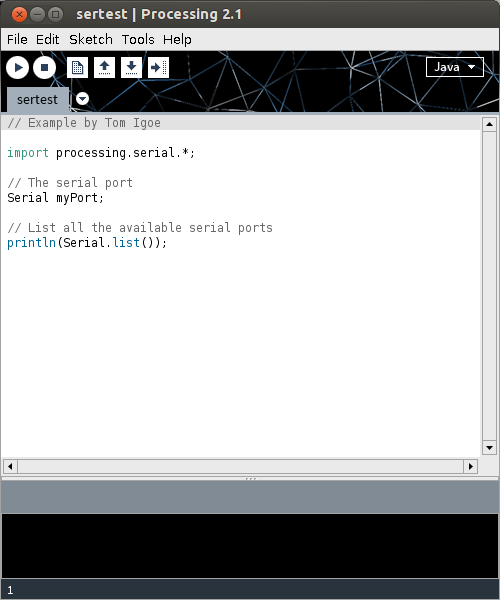 When this runs (it’s a little slow), you should get a single line of output, which should start /dev/tty___:
/dev/ttyACM0
(I have an Arduino Leonardo attached, which usually appears as an ACM device.)
Installing Arduino/Firmata support
(I’m not going to go into uploading Firmata onto your Arduino here. All I can recommend is that you use the newest version at firmata/arduino, rather than the old code bundled with your Arduino distribution.)
Exit Processing, and download processing-arduino.zip from firmata/processing. Extract it into your Processing sketchbook:
unzip processing-arduino.zip -d ~/sketchbook/libraries/
For tedious reasons, you also have to rename one of the files:
mv ~/sketchbook/libraries/arduino/library/Arduino.jar ~/sketchbook/libraries/arduino/library/arduino.jar
Start up Processing again, and save Most Probably the World’s Second Least Interesting Processing Programâ„¢:
import processing.serial.*;
import cc.arduino.*;
Arduino arduino;
int ledPin = 13;

void setup()
{
  println(Arduino.list());
  arduino = new Arduino(this, Arduino.list()[0], 57600);
  arduino.pinMode(ledPin, Arduino.OUTPUT);
}

void draw()
{
  arduino.digitalWrite(ledPin, Arduino.HIGH);
  delay(1000);
  arduino.digitalWrite(ledPin, Arduino.LOW);
  delay(1000);
}
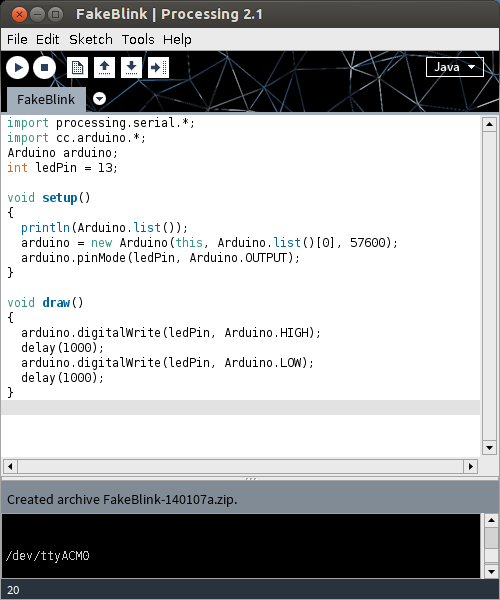
What this sketch does is emulate the µC’s “Hello World†program, Blink. It flashes the board’s LED once per second. Boring? Yes. But if it worked, you have a working Processing 2.1 installation on your Raspberry Pi. Go forth and make more interesting things.
(Props to bitcraftlab/wolfing for the basic outline for installing Processing, and for samaygoenka for the prodding needed to update and test the Processing installation process. If you’re still stuck, the Processing 2.0 Forum and the Raspberry Pi Forum are good places to ask.)
Introducing RAFTP — the Really Annoying File Transfer Protocol
I would like to describe a new and highly impractical method of transferring data between computers. Modern networks are getting more efficient every year. This protocol aims to reverse this trend, as RAFTP features:
- Slow file transfers
- A stubborn lack of error correction
- The ability to irritate neighbours while ensuring inaccurate transmission through playing the data over the air using Bell 202 tones.

Figure 1 shows a test image before it was converted into PGM format. This was then converted into an audio file using minimodem:
minimodem --tx -v 0.90 -f doge-small-1200.wav 1200 < doge-small-tx.pgm
This file was then transferred to an audio player. To ensure maximal palaver, the audio player was connected to a computer via a USB audio interface and a long, minimally-shielded audio cable. The output was captured as mp3 by Audacity as this file: RAFTP-demo
The mp3 file was then decoded back to an image:
madplay -o wav:- RAFTP-demo.mp3Â Â | minimodem --rx -q -f - 1200 | rawtopgm 90 120 | pnmtopng > doge-small-rx.png
Figure 2 shows the received and decoded file:

My Raspberry Pi talks to my Oscilloscope
Hey! This post is completely ancient. It doesn’t even use Python 3. Advice given here might be well out of date.
… it complains that the oscilloscope is always making waves.
Ahem. Anyway. I have a Rigol DS1102E 100 MHz Digital Oscilloscope. For such a cheap device, it’s remarkable that you can control it using USB Test & Measurement Class commands. I’d been wanting to use a Raspberry Pi as a headless data acquisition box with the oscilloscope for a while, but Raspbian doesn’t ship with the usbtmc kernel module. I thought I was stuck.
Alex Forencich turned up in the forum with an all-Python solution: Python USBTMC (source: alexforencich / python-usbtmc). I got this working quite nicely today on both the Raspberry Pi and my Ubuntu laptop. Here’s how I installed it:
- Check your device’s USB code with lsusb:
$ lsusb
Bus 001 Device 002: ID 0424:9512 Standard Microsystems Corp.
….
Bus 001 Device 004: ID 1ab1:0588 Rigol Technologies DS1000 SERIES - Ensure that libusb-1.0 is installed:
sudo apt-get install libusb-1.0-0 - Create a new group, usbtmc:
sudo groupadd usbtmc - Add yourself to this group:
sudo usermod -a -G usbtmc pi - As root, create a file /etc/udev/rules.d/usbtmc.rules. You’ll need to put in your device’s ID values:
# USBTMC instruments
# Rigol DS1100 – ID 1ab1:0588 Rigol Technologies DS1000 SERIES
SUBSYSTEMS==”usb”, ACTION==”add”, ATTRS{idVendor}==”1ab1″, ATTRS{idProduct}==”0588″, GROUP=”usbtmc”, MODE=”0660″
(all of the SUBSYSTEMS to MODE= should be one one line) - Download and install the latest pyusb (Raspbian version is rather old):
git clone https://github.com/walac/pyusb.git
cd pyusb
python setup.py build
sudo python setup.py install - Now get python-usbtmc:
git clone https://github.com/alexforencich/python-usbtmc.git
cd python-usbtmc
python setup.py build
sudo python setup.py install - For this simple demo, you’ll need to convert the USB vendor IDs to decimal:
0x1ab1 = 6833
0x0588 = 1416 - Now, start python as root (sudo python) then type:
import usbtmc
instr =Â usbtmc.Instrument(6833, 1416)
print(instr.ask(“*IDN?”)) - This should return something like:
Rigol Technologies,DS1102E,DS1EB13490xxxx,00.02.06.00.01
If you get the status line, congratulations! You now have a fully working usbtmc link. I haven’t had much time to play with this, but I know I can make really nice screenshots to an attached USB drive using the command: instr.write(“:HARDcopy”). Many more commands can be found in the DS1000D/E Programming Guide, available on Rigol‘s site.
I had a couple of problems, though:
The library seems to need root privileges, despite the udev rule thing. After creating the udev rule, you will need to reboot. This is the simplest way of getting it to work without being root.Reading from the ‘scope’s memory chokes on non-UTF8 characters. If I do:
rawdata = instr.ask(“:WAV:DATA? CHAN1”)[10:]
I get a lengthy Python error which ends:
…
File “/usr/lib/python2.7/encodings/utf_8.py”, line 16, in decode
   return codecs.utf_8_decode(input, errors, True)
UnicodeDecodeError: ‘utf8’ codec can’t decode byte 0x99 in position 10: invalid start byte
I have no idea what that means, or how to fix it. Alex suggested using ask_raw instead of ask, and the data comes through with no complaints.
I’ve still got to work my way through the Rigol’s data format, but other people have done that before:
- Controlling a Rigol oscilloscope using Linux and Python | C i b o M a h t o . c o m
- Ken Shirriff’s blog: Four Rigol oscilloscope hacks with Python
I’ll post any updates here, along with the Raspberry Pi forum topic: USB Test & Measurement class (usbtmc) driver?
Incidentally, if you’re working with WFM data dumps from the Rigol ‘scopes (and you should, because they make storing data to USB drives quick), mabl/pyRigolWFM is basically magic. Not merely can it describe and decode those binary files, it can do pretty graphics with no thought required:
 Hat tip for the mention: MP3 Options & Oscilloscope Interfacing For Raspberry Pi @Raspberry_Pi #piday #raspberrypi « adafruit industries blog
Update, 2013-12-20: I’ve successfully managed to run most of Ken’s examples with Alex’s code. The major modification you have to do is use ask_raw instead of ask. Example code shown below:
#!/usr/bin/python
# -*- coding: utf-8 -*-
"""
Download data from a Rigol DS1102E oscilloscope and graph with matplotlib
using Alex Forencich's python-usbtmc pure python driver
https://github.com/alexforencich/python-usbtmc
scruss - 2013-12-20
based on
Download data from a Rigol DS1052E oscilloscope and graph with matplotlib.
By Ken Shirriff, http://righto.com/rigol
which in turn was
Based on http://www.cibomahto.com/2010/04/controlling-a-rigol-oscilloscope-using-linux-and-python/
by Cibo Mahto.
"""
import usbtmc
import time
import numpy
import matplotlib.pyplot as plot
# initialise device
instr = usbtmc.Instrument(0x1ab1, 0x0588) # Rigol DS1102E
# read data
instr.write(":STOP")
instr.write(":WAV:POIN:MODE RAW")
# first ten bytes are header, so skip
rawdata = instr.ask_raw(":WAV:DATA? CHAN1")[10:]
data_size = len(rawdata)
# get metadata
sample_rate = float(instr.ask_raw(':ACQ:SAMP?'))
timescale = float(instr.ask_raw(":TIM:SCAL?"))
timeoffset = float(instr.ask_raw(":TIM:OFFS?"))
voltscale = float(instr.ask_raw(':CHAN1:SCAL?'))
voltoffset = float(instr.ask_raw(":CHAN1:OFFS?"))
# show metadata
print "Data size: ", data_size
print "Sample rate: ", sample_rate
print "Time scale: ", timescale
print "Time offset: ", timeoffset
print "Voltage offset: ", voltoffset
print "Voltage scale: ", voltscale
# convert data from (inverted) bytes to an array of scaled floats
# this magic from Matthew Mets
data = numpy.frombuffer(rawdata, 'B')
data = data * -1 + 255
data = (data - 130.0 - voltoffset/voltscale*25) / 25 * voltscale
# creat array of matching timestamps
time = numpy.linspace(timeoffset - 6 * timescale, timeoffset + 6 * timescale,
num=len(data))
# scale time series and label accordingly
if (time[-1] &lt; 1e-3):
time = time * 1e6
tUnit = "µS"
elif (time[-1] &lt; 1):
time = time * 1e3
tUnit = "mS"
else:
tUnit = "S"
# Plot the data
plot.plot(time, data)
plot.title("Oscilloscope Channel 1")
plot.ylabel("Voltage (V)")
plot.xlabel("Time (" + tUnit + ")")
plot.xlim(time[0], time[-1])
plot.show()
Faster MP3 options for Raspberry Pi
Hi there! This post is beyond ancient, and made sense back when the original Raspberry Pi Linux distributions didn’t have floating point support. With the multi-core Raspberry Pi 3, lame now runs at an acceptable rate. You should probably ignore this post unless you’re deliberately trying to recreate that bubbly old MP3 sound.
One thing the Raspberry Pi is not good at is encoding MP3s at any great speed. At best (using lame) you might get slightly better than 2× real time playback. If you’re using your Raspberry Pi to transcode to another format, that might be slow enough (with other system overhead) to make the output stutter.
While it would be nice to have the GPU as a general media encoder, we’re not there yet. If you must encode mp3s quickly on a Raspberry Pi, there are a couple of options:
- Comprec – http://unimut.fsk.uni-heidelberg.de/demi/comprec/index.html
This uses ARM assembly language. The code is a little fiddly to compile, but can encode to a 128 kbit/s mp3 in ~ 6× real time. I’ve used this for years. - Shine – https://github.com/savonet/shine
This is actually being maintained, and is portable between architectures. Not quite as fast as comprec, at 2.7× real time, but still a bit faster than lame.
Please note that both of these are based on the old ‘8hz’ mp3 encoder, which was a fairly literal interpretation of the original Fraunhofer code. They only start producing okay sounding files at high bitrates.
If you need to decode mp3s quickly, MAD is pretty good: http://www.underbit.com/products/mad. It’s in the repos as ‘madplay’.
Blueline / Black & Decker Power Monitor RF Packets
Update 2014-10-02: I’ve forked Bryan’s Arduino code and added some instructions: scruss/Powermon433 (though use Bryan’s, srsly)
Update 2014-08-19: Bryan Mayland has decoded the data on Arduino! More details here: CapnBry/Powermon433
Given that I first started thinking about reverse-engineering the Blueline Powercost Monitor‘s data stream in September 2010, I hardly win any awards for rapid development. Here’s what I know so far about the device and its transmissions:
- The Blueline unit and the (now discontinued)Â Black & Decker Power Monitor (EM100B) appear to be functionally identical. Both transmit data using simple ASK/OOK at 433.92 MHz in the ISM band.
- It is, however, completely different from the Norgo NGE101 meter, dammit.
- The display unit is made by Hideki Electronic Limited, who make many small weather stations and wireless displays. [Pictures of the display circuit boards]

- The transmitter unit was designed by Intectus in Ottawa for Blueline. It uses a TI MSP430 µcontroller. [Transmitter board picture]

- The transmitter can be triggered by simulating a power meter if you flash a 940 nm IR Emitter LED for 50 ms into its sensor. 1× 50 ms flash represents 1 Wh of power consumed. A pulse frequency of 1 Hz represents 3.6 kW consumption.

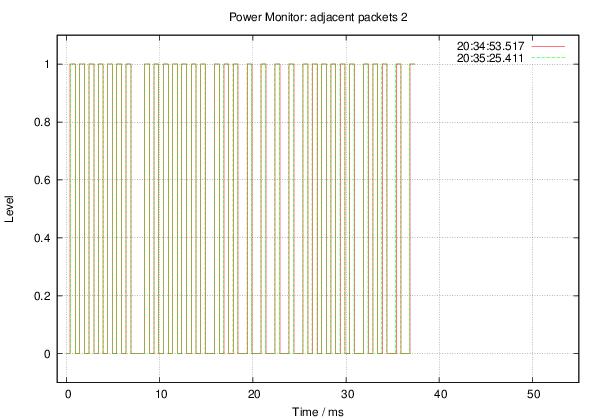
- The transmitter sends a bundle of three (seemingly) identical packets every 31.8 seconds. These appear to contain consumption data, as the display updates approximately every 32 seconds.
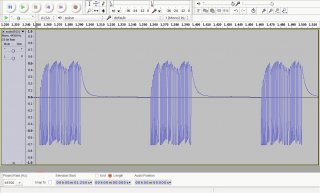
- A series of contiguous packets, recorded as audio using a simple circuit described by the Protocol Analyzer project: audio201311182215-silenced (FLAC; please note that interstitial silences have been blanked to reduce file size).
- Temperature packets may be sent separately from power, as the display updates temperature much more slowly than power use.
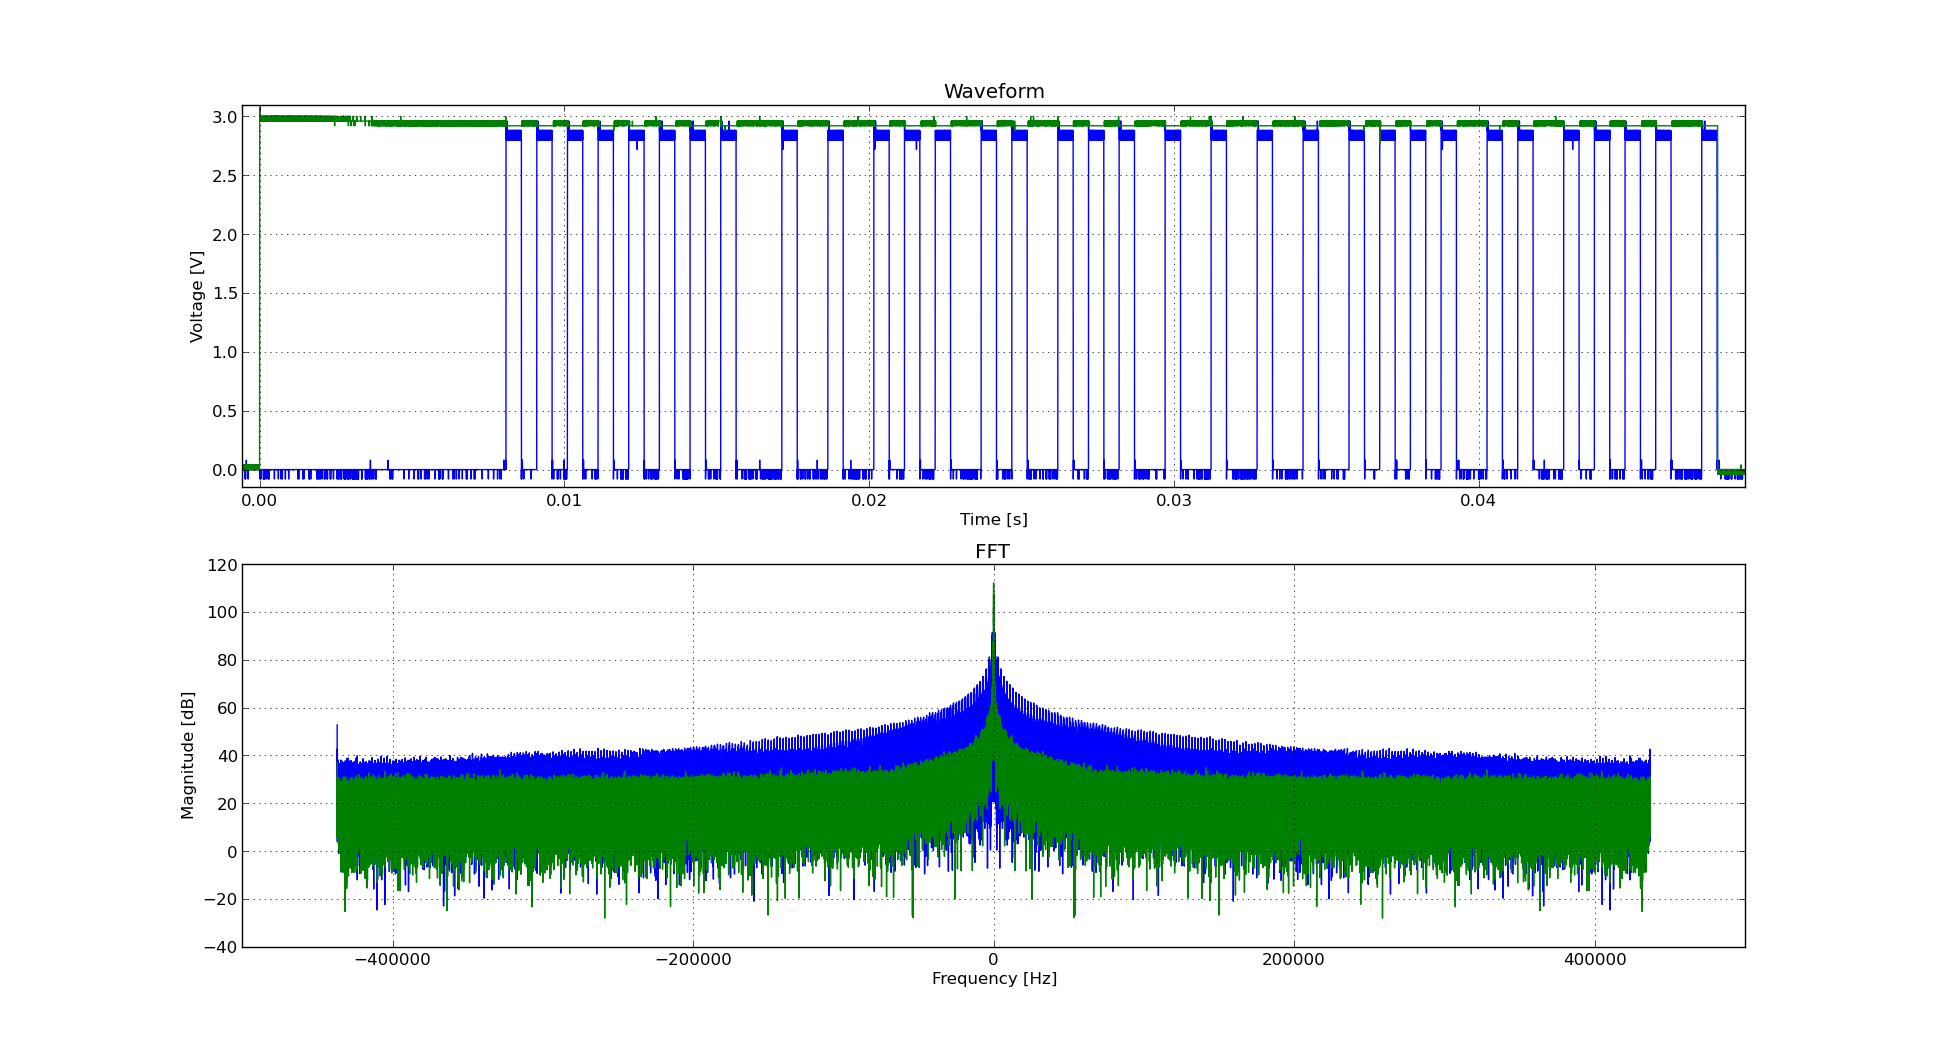
- Power packets only appear to contain use data (along with a transmitter ID). If the sensor receives an absolutely constant input, the packets transmitted 32 s apart can be identical.
- The packets appear to be Manchester-encoded.

Some rough notes on mark/space timing (all times in µs):
Mark : Mean    529.4 Min    499.0 Max    590.0 StdDev:   15.03
Space: Mean    694.5 Min    385.0 Max   1474.0 StdDev:  281.57
Mark/space times, by frequency (all times in µs):
MARK
====

          µS
Rank     Value   Count
-------- ------- -----
     1         522  498
     2         544  206
     3         567   32
     4         499   32
     5         590    8

SPACE
=====

          µS
Rank     Value   Count
-------- ------- -----
     1         476  279
     2         975  223
     3         454   99
     4         952   65
     5         431   26
     6        1474   22
     7         408   21
     8         499   17
     9         998   12
    10      199000    8
    11         385    2
    12        1451    2
More later, including raw packet data.
Thanks to Randy Simons and Bryan Mayland for the recent help. Thanks too to Brett “Wiring†Hagman for asking just why I was trying to do this …
We won’t, we won’t Roku …
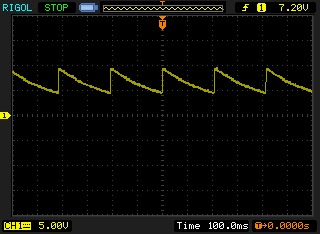
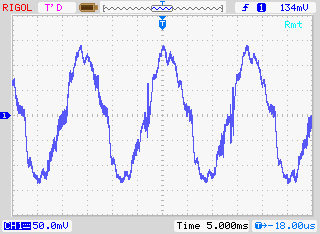
I’m pretty sure the 9V DC power supply for one of my Roku Soundbridges shouldn’t be doing that ↑↑ . This is the second unit I’ve had to replace, my other Soundbridge blowing its 5 V supply a couple of years back. This one cycles from 9.4 to 4.4 V about 5 times a second. Not very DC, but kind of lethargic for AC.
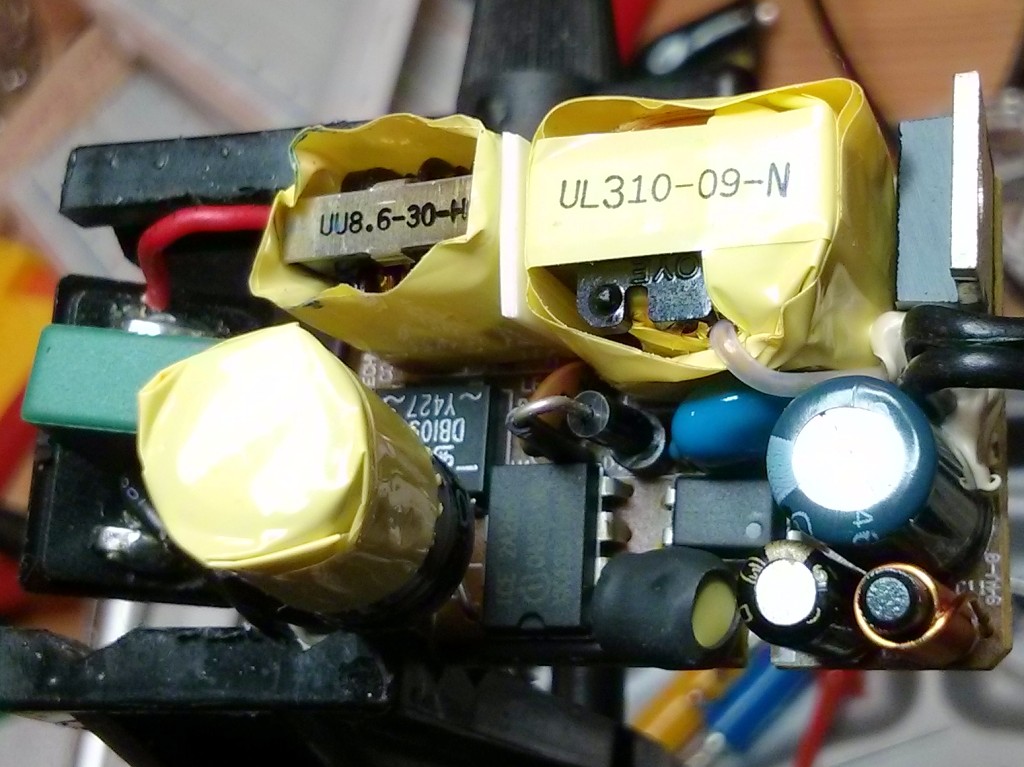
It’s hard to tell, but one of the caps inside the rather complex little Unifive wall wart may have blown. I’ve scrapped the PSU and replaced it with a beefier one. It seems that power supplies are a problem (see: 1, 2, 3, 4) on these machines, so I wonder when/if I will need to replace this one.
Serious nostalgia…
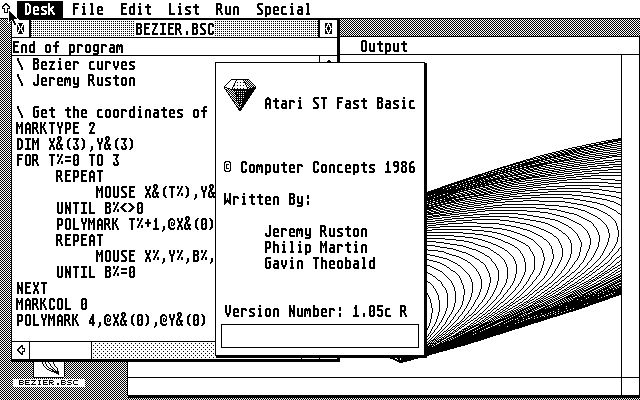
Oh man — emulating an Atari ST. It’s 1987, and I’m back in that computer lab on the first floor of the James Weir Building …
(Jeremy Ruston went on to write TiddlyWiki, amongst other things.)
Google Contacts – ISO dates, please
I’ll just leave this stinker here, shall I?
![]()
Protext lives!
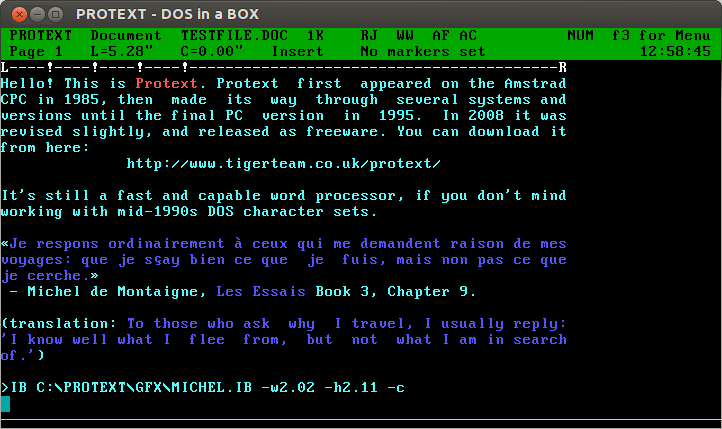
Oh man, Protext! For years, it was all I used: every magazine article, every essay at university (all two of them), my undergraduate dissertation (now mercifully lost to time: The Parametric Design of a Medium Specific Speed Pump Impeller, complete with spline-drawing code in HiSoft BASIC for the Amiga, is unlikely to be of value to anyone these days), letters — you name it, I used Protext for it.
I first had it on 16kB EPROM for the Amstrad CPC464; instant access with |P. I then ran it on the Amiga, snagging a cheap copy direct from the authors at a trade show. I think I had it for the PC, but I don’t really remember my DOS days too well.
The freeware version runs quite nicely under dosemu. You can even get it to print directly to PDF:
- In your Linux printer admin, set up a CUPS PDF printer. Anything sent to it will appear as a PDF file in the folder ~/PDF.
- Add the following lines to your ~/.dosemurc:
$_lpt1 = “lpr -l -P PDF”
$_printer_timeout = (20) - In Protext, configure your printer to be a PostScript printer on LPT1:
The results come out not bad at all:
 Protext’s file import and export is a bit dated. You can use the CONVERT utility to create RTF, but it assumes Code page 437, so your accents won’t come out right. Adding \ansicpg437 to the end of the first line should make it read okay.
(engraving of Michel de Montaigne in mad puffy sleeves: public domain from Wikimedia Commons: File:Michel de Montaigne 1.jpg – Wikimedia Commons)