Processing 2.1 + Oracle Java + Raspberry Pi + Serial + Arduino = ☺

Hey! This is very old and there’s an officially supported version out now coming out very soon.

Update for Raspberry Pi 2/Processing 2.2.1/Processing 3.0.5: Raspbian now ships with Java 8, and Processing only likes Java 7. oracle-java7-jdk is still in the repos, so install that, and follow the instructions below. It’s a bit flakey, but when it runs, runs quite fast on the Raspberry Pi 2. You might have more luck running Processing.js or p5.js in the browser.

With Sun Oracle hardfloat Java now available, Processing now runs at a decent clip on the Raspberry Pi. My old instructions are now very obsolete. Here are current, tested instructions for installing it under Raspbian.

[This is a particular solution to installing a Serial/Firmata-enabled Processing 2.1 distribution on a Raspberry Pi. Processing still has issues with other aspects of visual programming (particularly video) that I’m not addressing here.]

A lot of software is installed here, and much of it depends on previous steps. Don’t jump in mid-way and expect it to work.

Update the system

Always a good plan if you’re doing major upgrades:

sudo apt-get update
sudo apt-get dist-upgrade

Install Sun Oracle Java

sudo apt-get install oracle-java7-jdk

Check if the right version is installed as default: java -version should give

java version "1.7.0_40"
Java(TM) SE Runtime Environment (build 1.7.0_40-b43)
Java HotSpot(TM) Client VM (build 24.0-b56, mixed mode)

If you get anything else, you need to make Sun Oracle’s version the default:

sudo update-alternatives --config java

Download & Install Processing

Go to Download \ Processing.org and get the Linux 32-bit version.  It’s big; about 100 MB. I’m going to install it in my home directory, so the base path will be ~/processing-2.1. Extract it:

tar xvzf processing-2.1-linux32.tgz

Now you have to remove the included x86 Java runtime, and replace it with the Raspberry Pi’s armhf one:

rm -rf ~/processing-2.1/java 
ln -s /usr/lib/jvm/jdk-7-oracle-armhf ~/processing-2.1/java

You should now have a Processing installation that will run, but there’s some more we need to get serial and Arduino support.

Install the  java Simple Serial connector

Download jSSC-2.6.0-Release.zip and extract it:

unzip jSSC-2.6.0-Release.zip

Now overwrite the jssc.jar that ships with Processing with the one you just downloaded:

mv jSSC-2.6.0-Release/jssc.jar ~/processing-2.1/modes/java/libraries/serial/library/

(You can remove the jSSC folder now: rm -r jSSC-2.6.0-Release)

Test Processing’s serial support

You’re almost there! Fire up Processing:

~/processing-2.1/processing

and try Perhaps the World’s Most Boring Processing Sketchâ„¢:

// Example by Tom Igoe

import processing.serial.*;

// The serial port
Serial myPort;

// List all the available serial ports
println(Serial.list());
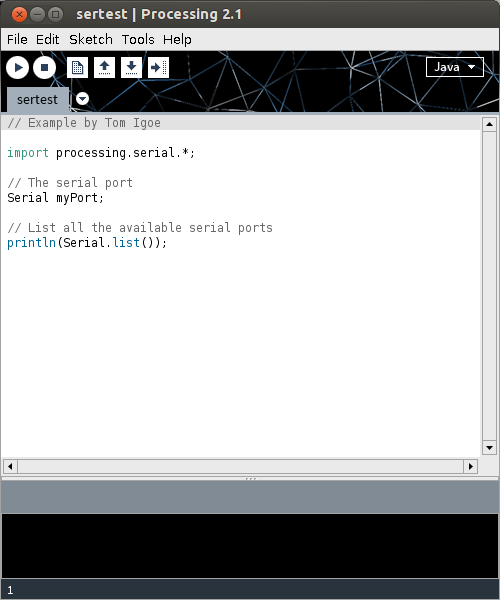
Screenshot from 2014-01-07 20:08:32When this runs (it’s a little slow), you should get a single line of output, which should start /dev/tty___:

/dev/ttyACM0

(I have an Arduino Leonardo attached, which usually appears as an ACM device.)

Installing Arduino/Firmata support

(I’m not going to go into uploading Firmata onto your Arduino here. All I can recommend is that you use the newest version at firmata/arduino, rather than the old code bundled with your Arduino distribution.)

Exit Processing, and download processing-arduino.zip from firmata/processing. Extract it into your Processing sketchbook:

unzip processing-arduino.zip -d ~/sketchbook/libraries/

For tedious reasons, you also have to rename one of the files:

mv  ~/sketchbook/libraries/arduino/library/Arduino.jar  ~/sketchbook/libraries/arduino/library/arduino.jar

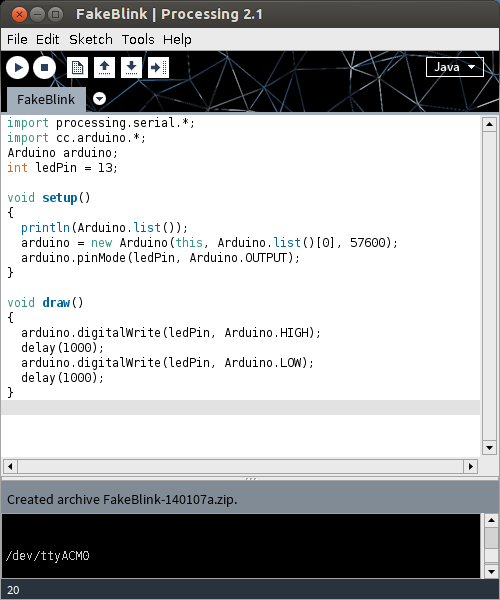
Start up Processing again, and  save Most Probably the World’s Second Least Interesting Processing Programâ„¢:

import processing.serial.*;
import cc.arduino.*;
Arduino arduino;
int ledPin = 13;

void setup()
{
  println(Arduino.list());
  arduino = new Arduino(this, Arduino.list()[0], 57600);
  arduino.pinMode(ledPin, Arduino.OUTPUT);
}

void draw()
{
  arduino.digitalWrite(ledPin, Arduino.HIGH);
  delay(1000);
  arduino.digitalWrite(ledPin, Arduino.LOW);
  delay(1000);
}
Screenshot from 2014-01-07 21:13:54
What this sketch does is emulate the µC’s “Hello World” program, Blink. It flashes the board’s LED once per second. Boring? Yes. But if it worked, you have a working Processing 2.1 installation on your Raspberry Pi. Go forth and make more interesting things.
(Props to bitcraftlab/wolfing for the basic outline for installing Processing, and for samaygoenka for the prodding needed to update and test the Processing installation process. If you’re still stuck, the Processing 2.0 Forum and the Raspberry Pi Forum are good places to ask.)
Faster Java on Raspberry Pi

With the official announcement of Oracle Java on Raspberry Pi, Java just got usable on the Raspberry Pi. It’s still not super-fast, but I’m seeing ~10× speedup over OpenJDK.

To install it (on Raspbian):

sudo apt-get update && sudo apt-get install oracle-java7-jdk
sudo update-java-alternatives -s jdk-7-oracle-armhf

By way of a baseline, here are SciMark 2.0 results on OpenJDK:

$ java -classpath ./scimark2lib.jar jnt.scimark2.commandline -large

SciMark 2.0a

Composite Score: 2.4987047508570632
FFT (1048576): 1.5550941987343943
SOR (1000x1000):   5.32030759023185
Monte Carlo : 0.6005590152716936
Sparse matmult (N=100000, nz=1000000): 2.3584905938878946
LU (1000x1000): 2.6590723561594847

java.vendor: Sun Microsystems Inc.
java.version: 1.6.0_27
os.arch: arm
os.name: Linux
os.version: 3.6.11+

Here’s what the Oracle JDK cranks out (bigger numbers → better):

$ java -classpath ./scimark2lib.jar jnt.scimark2.commandline -large

SciMark 2.0a

Composite Score: 14.94896390647437
FFT (1048576): 6.953238474333376
SOR (1000x1000):   33.91437255527547
Monte Carlo : 8.869794361002157
Sparse matmult (N=100000, nz=1000000): 9.81896340073432
LU (1000x1000): 15.188450741026523

java.vendor: Oracle Corporation
java.version: 1.7.0_40
os.arch: arm
os.name: Linux
os.version: 3.6.11+

That’s a tidy increase, and might make Processing and Arduino much easier to work with.

(It’s still not tremendously fast, though. My i7 quad-core has a composite score of nearly 1450 …)

Controlling an Arduino from Raspberry Pi using Processing

Hey! This article is really old! The code might still work, but I’ve updated the installation instructions for Processing 2.1 and Sun Oracle Java here: Processing 2.1 + Oracle Java + Raspberry Pi + Serial + Arduino = ☺.

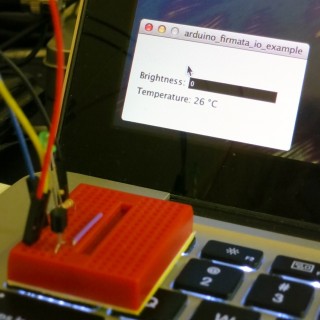
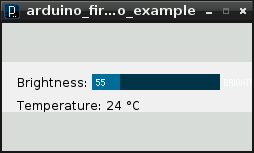
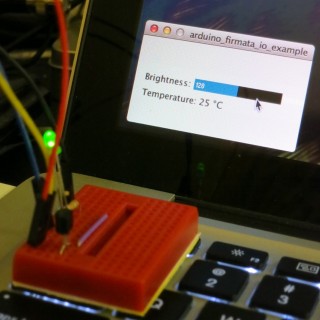
This might not look like much, but it was a lot of work to get here. It’s the display from a small Processing sketch, running on a Raspberry Pi, talking to an Arduino controlling the brightness of an LED with the slider, and reading from an LM35 temperature sensor.

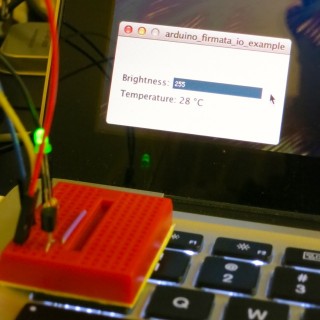
I wanted to see if I could get graphical control of an Arduino on the Raspberry Pi. I wrote about the simplest sketch in Processing that combined output (to control a small green LED through a resistor) and input (from an LM35, that simplest of sensors). This is how it looks running on a slightly faster machine than the Raspberry Pi:

LED at half brightness, LM35 showing 25°C

LED off, sensor at 26°C

LED full on, LM35 warmed up

I had the same results on the Raspberry Pi; just much, much slower. The sketch is below the fold.

Running Processing on Raspberry Pi

Processing is both written in and generates Java, so there’s some hope that it can run on most platforms. Up-to-date installation instructions. These instructions are modified from Processing sur Raspberry Pi, for which thanks are given to the original author:

  1. Install the JDK and Java serial library: sudo apt-get install librxtx-java openjdk-6-jdk
  2. Download the Linux version of Processing, and unpack it to somewhere permanent in your home directory
  3. Delete the java folder in the Processing directory; for me, that was processing-1.5.1/java
  4. Replace that java folder with a link to your system’s installation: ln -s /usr/lib/jvm/java-6-openjdk-armhf java
  5. In the Processing folder, remove or rename modes/java/libraries/serial/library/linux32/librxtxSerial.so; it’s an x86 binary, and will fail
  6. In the Processing folder, also remove modes/java/libraries/serial/library/RXTXcomm.jar, and replace it with a copy of /usr/share/java/RXTXcomm.jar
    (If you don’t do this, you’ll get a warning: “WARNING:  RXTX Version mismatch”, and any serial comms will fail.)
  7. Download and install the controlP5 library for Processing
  8. Download and install the Arduino library for Processing
  9. Program your Arduino with Firmata; the version that comes with the Arduino software is fine a bit old.
  10. Connect your Arduino to the Raspberry Pi with a USB cable; it may require external power.

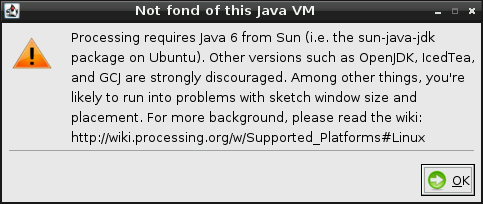
Now fire up Processing. It will used to take a while to start up, and will throw the following warning:

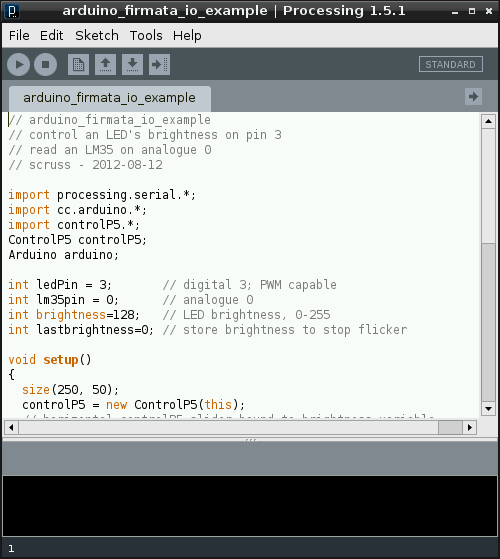
Despite this, it should eventually should start up fine:

Now, this is slow. It takes tens of seconds to start up. It might not be the most practical development tool, but Processing sketches are very portable, so you can develop on one machine, and then run on the Raspberry Pi.

The code at the end of this article expects:

  • an Arduino running the Firmata DAQ sketch attached to a USB port;
  • a small LED connected from digital pin 3, through a 1kΩ resistor to ground;
  • an LM35 with the following connections: +Vs → +5V, Vout → analogue pin 0, and GND → GND.

If you run this, after about half a minute, the blank sketch window appears, and about half a minute later, the slider and temperature reading appears. If it doesn’t, there’s a good chance that the serial libraries are wrong. Try this sketch:

import processing.serial.*;
import cc.arduino.*;

Arduino arduino;
println(Arduino.list());

This should return a number and a serial port where the Arduino was found; something like ‘[0] /dev/ttyACM0’.

What I really want to do now is get this same hardware running with Python and tkinter. It’s not that Python’s my favourite language; it’s just that the Raspberry Pi Foundation chose Python as the official language for the board. I’d rather work to further the aims of this educational foundation rather than work against it. Processing’s pretty much unworkably slow on the Raspberry Pi — but it does work!

Creating secure digital QSL cards with your LoTW certificate

Hams have sent out QSL cards since the hobby began. It may be less popular than it used to be, because mail seems slow now (especially when QSL bureaux are used), and there are online alternatives like eQSL, QRZ.com, and the ARRL‘s Logbook of the World (LoTW).

LoTW has been criticized for being too complex. It uses an X.509 public key signature to verify your submitted log entries, and a QSL is confirmed when the other party sends in a matching entry. In a way, it’s rather elegant, as the LoTW server does the work of matching the entries, so QSLs “magically” appear in your log. You don’t get a fancy QSL card in the mail or on your screen, and I think a lot of users miss that.

X.509 might be a bit unweildy, but props to ARRL for setting up a industry standard, robust (-ish; X.509 has its flaws), general purpose signing infrastructure. Since other file formats — notably PDF — support X.509 signing, you can use your LoTW certificate to make other data tamper-evident.

Here I document a method of creating a digital QSL card that can be e-mailed, and subsequently verified by the recipient as being legitimate. Any alterations to the file will break the signature, and the file will just appear as a regular PDF (or not display properly). The process can be used to sign any other Acrobat file. There are probably more streamlined ways to do this, but I only came up with it last night as the beginning of a scriptable solution.

You will need:

  • Your ARRL LoTW electronic certificate file. This is called callsign.p12; mine is VA3PID.P12
  • A means of making a QSL card as a PDF fill-in form. I used Scribus; it’s a free but powerful DTP system.
  • Pdftk, “the” PDF toolkit, to apply the QSL details to the PDF form. If you’re on Windows, you might want the Pdftk GUI.
  • PortableSigner, a java application for signing Acrobat files using an X.509 certificate.

(Quite a bit of what follows was learnt from the two pages Your first PDF form with Scribus – Scribus Wiki and filling in forms with pdftk, so thanks to the authors of those for the guidance.)

First, make your QSL card. Since you’re not going to print this, it can be any size you want, but postcard size is standard. At the very least, create spaces for the recipient callsign, the date, the time, frequency, mode used, and signal report.

Under these headings, I’ve made six PDF text form fields. Scribus creates form fields like text frames/boxes. I used plain text fields (which are selected by this icon: ), centred text, and with the name of the field set from the PDF Options → Field Properties context menu. Each field needs a different name. I used callsign, date, utc, mhz, mode, and report.

Save your QSL card as PDF. It might be an idea to check it to see if the form fields are really there and editable:

Now it starts to get really nerdy. Adobe specified the Forms Data Format (FDF) to allow PDF form data to be slung around. FDF looks a bit like PostScript or raw PDF:

%FDF-1.2

1 0 obj
<<
/FDF << /Fields 2 0 R>>
>>
endobj
2 0 obj
[<< /T (callsign) /V (VE3KPK) >>
<< /T (date) /V (2011-10-02) >>
<< /T (mhz) /V (7.03581) >>
<< /T (mode) /V (CW) >>
<< /T (report) /V (499) >>
<< /T (utc) /V (2341) >>
]
endobj
trailer
<< /Root 1 0 R >>
%%EOF

If you think of the T & V values above as Tag and Value, you can see that the file defines callsign=VE3KPK, date=2011-10-02, mode=CW, and so on. This step can be easily scripted. If you’re not sure what the fields are called, pdftk has a “dump_data_fields” option that spits out the field names as plain text.

pdftk is also used to put the data from the FDF file into the PDF template. It’s a slightly hairy command line:

pdftk QSL-blank.pdf fill_form VE3KPK.fdf output QSL-VE3KPK.pdf flatten

Here the source file is QSL-blank.pdf, the FDF data is VE3KPK.fdf, and the output is to QSL-VE3KPK.pdf. The flatten option turns the pdf form into regular, uneditable PDF. (These details are from a real QSO, by the way, and by utter coincidence I’m writing this in a hotel in Ken VE3KPK’s home town in Northern Ontario.)

Checking that this worked in Adobe Reader:

For many people this is probably enough (or perhaps, too much already!) but I really want to have a digital QSL card that will stand up to some scrutiny. This is where your LoTW certificate file comes in.

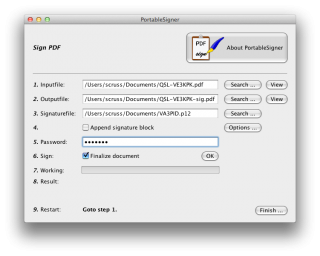
PortableSigner is a java application for signing PDF files. It seems quite happy signing the files made in this workflow. It can run from the command line, or as a windowed application:

You use your .p12 signature file and its password to sign the PDF. Once the file is signed, you can send it to your contact, and they can prove (and hopefully, any certification/contest agency will agree) that the contact was confirmed.

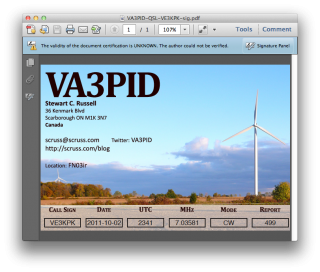
Viewing the signed document is deeply unimpressive:

It’s not such a big deal that Reader says that “the validity of the certification is unknown”. It’s just that Adobe doesn’t have the ARRL’s certificate loaded into everyone’s reader (what!? mock outrage!) and so it doesn’t match a certificate it knows about. You have to dig a bit deeper into the signature panel to check out who is responsible for this.

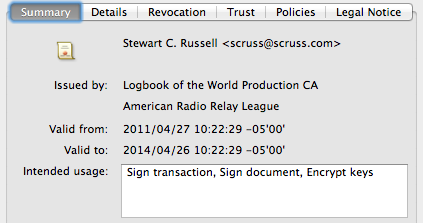
Well, that’s a start; at least it was signed by someone with my e-mail address. There’s more under Show Signature Properties:

There’s the ARRL signature in there. Buried deep in another properties tree is my callsign; can’t find it today, but I saw it in there last night. Either way, the digital QSL PDF is now signed and certified that it came from me, as an ARRL LoTW user.
I don’t like prunes, but I do like prune


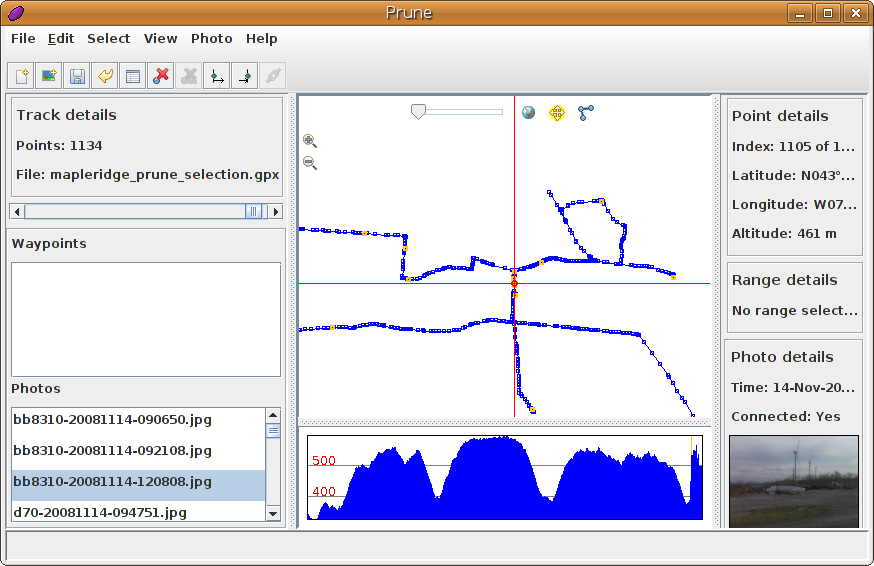
Just spent a pleasant morning munging gps data and photos using Prune. It has allowed me to edit a complex GPS track, add many photos, correctly correlate them to GPS locations, and save it all back out in a variety of useful formats.

I see that the author is talking about producing a native KDE version. Noooo! I like my Java. It runs everywhere.

(Incidentally, I see that with the recent software update, the Blackberry Curve will now geotag images from the camera. It’s now a really good “I was here” device – coming close to the “Utensil” that Robyn Hitchcock spoke about years ago.)