Crickets in February

It’s mid-February in Toronto: -10 °C and snowy. The memory of chirping summer fields is dim. But in my heart there is always a cricket-loud meadow.

Short of moving somewhere warmer, I’m going to have to make my own midwinter crickets. I have micro-controllers and tiny speakers: how hard can this be?

more fun than a bucket of simulated crickets
(video description: a plastic box containing three USB power banks, each with USB cable leading to a Raspberry Pi Pico board. Each board has a small electromagnetic speaker attached between ground and a data pin)

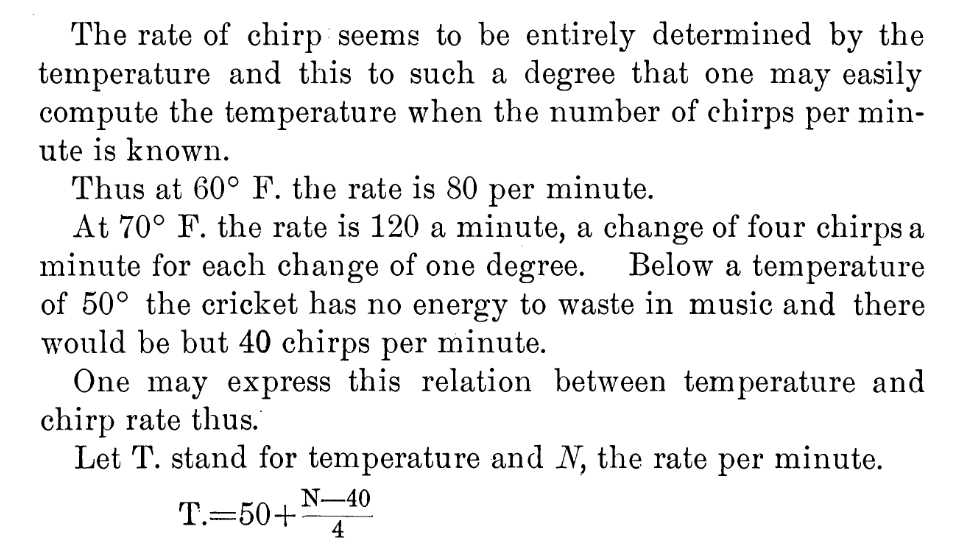
I could have merely made these beep away at a fixed rate, but I know that real crickets tend to chirp faster as the day grows warmer. This relationship is frequently referred to as Dolbear’s law. The American inventor Amos Dolbear published his observation (without data or species identification) in The American Naturalist in 1897: The Cricket as a Thermometer

journal text:

The rate of chirp seems to be entirely determined by the temperature and this to such a degree that one may easily compute the temperature when the number of chirps per minute is known.

Thus at 60° F. the rate is 80 per minute.

At 70° F. the rate is 120 a minute, a change of four chirps a minute for each change of one degree. Below a temperature
of 50° the cricket has no energy to waste in music and there would be but 40 chirps per minute.
One may express this relation between temperature and chirp rate thus.
Let T. stand for temperature and N,  the rate per minute.

(typeset equation)
T. = 50 + (N - 40) / 4
pretty bold assertions there without data eh, Amos old son …?

When emulating crickets I’m less interested in the rate of chirps per minute, but rather in the period between chirps. I could also care entirely less about barbarian units, so I reformulated it in °C (t) and milliseconds (p):

t = ⅑ × (40 + 75000 ÷ p)

Since I know that the micro-controller has an internal temperature sensor, I’m particularly interested in the inverse relationship:

p = 15000 ÷ (9 * t ÷ 5 – 8)

I can check this against one of Dolbear’s observations for 70°F (= 21⅑ °C, or 190/9) and 120 chirps / minute (= 2 Hz, or a period of 500 ms):

p = 15000 ÷ (9 * t ÷ 5 – 8)
   = 15000 ÷ (9 * (190 ÷ 9) ÷ 5 – 8)
   = 15000 ÷ (190 ÷ 5 – 8)
   = 15000 ÷ 30
   = 500

Now I’ve got the timing worked out, how about the chirp sound. From a couple of recordings of cricket meadows I’ve made over the years, I observed:

  1. The total duration of a chirp is about ⅛ s
  2. A chirp is made up of four distinct events:
    • a quieter short tone;
    • a longer louder tone of a fractionally higher pitch;
    • the same longer louder tone repeated;
    • the first short tone repeated
  3. There is a very short silence between each tone
  4. Each cricket appears to chirp at roughly the same pitch: some slightly lower, some slightly higher
  5. The pitch of the tones is in the range 4500–5000 Hz: around D8 on the music scale

I didn’t attempt to model the actual stridulating mechanism of a particular species of cricket. I made what sounded sort of right to me. Hey, if Amos Dolbear could make stuff up and get it accepted as a “law”, I can at least get away with pulse width modulation and tiny tinny speakers …

This is the profile I came up with:

  • 21 ms of 4568 Hz at 25% duty cycle
  • 7 ms of silence
  • 28 ms of 4824 Hz at 50% duty cycle
  • 7 ms of silence
  • 28 ms of 4824 Hz at 50% duty cycle
  • 7 ms of silence
  • 21 ms of 4568 Hz at 25% duty cycle
  • 7 ms of silence

That’s a total of 126 ms, or ⅛ish seconds. In the code I made each instance play at a randomly-selected relative pitch of ±200 Hz on the above numbers.

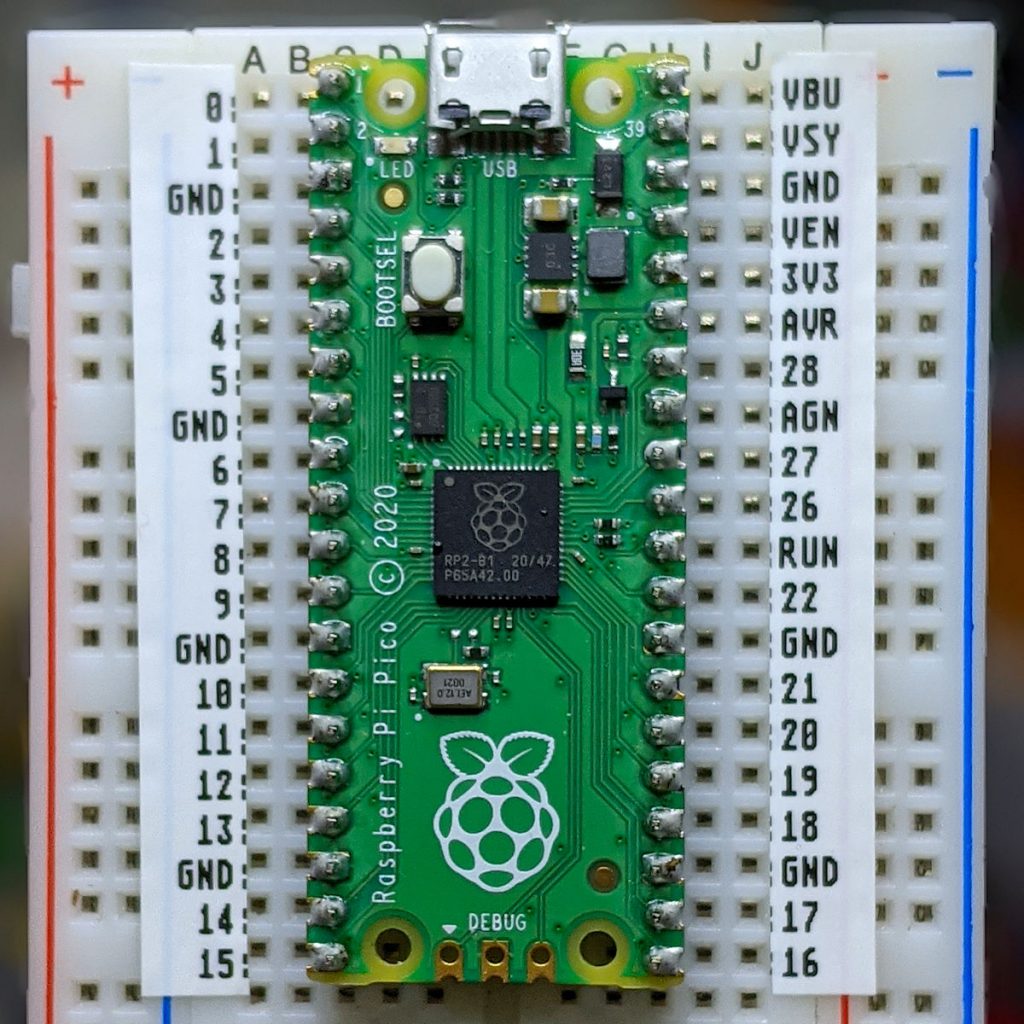
For the speaker, I have a bunch of cheap PC motherboard beepers. They have a Dupont header that spans four pins on a Raspberry Pi Pico header, so if you put one on the ground pin at pin 23, the output will be connected to pin 26, aka GPIO 20:
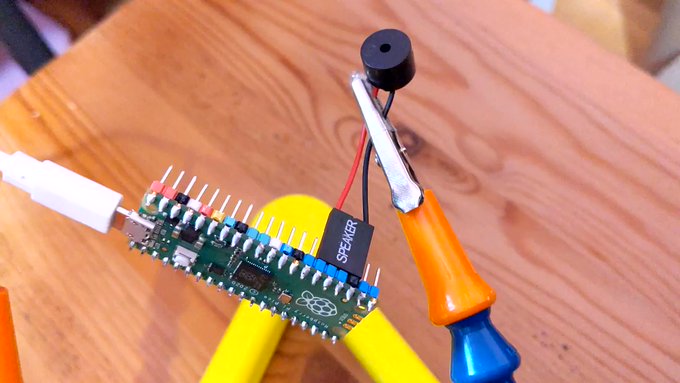
Raspberry Pi Pico with small piezo speaker connected to pins 23 (ground) and 26 (GPIO 20)
from a post where I did a very, very bad thing: Nyan Cat, except it gets faster — RTTTL on the Raspberry Pi Pico

So — finally — here’s the MicroPython code:

# cricket thermometer simulator - scruss, 2024-02
# uses a buzzer on GPIO 20 to make cricket(ish) noises
# MicroPython - for Raspberry Pi Pico
# -*- coding: utf-8 -*-

from machine import Pin, PWM, ADC, freq
from time import sleep_ms, ticks_ms, ticks_diff
from random import seed, randrange

freq(125000000)  # use default CPU freq
seed()  # start with a truly random seed
pwm_out = PWM(Pin(20), freq=10, duty_u16=0)  # can't do freq=0
led = Pin("LED", Pin.OUT)
sensor_temp = machine.ADC(4)  # adc channel for internal temperature
TOO_COLD = 10.0  # crickets don't chirp below 10 °C (allegedly)
temps = []  # for smoothing out temperature sensor noise
personal_freq_delta = randrange(400) - 199  # different pitch every time
chirp_data = [
    # cadence, duty_u16, freq
    # there is a cadence=1 silence after each of these
    [3, 16384, 4568 + personal_freq_delta],
    [4, 32768, 4824 + personal_freq_delta],
    [4, 32768, 4824 + personal_freq_delta],
    [3, 16384, 4568 + personal_freq_delta],
]
cadence_ms = 7  # length multiplier for playback


def chirp_period_ms(t_c):
    # for a given temperature t_c (in °C), returns the
    # estimated cricket chirp period in milliseconds.
    #
    # Based on
    # Dolbear, Amos (1897). "The cricket as a thermometer".
    #   The American Naturalist. 31 (371): 970–971. doi:10.1086/276739
    #
    # The inverse function is:
    #     t_c = (75000 / chirp_period_ms + 40) / 9
    return int(15000 / (9 * t_c / 5 - 8))


def internal_temperature(temp_adc):
    # see pico-micropython-examples / adc / temperature.py
    return (
        27
        - ((temp_adc.read_u16() * (3.3 / (65535))) - 0.706) / 0.001721
    )


def chirp(pwm_channel):
    for peep in chirp_data:
        pwm_channel.freq(peep[2])
        pwm_channel.duty_u16(peep[1])
        sleep_ms(cadence_ms * peep[0])
        # short silence
        pwm_channel.duty_u16(0)
        pwm_channel.freq(10)
        sleep_ms(cadence_ms)


led.value(0)  # led off at start; blinks if chirping
### Start: pause a random amount (less than 2 s) before starting
sleep_ms(randrange(2000))

while True:
    loop_start_ms = ticks_ms()
    sleep_ms(5)  # tiny delay to stop the main loop from thrashing
    temps.append(internal_temperature(sensor_temp))
    if len(temps) > 5:
        temps = temps[1:]
    avg_temp = sum(temps) / len(temps)
    if avg_temp >= TOO_COLD:
        led.value(1)
        loop_period_ms = chirp_period_ms(avg_temp)
        chirp(pwm_out)
        led.value(0)
        loop_elapsed_ms = ticks_diff(ticks_ms(), loop_start_ms)
        sleep_ms(loop_period_ms - loop_elapsed_ms)

There are a few more details in the code that I haven’t covered here:

  1. The program pauses for a short random time on starting. This is to ensure that if you power up a bunch of these at the same time, they don’t start exactly synchronized
  2. The Raspberry Pi Pico’s temperature sensor can be slightly noisy, so the chirping frequency is based on the average of (up to) the last five readings
  3. There’s no chirping below 10 °C, because Amos Dolbear said so
  4. The built-in LED also flashes if the board is chirping. It doesn’t mimic the speaker’s PWM cadence, though.

Before I show you the next video, I need to say: no real crickets were harmed in the making of this post. I took the bucket outside (roughly -5 °C) and the “crickets” stopped chirping as they cooled down. Don’t worry, they started back up chirping again when I took them inside.

“If You’re Cold They’re Cold, Bring Them Inside”
(video description: a plastic box containing three USB power banks, each with USB cable leading to a Raspberry Pi Pico board. Each board has a small electromagnetic speaker attached between ground and a data pin)

The Joy of BirdNetPi

I don’t think I’ve had as much enjoyment for a piece of software for a very long time as I’ve had with BirdNET-Pi. It’s a realtime acoustic bird classification system for the Raspberry Pi. It listens through a microphone you place somewhere near where you can hear birds, and it’ll go off and guess what it’s hearing, using a cut-down version of the BirdNET Sound ID model. It does this 24/7, and saves the samples it hears. You can then go to a web page (running on the same Raspberry Pi) and look up all the species it has heard.

Our Garden

a somewhat overgrown garden with budding green trees against blue sky

Not very impressive, kind of overgrown, in the wrong part of town. Small, too. But birds love it. At this time of year, it’s alive with birds. You can’t make them out, but there’s a pair of Rose-breasted Grosbeaks happily snacking near the top of the big tree. There are conifers next door too, so we get birds we wouldn’t expect.

We are next to two busy subway/train stations, and in between two schools. There’s a busy intersection nearby, too. Consequently, the background noise is horrendous

What I used

This was literally “stuff I had lying around”:

  • Raspberry Pi 3B+ (with power supply, case, thermostatic fan and SD card)
  • USB extension cable (this, apparently, is quite important to isolate the USB audio device from electrical noise)
  • Horrible cheap USB sound card: I paid about $2 for a “3d sound” thing about a decade ago. It records in mono. It works. My one is wrapped in electrical tape as the case keeps threatening to fall off, plus it has a hugely bright flashing LED the is annoying.
  • Desktop mic (circa 2002): before video became a thing, PCs had conferencing microphones. I think I got this one free with a PC over 20 years ago. It’s entirely unremarkable and is not an audiophile device. I stuck it out a back window and used a strip of gaffer tape to stop bugs getting in. It’s not waterproof, but it didn’t rain the whole week it was out the window.
  • Raspberry Pi OS Lite 64-bit. Yes, it has to be 64 bit.
  • BirdNET-Pi installation on top.

I spent very little time optimizing this. I had to fiddle with microphone gain slightly. That’s all.

What I heard

To the best of my knowledge, I have actual observations of 30 species, observed between May 7th and May 16th 2023:

American Goldfinch, American Robin, Baltimore Oriole, Blue Jay, Cedar Waxwing, Chimney Swift, Clay-colored Sparrow, Common Grackle, Common Raven, Gray Catbird, Hermit Thrush, House Finch, House Sparrow, Killdeer, Mourning Dove, Nashville Warbler, Northern Cardinal, Northern Parula, Orchard Oriole, Ovenbird, Red-winged Blackbird, Ring-billed Gull, Rose-breasted Grosbeak, Ruby-crowned Kinglet, Song Sparrow, Veery, Warbling Vireo, White-throated Sparrow, White-winged Crossbill, Wood Thrush

I’ll put the recordings at the end of this post. Note, though, they’re noisy: Cornell Lab quality they ain’t.

What I learned

This is the first time that I’ve let an “AI” classifier model run with no intervention. If it flags some false positives, then it’s pretty low-stakes when it’s wrong. And how wrong did it get some things!

allegedly a Barred Owl, this is clearly a two-stroke leafblower
Black-Billed Cuckoo? How about kids playing in the school yard?
Emergency vehicles are Common Loons now, according to BirdNetPi
Police cars at 2:24 am are Eastern Screech-Owls. I wonder if we could use this classifier to detect over-policed, under-served neighbourhoods?
Great Black-backed Gulls, or kids playing? The latter
Turkey Vulture? How about a very farty two-stroke engine in a bicycle frame driving past?
(This thing stinks out the street, blecch)

There are also false positive for Trumpeter Swans (local dog) and Tundra Swans (kids playing). These samples had recognizable voices, so I didn’t include them here.

The 30 positive species identifications

Many of these have a fairly loud click at the start of the sample, so mind your ears.

American Goldfinch

American Robin

Baltimore Oriole

(I dunno what’s going on here; the next sample’s much more representative)

Blue Jay

Cedar Waxwing

Chimney Swift

Clay-colored Sparrow

Common Grackle

Common Raven

Gray Catbird

Hermit Thrush

House Finch

House Sparrow

Killdeer

Mourning Dove

Nashville Warbler

Northern Cardinal

Hey, we’ve got both of the repetitive songs that these little doozers chirp out all day. Song 1:

and song 2 …

Northern Parula

Orchard Oriole

Ovenbird

Red-winged Blackbird

Ring-billed Gull

Rose-breasted Grosbeak

Ruby-crowned Kinglet

Song Sparrow

Veery

Warbling Vireo

White-throated Sparrow

White-winged Crossbill

Wood Thrush

Boring technical bit

BirdNetPi doesn’t create combined spectrograms with audio as a single video file. What it does do is create an mp3 plus a PNG of the spectrogram. ffmpeg can make a nice not-too-large webm video for sharing:

ffmpeg -loop 1 -y -i 'birb.mp3.png' -i 'birb.mp3' -ac 1 -crf 48 -vf scale=720:-2 -shortest 'birb.webm'

(Minor update, May 2024: the original project maintainer has moved on, so I changed the project link to point to Nachtzuster/BirdNET-Pi: A realtime acoustic bird classification system for the Raspberry Pi 5, 4B 3B+ 0W2 and more. Built on the TFLite version of BirdNET.)

Autumn in Canada: PicoMite version

more leaves

So I ported autumn in canada from OpenProcessing to PicoMite BASIC on the Raspberry Pi Pico:

a small black screen images with text in the centre: autumn in canada scruss, 2021-11 just watch ...
no leaves
a small black screen images with text in the centre: autumn in canada scruss, 2021-11 just watch ... with one red and one orange maple leaf sitting on top of it
a couple of leaves
a small black screen images with text in the centre: autumn in canada scruss, 2021-11 just watch ... with four red/yellow/orange maple leaves sitting on top of it
more leaves
a small black screen images with text in the centre: autumn in canada scruss, 2021-11 just watch ... with sixteen simulated fallen maple leaves mostly covering it
plenty of leaves
a small black screen image completely covered with many simulated fallen maple leaves
far too many leaves

The biggest thing that tripped me up was that PicoMite BASIC starts arrays at 0. OPTION BASE 1 fixes that oversight. It would have been nice to have OpenProcessing’s HSV colour space, and an editor that could handle lines longer than 80 characters that didn’t threaten to bomb out if you hit the End key, but it’ll serve.

Source below:

' autumn in canada
' scruss, 2021-11
' a take on my https://openprocessing.org/sketch/995420 for picomite

OPTION base 1
RANDOMIZE TIMER
' *** initialize polar coords of leaf polygon and colour array
DIM leaf_rad(24), leaf_ang(24), px%(24), py%(24)
FOR i=1 TO 24
    READ leaf_rad(i)
NEXT i
FOR i=1 TO 24
    READ x
    leaf_ang(i)=RAD(x)
NEXT i

DIM integer c%(8)
FOR i=1 TO 8
    READ r%, g%, b%
    c%(i)=RGB(r%,g%,b%)
NEXT i

' *** set up some limits
min_scale%=INT(MIN(MM.HRES, MM.VRES)/8)
max_scale%=INT(MIN(MM.HRES, MM.VRES)/6)
min_angle=-30
max_angle=30
min_x%=min_scale%
min_y%=min_x%
max_x%=MM.HRES - min_x%
max_y%=MM.VRES - min_y%

CLS
TEXT MM.HRES/2, INT(MM.VRES/3), "autumn in canada", "CM"
TEXT MM.HRES/2, INT(MM.VRES/2), "scruss, 2021-11", "CM"
TEXT MM.HRES/2, INT(2*MM.VRES/3), "just watch ...", "CM"

kt%=0
DO
    cx% = min_x% + INT(RND * (max_x% - min_x%))
    cy% = min_y% + INT(RND * (max_y% - min_y%))
    angle = min_angle + RND * (max_angle - min_angle)
    sc% = min_scale% + INT(RND * (max_scale% - min_scale%))
    col% = 1 + INT(RND * 7)
    leaf cx%, cy%, sc%, angle, c%(7), c%(col%)
    kt% = kt% + 1
LOOP UNTIL kt% >= 1024

END

SUB leaf x%, y%, scale%, angle, outline%, fill%
    FOR i=1 TO 24
        px%(i) = INT(x% + scale% * leaf_rad(i) * COS(RAD(angle)+leaf_ang(i)))
        py%(i) = INT(y% - scale% * leaf_rad(i) * SIN(RAD(angle)+leaf_ang(i)))
    NEXT i
    POLYGON 24, px%(), py%(), outline%, fill%
END SUB

' radii
DATA 0.536, 0.744, 0.608, 0.850, 0.719
DATA 0.836, 0.565, 0.589, 0.211, 0.660, 0.515
DATA 0.801, 0.515, 0.660, 0.211, 0.589, 0.565
DATA 0.836, 0.719, 0.850, 0.608, 0.744, 0.536, 1.000
' angles
DATA 270.000, 307.249, 312.110, 353.267, 356.540
DATA 16.530, 18.774, 33.215, 3.497, 60.659, 72.514
DATA 90.000, 107.486, 119.341, 176.503, 146.785, 161.226
DATA 163.470, 183.460, 186.733, 227.890, 232.751, 270.000, 270.000
' leaf colours
DATA 255,0,0, 255,36,0, 255,72,0, 255,109,0
DATA 255,145,0, 255,182,0, 255,218,0, 255,255,0

You could probably use AUTOSAVE and paste the text into the PicoMite REPL. I used an ILI9341 SPI TFT LCD Touch Panel with my Raspberry Pi Pico along with some rather messy breadboard wiring.

Fun fact: the maple leaf polygon points are derived from the official definition of the flag of Canada.

Raspberry Pi Zero 2 W: slides and thermals

2 out of 4 cores burning, 32-bit mode: time to overheat = basically never

Slides from last night’s talk:

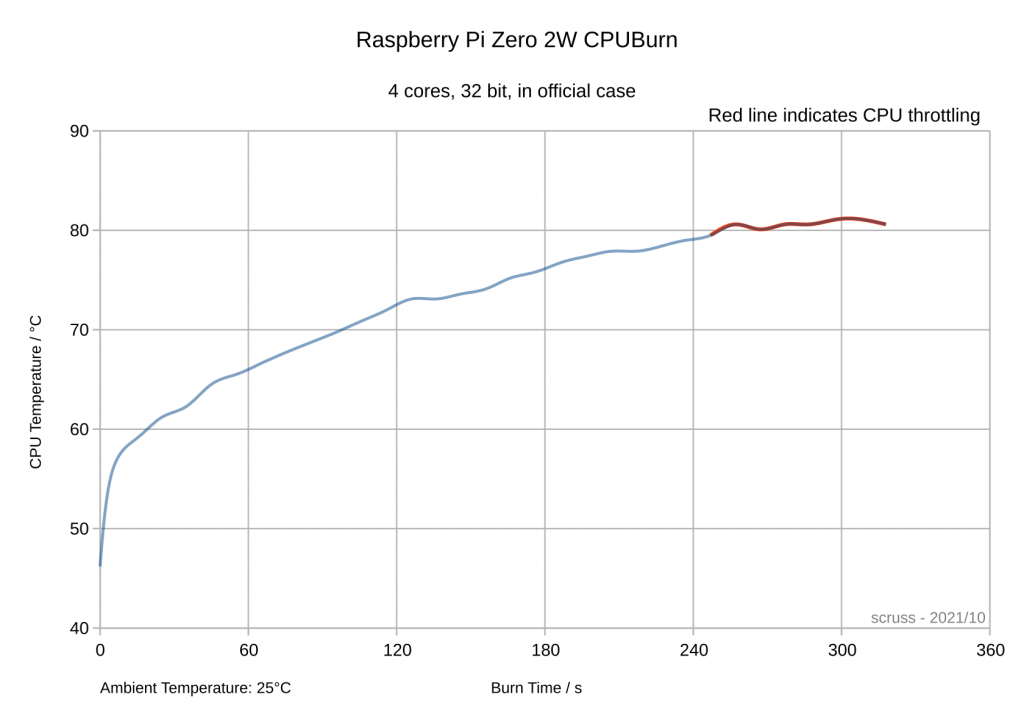
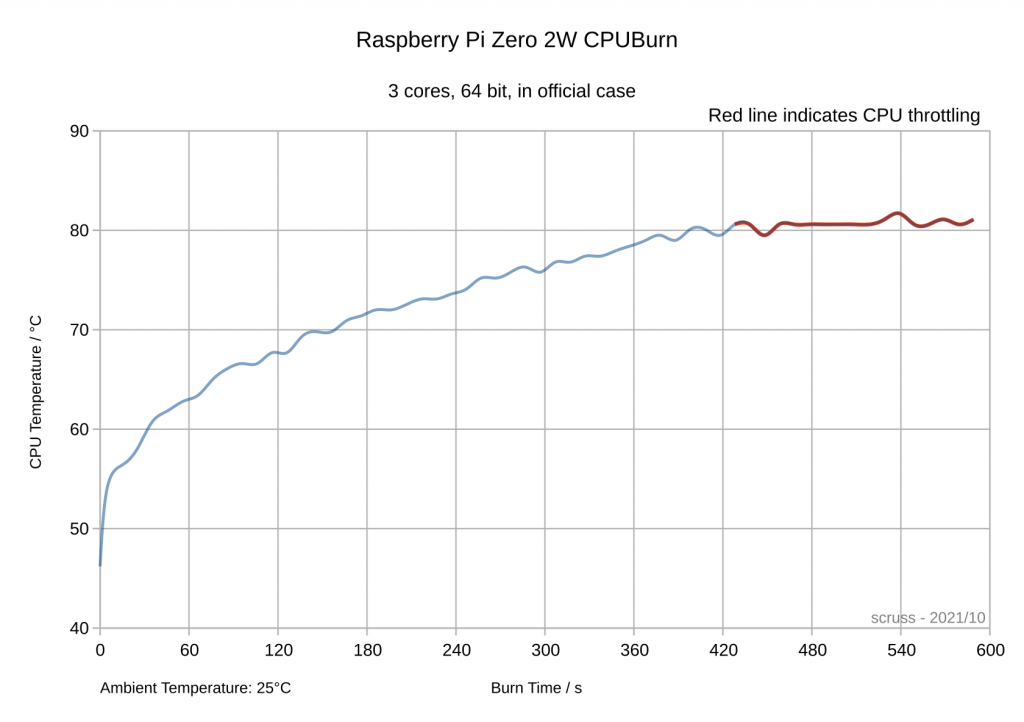
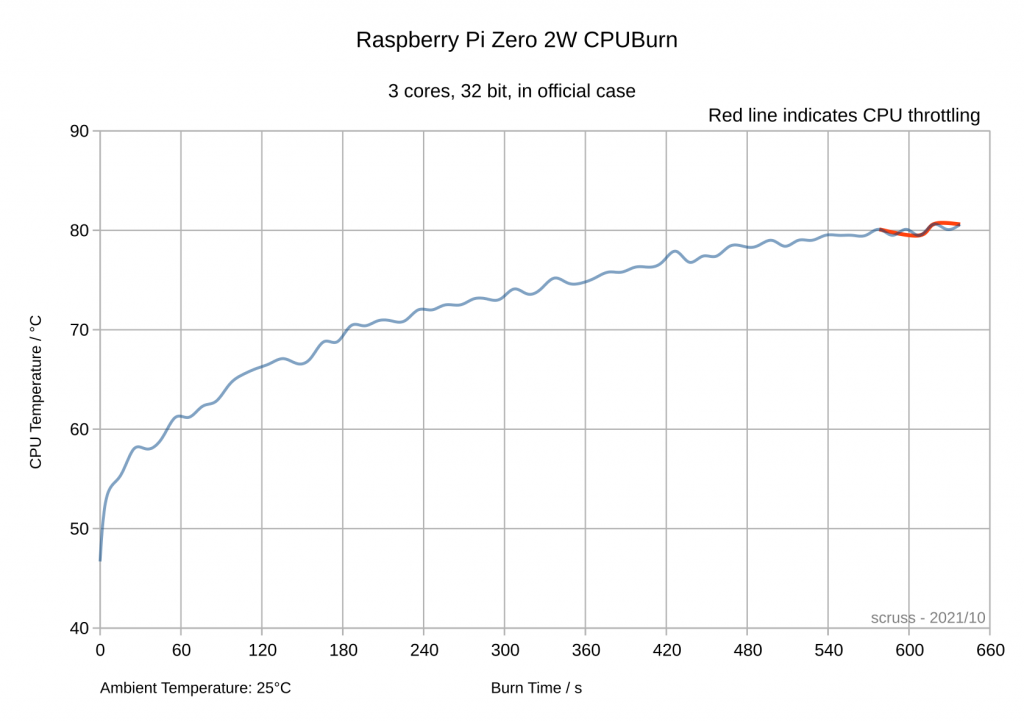
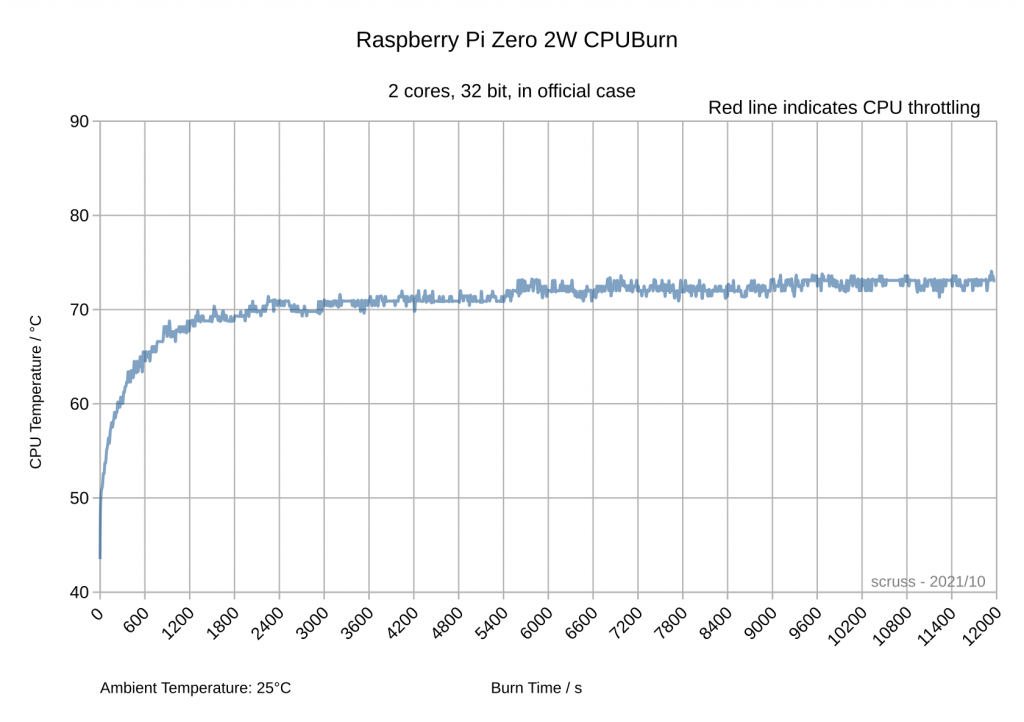
It’s impossible to have a Raspberry Pi Zero overheat unless you overclock it. That’s why you don’t get any cases for it with fans or heat sinks. The quad-core Raspberry Pi Zero 2 W, though, has the potential to do so. Here are some numbers:

  • Used official case with lid fitted: increases SoC temperature +3 °C over free air
  • Test – CPUBurn: https://github.com/pmylund/cpuburn
  • Tested 4, 3 and 2 cores burning in 32-bit and 64-bit modes: time from idle to throttling (80 °C) measured
  • GPU overheat not tested.
line graph of cpu temperature against time. Temperature rises sharply from about 47 degrees C to 82 degrees C in around four minutes
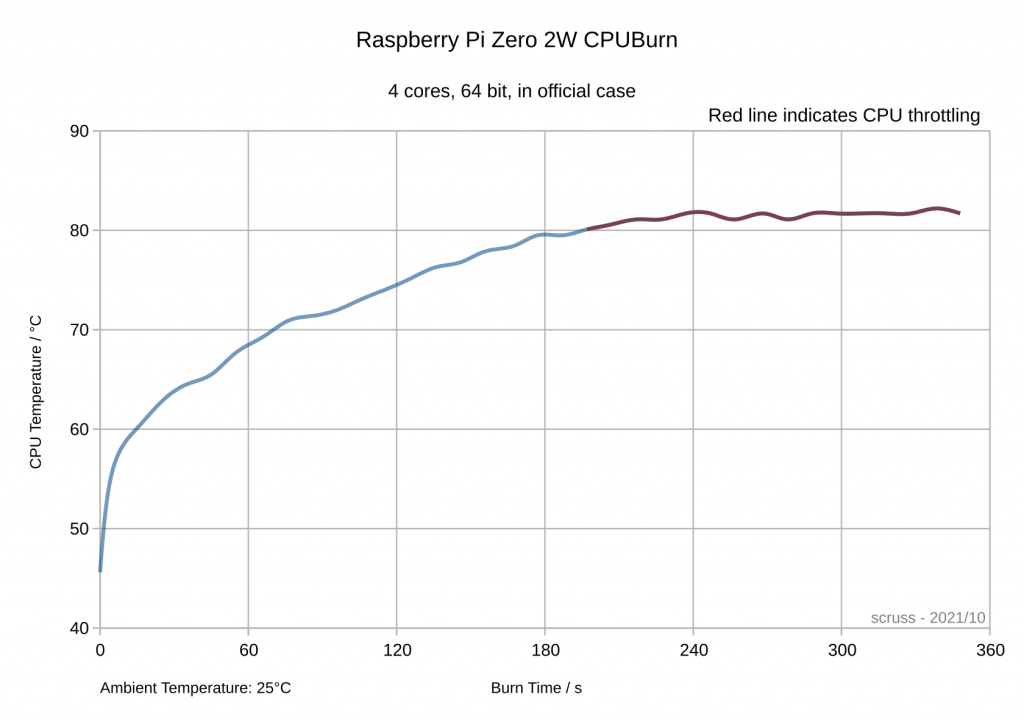
All 4 cores burning, 64-bit mode: time to overheat = under 3½ minutes
line graph of cpu temperature against time. Temperature rises sharply from about 47 degrees C to 82 degrees C in just over four minutes
All 4 cores burning, 32-bit mode: time to overheat = just over 4 minutes
line graph of cpu temperature against time. Temperature rises moderately from about 47 degrees C to 81 degrees C in around seven minutes
3 out of 4 cores burning, 64-bit mode: time to overheat = just over 7 minutes
line graph of cpu temperature against time. Temperature rises slowly from about 47 degrees C to 81 degrees C in around ten minutes
3 out of 4 cores burning, 32-bit mode: time to overheat = 9½ minutes
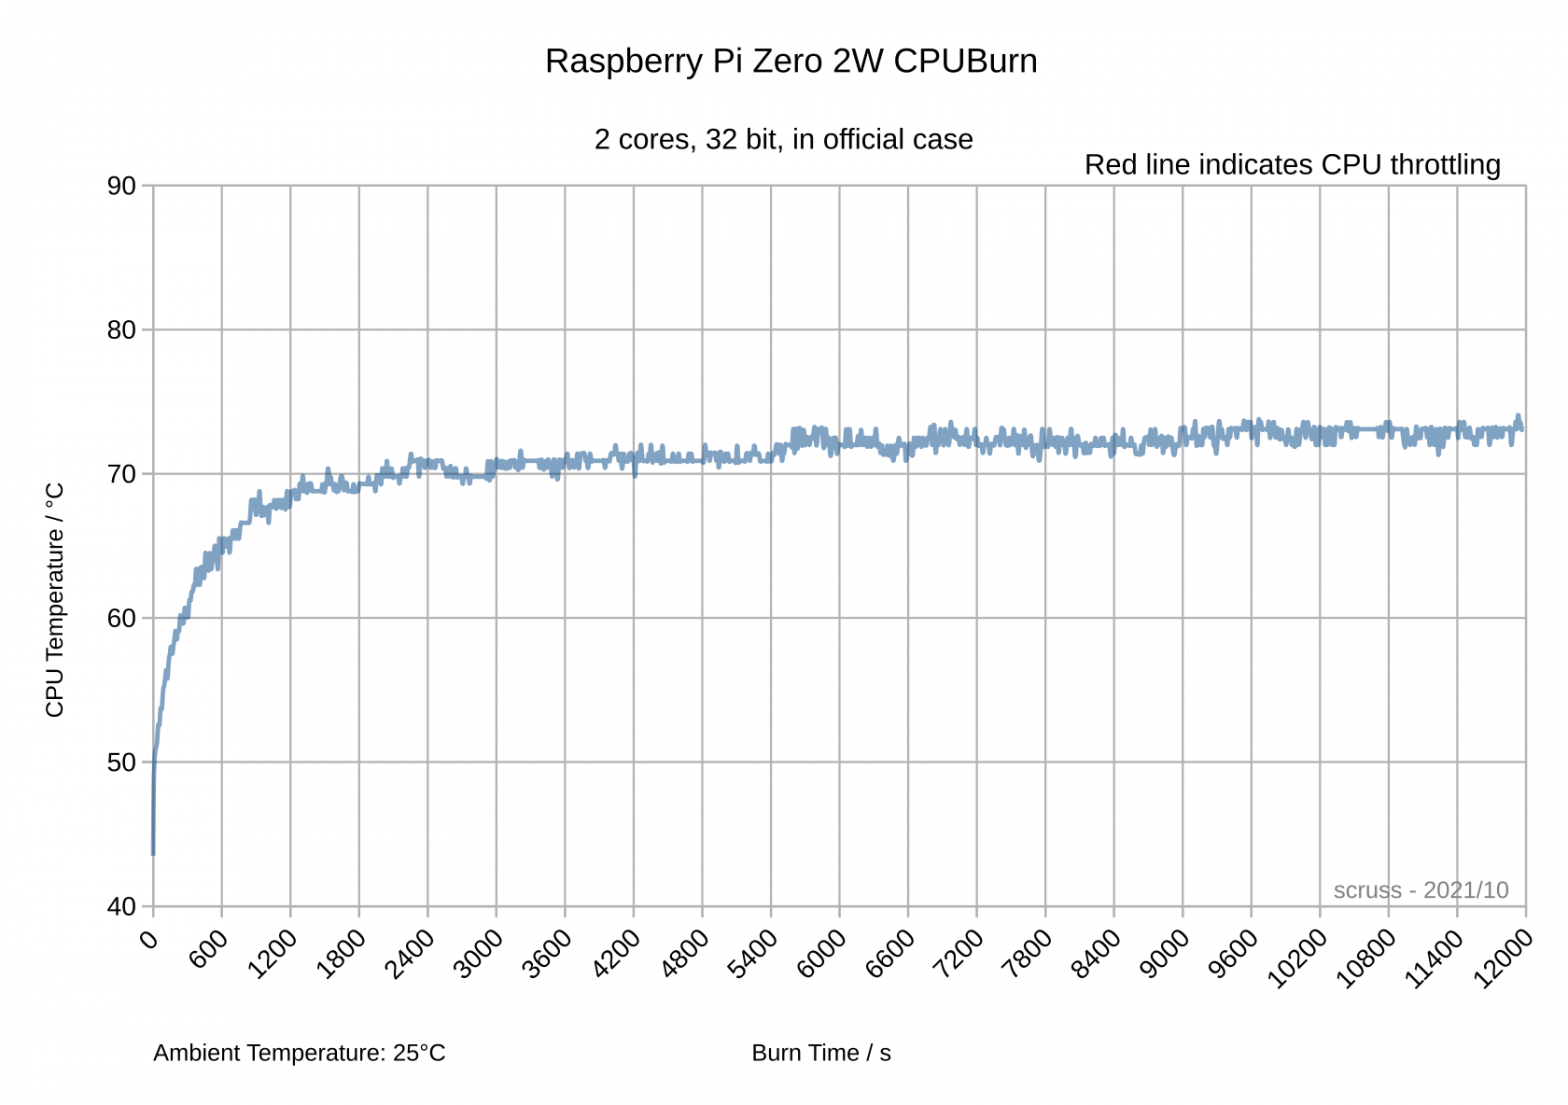
line graph of cpu temperature against time. Temperature rises very slowly, reach 70 degrees C in 40 minutes and then only rising very slightly to about 73 degrees C in the entire run time of 3 hours 20 minutes
2 out of 4 cores burning, 32-bit mode: time to overheat = basically never

Unless you’re doing things that might indicate you should be using a bigger computer, a Raspberry Pi Zero 2 W won’t overheat and doesn’t need any form of cooling. If you’re overclocking, well … it’s your choice to have cooling equipment worth more than the computer it’s trying to cool.

Raspberry Pi Zero 2 W: initial performance

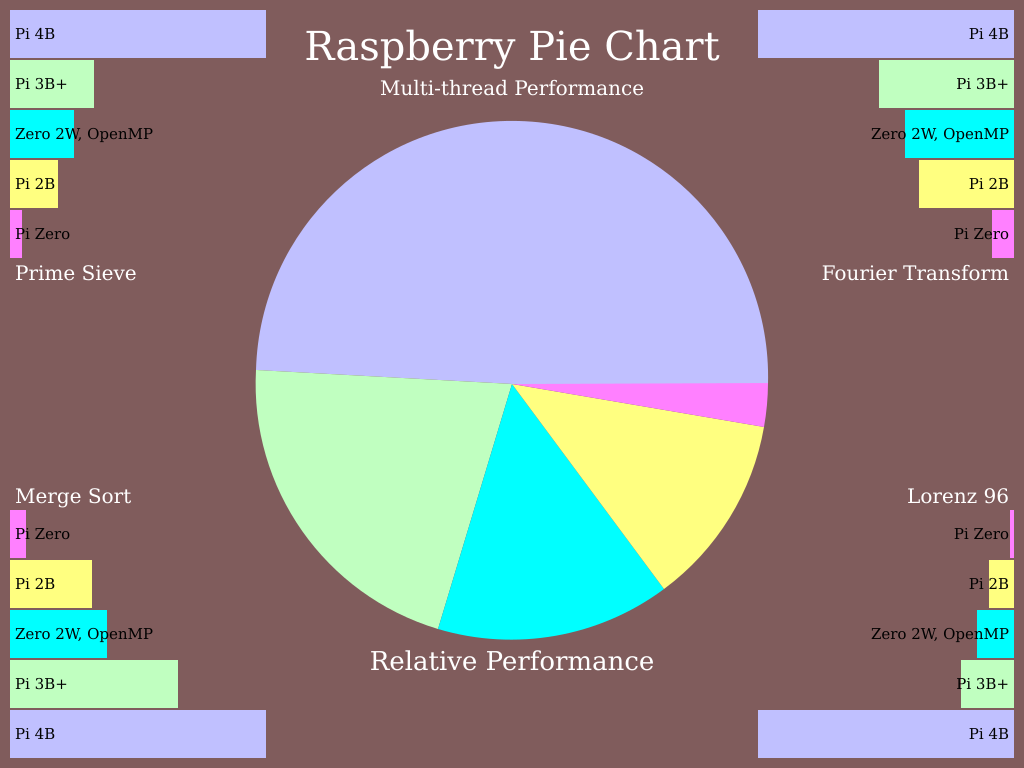
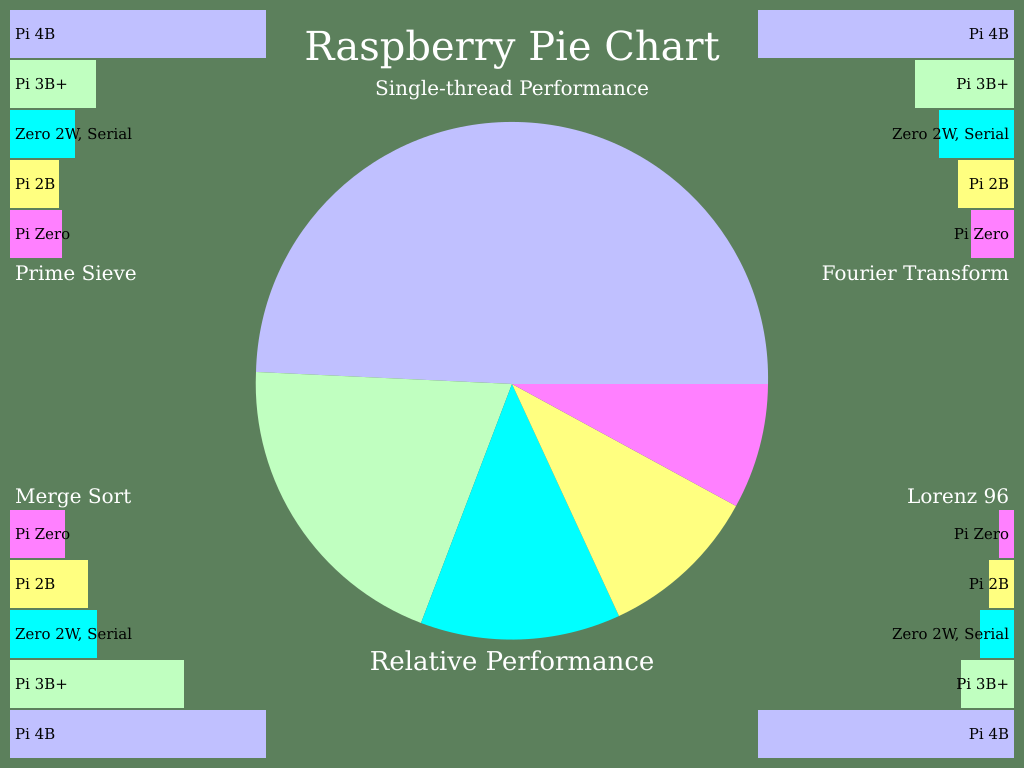
Running A Pi Pie Chart turned out some useful performance numbers. It’s almost, but not quite, a Raspberry Pi 3B in a Raspberry Pi Zero form factor.

32-bit mode

Running stock Raspberry Pi OS with desktop, compiled with stock options:

pie chart comparing multi-thread numeric performance of Raspberry Pi Zero 2 W: slightly faster than a Raspberry Pi 2B
multi-thread results
pie chart comparing single-thread numeric performance of Raspberry Pi Zero 2 W: slightly faster than a Raspberry Pi 2B
single-thread results
time ./pichart-openmp -t "Zero 2W, OpenMP"
pichart -- Raspberry Pi Performance OPENMP version 36

Prime Sieve          P=14630843 Workers=4 Sec=2.18676 Mops=427.266
Merge Sort           N=16777216 Workers=8 Sec=1.9341 Mops=208.186
Fourier Transform    N=4194304 Workers=8 Sec=3.10982 Mflops=148.36
Lorenz 96            N=32768 K=16384 Workers=4 Sec=4.56845 Mflops=705.102

The Zero 2W, OpenMP has Raspberry Pi ratio=8.72113
Making pie charts...done.

real	8m20.245s
user	15m27.197s
sys	0m3.752s

-----------------------------

time ./pichart-serial -t "Zero 2W, Serial"
pichart -- Raspberry Pi Performance Serial version 36

Prime Sieve          P=14630843 Workers=1 Sec=8.77047 Mops=106.531
Merge Sort           N=16777216 Workers=2 Sec=7.02049 Mops=57.354
Fourier Transform    N=4194304 Workers=2 Sec=8.58785 Mflops=53.724
Lorenz 96            N=32768 K=16384 Workers=1 Sec=17.1408 Mflops=187.927

The Zero 2W, Serial has Raspberry Pi ratio=2.48852
Making pie charts...done.

real	7m50.524s
user	7m48.854s
sys	0m1.370s

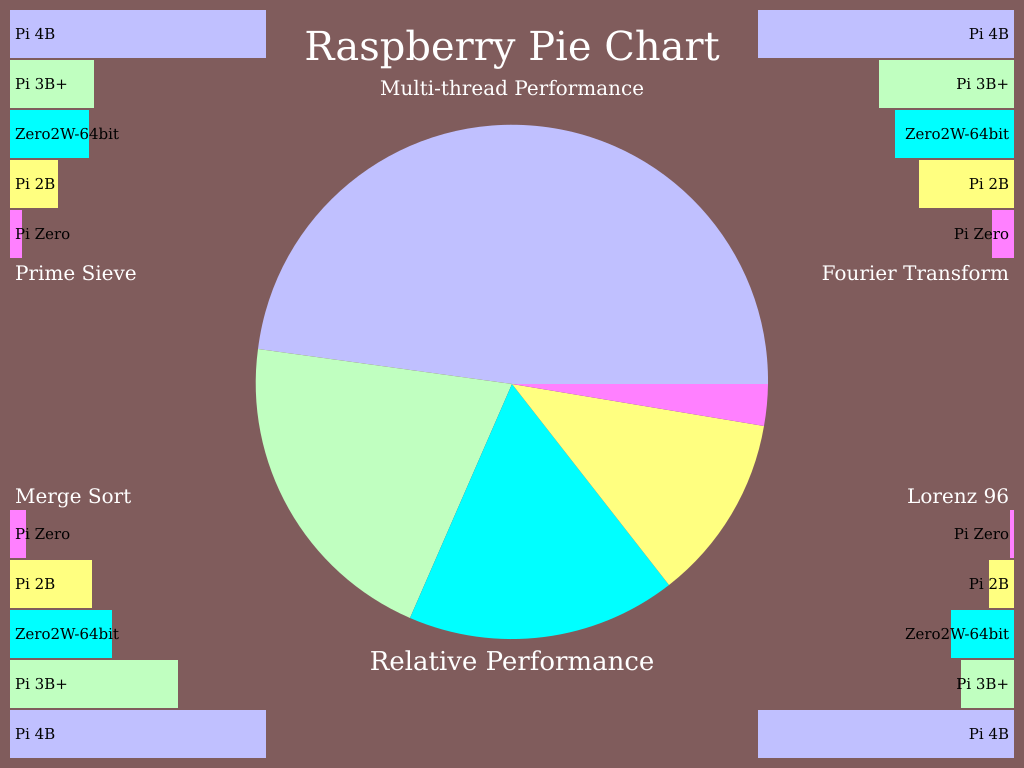
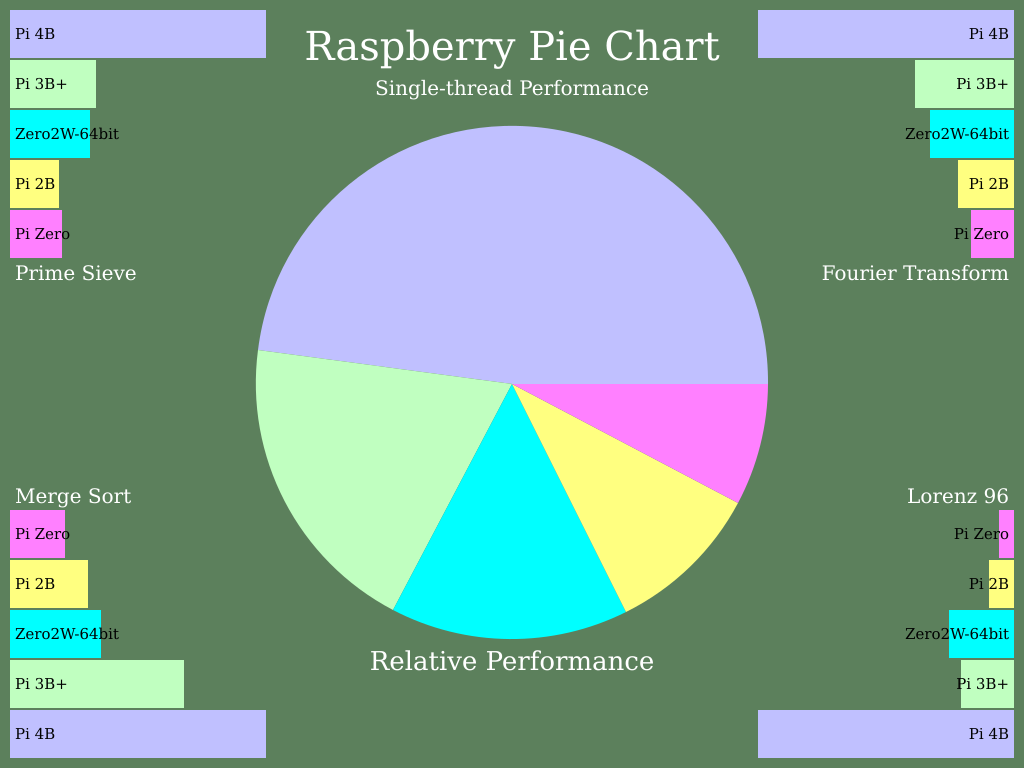
64-bit

Running stock/beta 64-bit Raspberry Pi OS with desktop. Curiously, these ran out of memory (at least, in oom-kill‘s opinion) with the desktop running, so I had to run from console. This also meant it was harder to capture the program run times.

The firmware required to run in this mode should be in the official distribution by now.

pie chart comparing 64 bit multi-thread numeric performance of Raspberry Pi Zero 2 W: slightly faster than a Raspberry Pi 2B
multi-thread, 64 bit: no, I can’t explain why Lorenz is better than a 3B+
pie chart comparing 64 bit single-thread numeric performance of Raspberry Pi Zero 2 W: slightly faster than a Raspberry Pi 2B
single thread, again with the bump in Lorenz performance
pichart -- Raspberry Pi Performance OPENMP version 36

Prime Sieve          P=14630843 Workers=4 Sec=1.78173 Mops=524.395
Merge Sort           N=16777216 Workers=8 Sec=1.83854 Mops=219.007
Fourier Transform    N=4194304 Workers=4 Sec=2.83797 Mflops=162.572
Lorenz 96            N=32768 K=16384 Workers=4 Sec=2.66808 Mflops=1207.32

The Zero2W-64bit has Raspberry Pi ratio=10.8802
Making pie charts...done.

-------------------------

pichart -- Raspberry Pi Performance Serial version 36

Prime Sieve          P=14630843 Workers=1 Sec=7.06226 Mops=132.299
Merge Sort           N=16777216 Workers=2 Sec=6.75762 Mops=59.5851
Fourier Transform    N=4194304 Workers=2 Sec=7.73993 Mflops=59.6095
Lorenz 96            N=32768 K=16384 Workers=1 Sec=9.00538 Mflops=357.7

The Zero2W-64bit has Raspberry Pi ratio=3.19724
Making pie charts...done.

The main reason for the Raspberry Pi Zero 2 W appearing slower than the 3B and 3B+ is likely that it uses LPDDR2 memory instead of LPDDR3. 64-bit mode provides is a useful performance increase, offset by increased memory use. I found desktop apps to be almost unusably swappy in 64-bit mode, but there might be some tweaking I can do to avoid this.

Unlike the single core Raspberry Pi Zero, the Raspberry Pi Zero 2 W can be made to go into thermal throttling if you’re really, really determined. Like “3 or more cores running flat-out“-determined. In my testing, two cores at 100% (as you might get in emulation) won’t put it into thermal throttling, even in the snug official case closed up tight. More on this later.

(And a great big raspberry blown at Make, who leaked the Raspberry Pi Zero 2 W release a couple of days ago. Not classy.)

Another Raspberry Pi Pico language: MMBasic

It’s very much a work in progress, but Geoff Graham and Peter Mather’s MMBasic runs nicely on the Raspberry Pi Pico. Development is mostly coordinated on TheBackShed.com forum.

It supports an impressive range of displays and peripherals. The project gives me a very distinct “This is how we do things” vibe, and it’s quite unlike any other Raspberry Pi Pico project.

To show you what MMBasic code looks like, here’s a little demo that uses one of those “Open Smart” LED traffic lights on physical pins 14-16 which cycles through the phases every few seconds:

' traffic light on gp10-12 (green, yellow, red), pins 14-16

' set up ports for output
FOR i=14 TO 16
  SETPIN i, DOUT
  PIN(i)=0
NEXT i

red=16
amber=15
green=14

DO
  ' green on for 5 seconds
  PIN(red)=0
  PIN(green)=1
  PAUSE 5000
  ' amber on for 3 seconds
  PIN(green)=0
  PIN(amber)=1
  PAUSE 3000
  ' red on for 5 seconds
  PIN(amber)=0
  PIN(red)=1
  PAUSE 5000
LOOP

Raspberry Pi Pico with TTP223 Touch Sensor

This is almost too trivial to write up, as the TTP223 does exactly what you’d expect it to do with no other components.

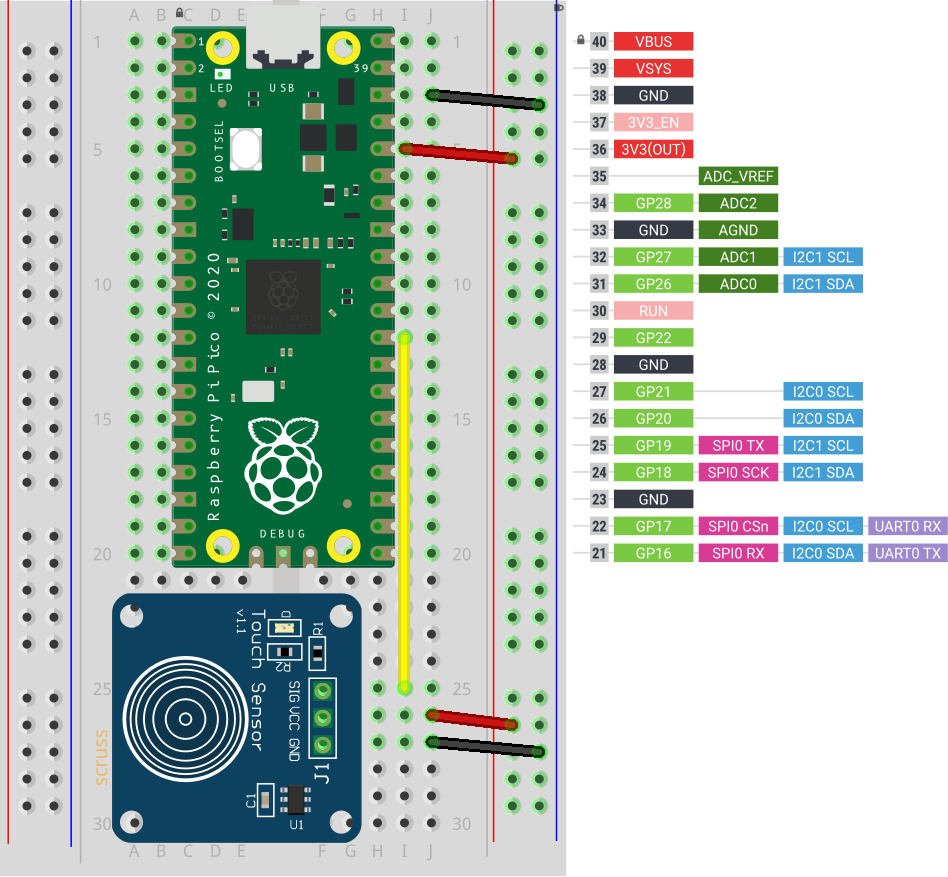
breadboard with Raspberry Pi Pico and small blue capacitive touch sensor
TTP223 sensor board connected to GP22 / physical pin 29

Breakout boards for the TTP223 capacitive touch sensor come in a whole variety of sizes. The ones I got from Simcoe DIY are much smaller, have a different connection order, and don’t have an indicator LED. What they all give you, though, is a single touch/proximity switch for about $1.50

Trivial code to light the Raspberry Pi Pico’s LED when a touch event is detected looks like this:

import machine
touch = machine.Pin(22, machine.Pin.IN)
led = machine.Pin(25, machine.Pin.OUT)

while True:
    led.value(touch.value())

For the default configuration, the sensor’s output goes high while a touch is detected, then goes low. This might not be the ideal configuration for you, so these sensor boards have a couple of solder links you can modify:

  1. Active Low — sometimes you want a switch to indicate a touch with a low / 0 V signal. On the boards I have, the A link controls that: put a blob of solder across it to reverse the switch’s sense.
  2. Toggle — if you want the output to stay latched at one level until you touch it again, a blob of solder across the T link will do that. Unlike a mechanical switch, this won’t stay latched after a power cycle, though.

And that’s all it does. Sometimes it’s nice to have a sensor that does exactly one thing perfectly well.

Happy Birthday Alvin Lucier

Happy Birthday Alvin Lucier - spectrogram of ten generations of re-recordings
Happy Birthday Alvin Lucier – spectrogram of ten generations of re-recordings

Just over 50 years ago, Alvin Lucier turned on his tape recorder and started to recite. This wasn’t an entirely unusual thing to do, but what he did next was a little different: he played that tape back, while recording it on another device. He kept doing this until all there was left was the ringing resonant frequency of the room, his voice smeared out of any recognizable sound. He called this piece I am sitting in a room, and it’s still a stunning work of sound art.

Alvin Lucier just turned 90 years old, so in recognition, I made this:

Many Happy Returns: for Alvin Lucier at 90

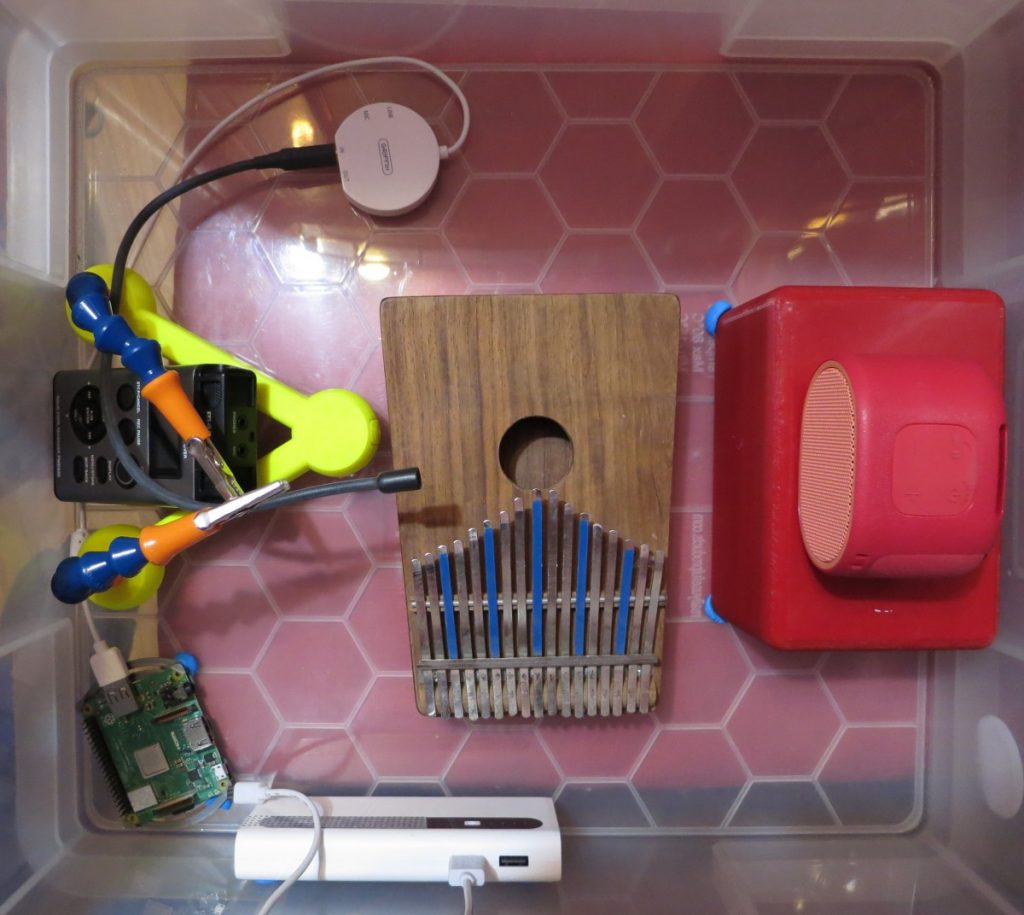
I don’t have a quiet room with two tape decks, but I do have a large plastic tote in which I can fit a whole bunch of battery-powered recording gubbins:

computer-based recording and playback equipment in plastic tote
my studio in a box. From L to R: Raspberry Pi 3A+, backup audio recorder, microphone stand, battery pack, microphone, USB audio interface, kalimba (for added resonance) and bluetooth speaker

After setting everything up and running, I put the box on my bed and covered it with several layers of blankets to keep our noisy neighbourhood sounds out. The initial audio was made in PicoTTS, and then playback and recording were controlled over wifi and VNC. I (or more accurately, the bash script I wrote) made 90 generations of recordings. I’ve only included the first 10 due to time constraints.

What I did

I guess I’ve been lucky with whatever audio system Raspberry Pi OS is using, because it recognized and used both my ancient Griffin iMic USB microphone adapter and my Sony Bluetooth speaker as default input/output devices.

One annoyance was having to build PicoTTS from source. Raspberry Pi OS doesn’t provide packages for it, but does have the source package. Building it goes something like this: Compile Pico TTS on Raspbian. You might prefer trying flite or espeak-ng, both of which have binary packages available.

I used this script, which may be rather too specific to my particular goal:

#!/bin/bash

parent=/home/pi/Desktop/sitting_in_a_box
gen0="$parent/box0.wav"
dest=${1:-$(date +%y%m%d%H%M)}
outdir="$parent/$dest"
mkdir -p "$outdir" && echo Created "$outdir"
n=0
outfile=$(printf "%s/%s_%03d.wav" "$outdir" "$dest" "$n")
tmpfile=$(printf "%s/%s_TMP.wav" "$outdir" "$dest")

# copy source file
sox -q --norm=-3 "$gen0" "$outfile"
while
    [ ! -f "$parent/STOP" ]
do
    infile="$outfile"
    n=$((n + 1))
    outfile=$(printf "%s/%s_%03d.wav" "$outdir" "$dest" "$n")
    echo Recording "$outfile" . . .
    arecord -f cd -q "$tmpfile" &
    rec_pid=$!
    echo Playing "$infile" . . .
    aplay -q "$infile"
    sleep 0.5
    kill -SIGINT "$rec_pid"
    echo Normalizing "$tmpfile" to "$outfile" . . .
    sox --norm=-3 "$tmpfile" -c 2 "$outfile" && rm "$tmpfile"
    echo ""
done
echo '***' Process stopped after "$n" iterations.

Some notes on the code:

  1. the script creates a folder for the output files, either as specified on the command line, or if not, from the current date/time
  2. I didn’t really know how many iterations I’d want, so I monitored occasional files by pulling them down using scp and listening. When I was satisfied, I’d create a file called STOP in the project folder that would make the loop exit
  3. $gen0 is the name of the source recording
  4. sox -q –norm=-3 infile outfile is a way of normalizing the audio so that it won’t clip
  5. We start the recording in the background (arecord … &) and immediately grab its process ID using $!. This allows us to stop the recording using kill after the audio file has played. arecord doesn’t update the file header when a process is stopped like this, so sox will complain quietly every time
  6. The sleep 0.5 after aplay is to prevent the recording cutting off. Both aplay and sox/play seem to exit as soon as the last block of audio data has been sent to the audio device, and not when the sound has stopped playing. This means you have to edit out increasingly longer gaps from your recordings, but at least you get everything.

What I’d do differently next time

  • Probably not used a Bluetooth speaker. Sure, they’re self-powered and you can’t complain about the number of wires, but they’re noisy and low quality
  • Done more work on the microphone interface. The pair of binaural mics I used to use with the Griffin interface (it’s stereo, unlike most USB interfaces) had a dead channel, so I had to fish around for other microphones. Somewhere I have a nice microphone from a Sony Pro Walkman, and I should have used that
  • Maybe considered a band-pass filter to cut the very high frequency ringing. Yes, I know the whole point of I am sitting in a room is to capture the room dynamics, but when you’re recording in a tiny space with very hard walls, the dynamics take over almost too quickly to be interesting
  • Spent more time on playback and record levels beyond the “hey, it works!” settings I used here
  • Used a higher bitrate recording. This might have resulted in more wolf-tones and ringing, though.

Presentation: Getting Started with MicroPython on the Raspberry Pi Pico

I just gave this talk to the Toronto Raspberry Pi Meetup group: Getting Started with MicroPython on the Raspberry Pi Pico. Slides are here:

or, if you must, pptx:

PDF, for the impatient:

If I were to do this again, I’d drop the messy thermistor code as an example and use a DS18x20, like here: Raspberry Pi Pico: DS18x20 in MicroPython

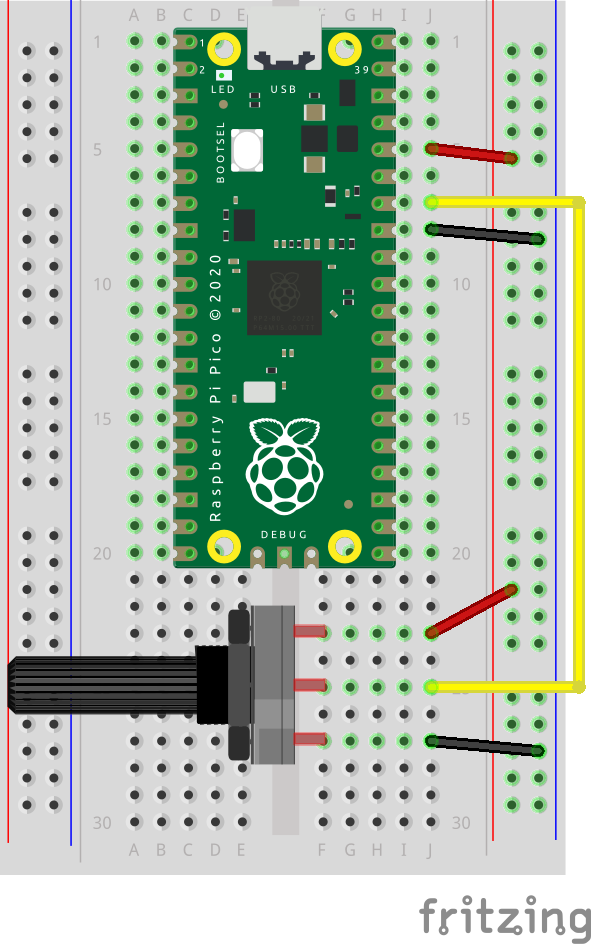
also, simple potentiometer demo I wrote during the talk: potentiometer.py

goodbye X10, hello trådfri …

scruss/ihsctrl: a package of bash scripts to control selected IKEA Home smart (aka “TRÅDFRI”) devices via their network gateway

The old X10 devices were getting really unreliable: seldom firing at all, getting far too hot, bringing a whole lot of not working to my life. So while it was kind of cool to have my lights controlled by an original 256 MB Raspberry Pi Model B from 2012, it was maybe working one schedule out of ten.

So it had to go: replaced by a Raspberry Pi Zero W and a whole lot of IKEA TRÃ…DFRI kit. I was deeply unimpressed with the IKEA Home smart app, though: you couldn’t use even basic schedules with more than one light cycle per day. So while I know there are lots of clever home automation systems, I wanted to replace my old cron scripts and set about writing some simple command tools. The result is ihsctrl: very limited, but good enough for me. It’s been working exactly as expected for the last week, so I’ll finally get to wade through 8 years of cobwebs and dismantle the old X10 setup. I already miss the 06:30 clonk of the X10 controller turning the front light on — that was my alarm clock (or alarm clonk) every morning.

(local copy: ihsctrl.zip)

Possibly Painless Network Printing from your Raspberry Pi

Printing from computers goes through waves of being difficult to being easy, then back to difficult again. This is likely due to the cycles of technology, complexity and user demand flow in and out of sync. I think we’re at peak annoyance right now.

It’s even harder with Raspberry Pis, as when printer drivers support Linux, 90% of them are for x86 or x86_64 computers only (Canon: ಠ_ಠ). ARM doesn’t get a look in. But one technology does actually seem to help: network printers that support IPP — Internet Printing Protocol.

We had an old Brother laser printer that just got slower and crankier and less useful as a printer, so yesterday I got a new Brother DCP-L2550DW to replace it. It says it supports Linux in the spec, but I knew not to be too optimistic with my Raspberry Pis. And indeed, it was seen on the network but no driver was found. I had a sad.

What turned my frown upside down was finding out about Raspbian’s cups-ipp-utils package. For desktop use, install it this way:

sudo apt install cups cups-ipp-utils system-config-printer

(leave off system-config-printer if you’re running from the terminal.)

Update: while you’re here, you might also want to install the print-to-PDF driver too. This allows you to print without wasting paper. Install it (and the IPP driver) with:

sudo apt install cups cups-ipp-utils system-config-printer printer-driver-cups-pdf

In many cases, this might be all you need to do: the network printers should be automatically found and added as devices.

Adding the new printer

On the desktop, open up Preferences → Print Settings and add a new printer. Yes, it prompts for your user password which you may have forgotten. I’ll wait while you try to remember it …

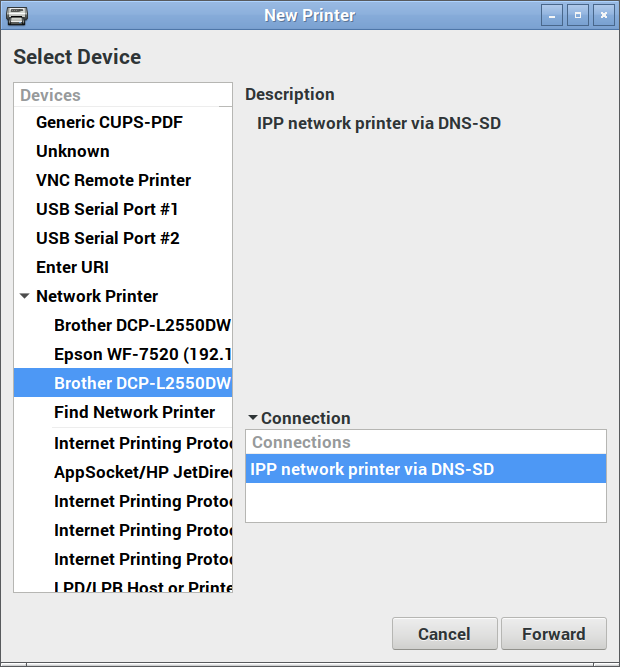
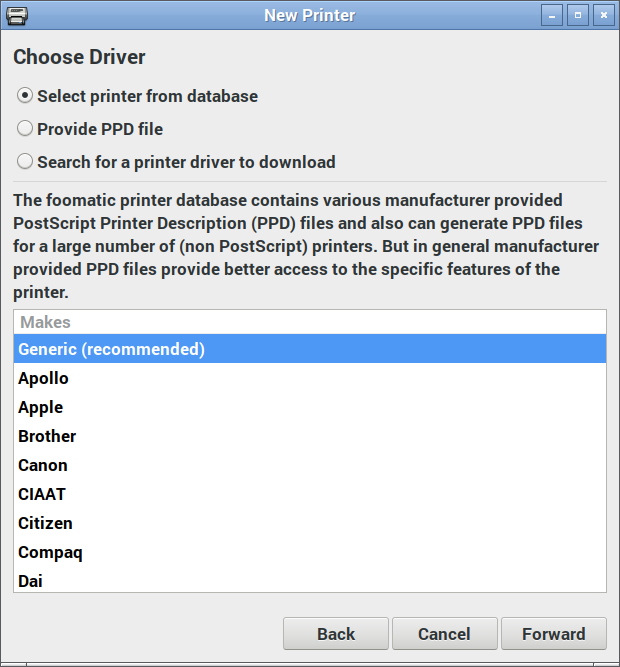
Now under Network Printers, you should see a device you recognize. Pick the one that says IPP network printer somewhere:

IPP network printer

Here’s where the magic happens: you actually want to pick the generic driver for once:

Select Generic (recommended) manufacturer

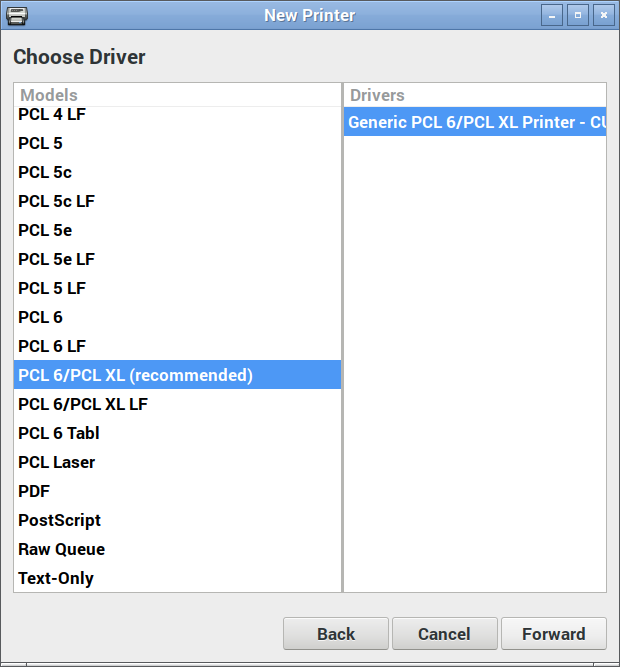
And again, the IPP utilities package will have picked the right driver for you:

Just go with what the driver suggests

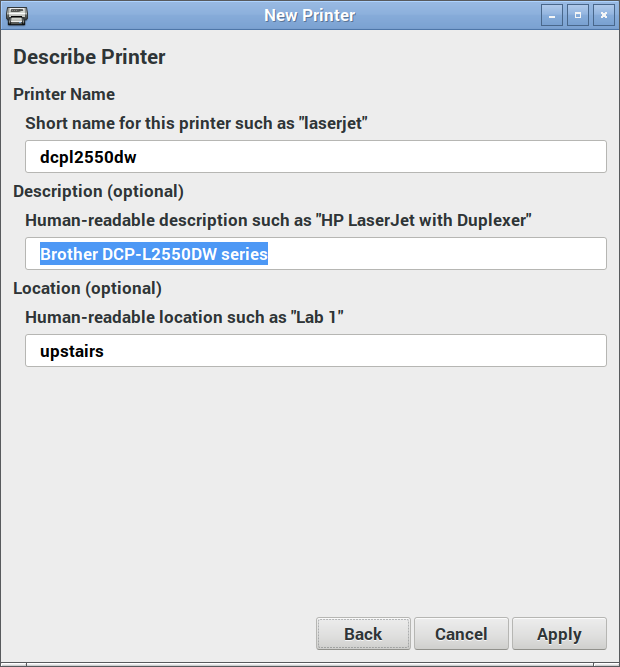
Changing the name and location is optional:

Your new printer’s almost ready to go!

Hit Apply, and you should be printing!

(Hey, printer manufacturers have been known to be evil and make good, working stuff suddenly not work. IPP is supposed to make everything sparkly again, but I can’t guarantee that something wicked won’t come this way.)

Update: After a few months of using the Brother DCP-L2550DW, I don’t recommend you buy it. It’s a perfectly capable printer, but it takes ‘chipped’ toner cartridges that:

  1. stop dead when you hit their page count limit, wasting toner and preventing you from finishing the print job;
  2. can’t easily be refilled by local technicians, so are wasteful of resources.

To get around (1), select Continue instead of Stop in the Toner Out configuration menu.

Update, January 2020: with sales and all needing a printer for work, the DCP-L2550DW will go with me to the office. I now have a MFC-L2750DW at home that scans to network, amongst other things. IPP proved it was magic yet again by the new printer being found and just worked with all my machines as soon as I added it to the network.

eben’s bbc basic programmes

I wrote this as a comment to Learn to write games for the BBC Micro with Eben – Raspberry Pi, but it didn’t seem to save:

BeebEm? Lawks, that’s a bit old (2006). All the cool (*cough*) kids are running b-em – https://github.com/stardot/b-em – these days. It’s lovingly maintain by Stardot forum members. It’s a little crashy on some Linux platforms, but seems stable on the Raspberry Pi and Raspbian. You may need to install the liballegro5-dev and zlib1g-dev packages to get it to compile.

If you want a native version of BBC BASIC, Richard Russell’s version is pretty neat: http://www.bbcbasic.co.uk/bbcsdl/ . You’ll most likely need to change line 280 to use some variant of the WAIT command to make it playable.

Another native interpreter is Brandy. There’s an ancient one in the repos, but I’m completely taken with the Matrix Brandy fork: https://github.com/stardot/MatrixBrandy . It may need a few packages installed to get it to build (libsdl1.2-dev might be a good first try), but it’s really fast. For cross-platform happiness, change line 280 to WAIT 10. If you stick to using a FOR loop, you might have to have it as high as 2,000,000 on a fast computer!

Lastly, if you want to run the game in a browser, JSBeeb to the rescue: https://bbc.godbolt.org/?autorun&loadBasic=https://gist.githubusercontent.com/scruss/f5a8eb83f28b85d6399142cac460c806/raw/74c4e39de7661bb2e3dd7f435840dd8db7172589/helicopter.bbc
It’s a bit slow in Chromium on a Raspberry Pi, but it does work!

Eugene’s fishing line header hack for Raspberry Pi Zero

0.38 mm / 5.4 kg test Trilene threaded through Raspberry Pi Zero header holes
0.38 mm / 5.4 kg test Trilene threaded through Raspberry Pi Zero header holes holds jumper wires snugly without soldering

Eugene “thirtytwoteeth” Andruszczenko (of Game Boy Zero – Handheld Edition fame) posted a neat idea to help your Raspberry Pi Zero take jumper wires without soldering. He threaded fishing line through the 40 hole header, making an interference fit for header pins. I tried it with 0.38 mm Trilene, which worked rather well.

Building (but not necessarily running) Amiberry on Raspberry Pi 3

I might not have Amiberry — an optimized Amiga emulator for Raspberry Pi — running quite yet, but the build instructions at midwan/amiberry are a bit lacking. If you want to compile it under Raspbian Stretch, you’ll need the following packages:
sudo apt install libsdl2-dev libxml2-dev libxml2-utils libsdl2-ttf-dev libsdl2-image-dev
This will at least allow you to get it to build correctly with:
make -j2 PLATFORM=rpi3-sdl2-dispmanx
More later when/if I get it working.

Raspblocks: Blocks-based Python coding for Raspberry Pi

Update, 2019-01: raspblocks.com appears to be dead, with an “Account Suspended” error from the host

Raspblocks is a new Blocks-based web programming environment for Raspberry Pi. You don’t even need to write the code on a Raspberry Pi, but the Python 3 code it produces will need to be transferred to a Raspberry Pi to run.

For maximum authenticity (and slowness), I fired up  http://www.raspblocks.com/ on a Raspberry Pi Zero over VNC. It took a minute or more to load up the site in Chromium, but creating a simple program was all easy dragging and dropping:

The code it produced was pretty much exactly what you’d write by hand:

import RPi.GPIO as GPIO
import time
GPIO.setmode(GPIO.BCM)
GPIO.setup(26, GPIO.OUT)

while True:
    GPIO.output(26,True)
    time.sleep(1)
    GPIO.output(26,False)
    time.sleep(1)

And, as you might expect, the code make an LED connected to GPIO 26 turn on and off. Science!

Raspblocks isn’t as polished as its more established rival  EduBlocks, but Raspblocks doesn’t need any software installed. Edublocks installs its own Node.js-based web service, which would be painfully slow on a Raspberry Pi Zero. Raspblocks’ code needs to be run manually from a terminal, but I’d put up with that any day over having yet another Node server distribution installed under /opt.

MQTT Talk tonight

I’m talking at the Raspberry Pi Toronto Meetup tonight, and if all goes well, the Net-Connected Cowbell will make an appearance:

My slides: MQTT.odp

Links:

Teensy USB Keypad

in which I finally learn about Fritzing’s wire alignment facility …

I’ve had a couple of Teensy boards for a while, but a misunderstanding that they needed a load of of extra software installed (they need one thing, and it’s easy) had kept me away. They’ve got really impressive specs, and they’re especially easy to turn into USB devices like keyboards.

Super-heavy CEECO keypad

Here’s a little demo that turns a phone keypad — in my case, a ridiculously solid CEECO solid metal keypad designed for institutional use — into a simple USB keyboard. Plug it into any machine (including a Raspberry Pi) and it will be identified as a keyboard. No drivers are required.

The code is based on the standard Arduino Keypad library basic demo. That code was meant for a different keypad, so I eventually found a configuration that worked in the Sparkfun 12 button keypad datasheet. Rather than printing characters to the serial port, I used calls to Teensy’s USB Keyboard library instead.

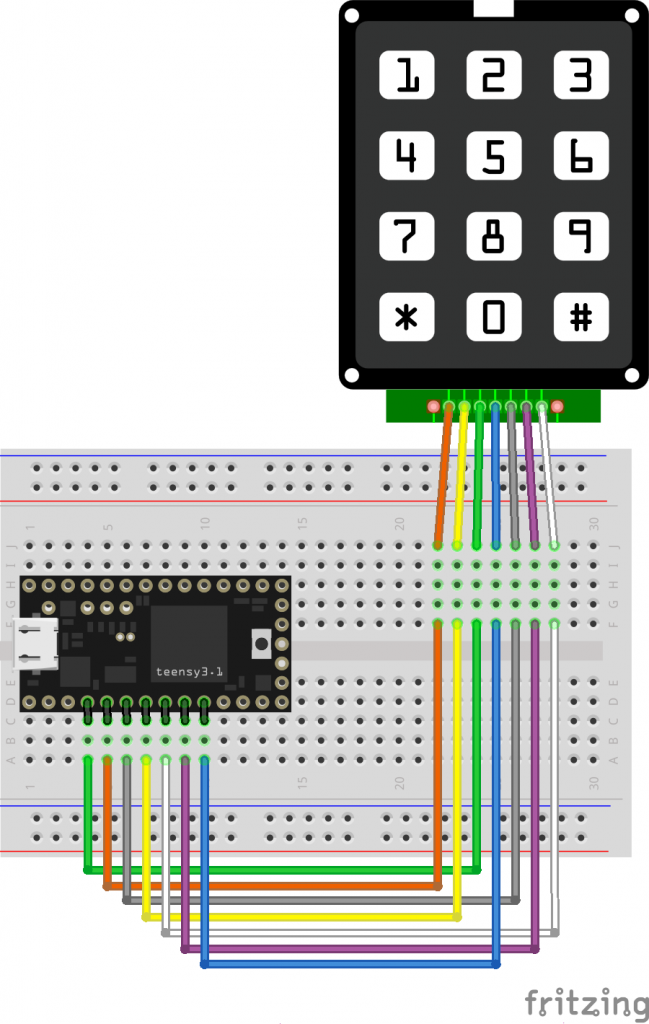
The pinout is (from left to right, key side up):

  1. do not connect
  2. Column 2
  3. Row 1
  4. Column 1
  5. Row 4
  6. Column 3
  7. Row 3
  8. Row 2
  9. n/c

There’s no reason why this wouldn’t work with those very cheap 4×4 button matrix keypads for Arduino too with only minor modifications. Those keypads use 8 data lines, and they’re arranged (I think) as rows 1-4 on pins 1-4 and columns 1-4 are pins 5-8. columns 4-1 then rows 1-4 from the top of the pin connector down:

The Teensy USB keyboard isn’t limited to sending single characters: a single button press could trigger sending a whole string. I haven’t yet thought out any major uses for this (except “Crypto!”, which is my usual idea when I have no idea what I’m doing), but you might have better plans.

Update, 2020-04: These keypads don’t have diodes on every key to prevent key ghosting if you press multiple keys. Despite what the Arduino Playground Keypad section might tell you, you can’t do useful multi-key/rollover detection with them.

Creating a systemd user service on your Raspberry Pi

Flushed with success from yesterday’s post where I made my first systemd service, I got carried away and wanted to show you how to create a service that runs as a regular user.

A fairly common question on the Raspberry Pi Forums is “How do I run a script every time I reboot?”. The traditional answer (and one I’ve given more than once) is to add a @reboot clause to your crontab. This will indeed run a command when the computer reboots, but it will run pretty early on in the boot sequence when there’s no guarantee of network or time services. So the usual remedy is a bit of a kludge:

@reboot sleep 60 && …

This waits a full minute after rebooting, then executes the command. Network and time services are really likely to be available, but it’s not very elegant. Cron also has some weird gotchas with PATH settings, so while it’s ubiquitous and has worked for decades, it’s not easy to get working. Systemd, however, has a much better way of doing it, and better yet, you can do it all without ever hitting sudo.

I’ll take as a basis for this post the forum query “python and crontab”. The asker wanted to log the time when their Raspberry Pi had rebooted, but they’ve hit the usual problem that the clock didn’t have the right time when their script was triggered, so the log was useless.

(I’m not going to do exactly what the forum poster did, but this is more a demo of a systemd user service than recreating their results.)

First off, here’s the script to log the time to a file (saved as ~/bin/boot_time.py):

#!/usr/bin/python3
from time import strftime
with open("/home/pi/logs/boot_time.txt", "a") as log:
 log.write(strftime("%d-%m-%Y,%H:%M:%S\n"))

I’d have done this as a shell script, but the OP used Python, so why fight it?

FUN FACT: Under most Linux flavours, if you create a bin folder in your home directory, it’s automatically added to your path. So I could just type boot_time.py and the shell would find it.
(You might have to log out and log back in again for the shell to review your path.)

In order to get that to run, I need to do a little housekeeping: make the script executable, and make sure the logs folder exits:

chmod +x ~/bin/boot_time.py
mkdir -p ~/logs

Now we need to do the bits that pertain to systemd. First off, you must make a folder for user services:

mkdir -p ~/.config/systemd/user

NOTE: mkdir -p … is useful here as it makes the directory and any parent directories that don’t exist. It also doesn’t complain if any of them already exist. It’s kind of a “make sure this directory exists” command. Make friends with it.

And here’s the service file, which I saved as ~/.config/systemd/user/boot_time_log.service:

[Unit]
Description=boot time log
DefaultDependencies=no
After=local-fs.target time-sync.target

[Service]
Type=oneshot
ExecStart=/home/pi/bin/boot_time.py

[Install]
WantedBy=default.target

The service file does the following (even if I’m slightly mystified by some of the headings …):

  • Unit
    • Description — a plain text name for the service. This appears in logs when it starts, stops or fails.
    • DefaultDependencies — as this service runs once at boot-up, it doesn’t need the normal systemd functions of restarting and shutting down on reboot. Most service files omit this line.
    • After — here we tell systemd what service targets must be running before this service is started. As we need to write to a file and have the right time, the local-fs.target and time-sync.target seem sensible.
  • Service
    • Type — this is run once, so it’s a oneshot rather than the usual simple service.
    • ExecStart — this is the command to run when the service is required.
  • Install
    • WantedBy — tbh no idea what this does, but if you omit it the service won’t install. Found the answer in this SE, and it works. So I guess what it does is make the service not fail …

Finally, you enable the service with:

systemctl --user enable boot_time_log.service

Next time you reboot, the time will be appended to the log file ~/logs/boot_time.txt.

Unlike most (that is, Type=simple) services, it’s perfectly fine if this one spends most of its time inactive:

$ systemctl status --user boot_time_log.service
● boot_time_log.service - boot time log
 Loaded: loaded (/home/pi/.config/systemd/user/boot_time_log.service; enabled;
 Active: inactive (dead) since Sun 2017-10-22 22:17:56 EDT; 1h 5min ago
 Process: 722 ExecStart=/home/pi/bin/boot_time.py (code=exited, status=0/SUCCES
 Main PID: 722 (code=exited, status=0/SUCCESS)

It has executed successfully, so the process doesn’t have to stick around.