I’m slightly embarrassed to be asking about this, but I’ve been looking for some particularly cheesy conference call hold music (aka music on hold) for years.
It was on a Telus (Canada) conference call system operated for my then employer, an Alberta-based power utility. It may have been any time from 2006–8, perhaps as late as 2013.
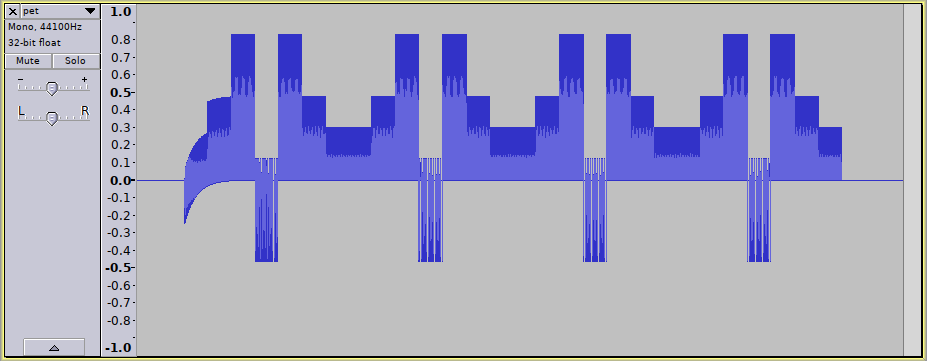
All I have to help you is my extremely poor rendition of the main theme on a cellphone keyboard-type thing:
Mystery Music on Hold – main theme: badly played on a keyboard type thing
There were two other “movements” to the piece. The only detail I remember from the other ones is that there was a random Windows alert noise (chord.wav)inserted into one of them, possibly in error. It sounded like this:
Yes, I’m going to ask about this on Hold Music, too …
E. Lamprecht’s MZ2SYNTH is a delightfully weird piece of code. It is an advanced wavetable synthesizer programmed only by an input image. Here’s an example:
Documentation is pretty sparse, so I’ve had to work it out as best I can:
input data must be a 720 px high NetPBM PPM or PGM image with a black background
waveforms are specified by pixel colour: sine, square, sawtooth and triangle are red, green, blue and luminance
dynamics are manipulated by changing the pixel brightness
the input plays at a constant rate along the horizontal pixels, defaulting to 10 pixels/second
The pitch is specified by the Y coordinate. To convert from MIDI note number n to an input coordinate for mz2synth, use this formula: y=6×(140 – n) So for Middle C (MIDI note 60), the Y coordinate would be 480.
I’ve created a very simple example that plays a C major scale with simple sine waves with no dynamics.
The input image:
The resulting audio:
And the python code that produced the image:
#!/usr/bin/env python3
# -*- coding: utf-8 -*-
# mz2-draw - draw a Cmaj scale in the right input format for mz2synth
# scruss, 2025-11
# mz2synth - https://github.com/frankenbeans/MZ2SYNTH
# command line:
#   mz2 -v -o mz2-cmaj.au mz2-cmaj.ppm

from PIL import Image, ImageDraw


# convert midi note number (20..127) to
# vertical offset for mz2 input
# notes < 20 (G#0) can't be played by mz2
def midi_to_y(n):
    return 6 * (140 - n)


middle_c = 60
maj_scale = (0, 2, 4, 5, 7, 9, 11, 12)
# maj_chord = (0, 4, 7)

# mz2 input must be 720 px high,
# preferably black bg
im = Image.new("RGB", (10 * len(maj_scale), 720), "black")
draw = ImageDraw.Draw(im)

for i, d in enumerate(maj_scale):
    # bright red lines mean full
    # volume sine waves
    draw.line(
        [
            10 * i,
            midi_to_y(middle_c + d),
            10 * i + 8,
            midi_to_y(middle_c + d),
        ],
        "red",
        1,
    )

# mz2 can only read NetPBM PPM format
im.save("mz2-cmaj.ppm")
Building
mz2synth comes with Windows and Mac OS binaries. To run the Mac code, you need Homebrew with the gcc@13 recipe. See this issue for details.
To build on Linux, you’ll need gfortran. A build script could be something like this:
git clone https://github.com/frankenbeans/MZ2SYNTH.git
cd MZ2SYNTH/SOURCE
make -f Makefile.gfortran
Put the resulting mz2 binary somewhere in your path, and that’s all the installation it needs. These same instructions should work for Mac OS.
If you really want to live on the edge (note: not really) and get a faster binary at the expense of array bounds checking, use this to recompile instead of the above make line:
I’m of an age that I had to learn to recite Gerard Manley Hopkins’ Pied Beauty at school, on several different occasions. I did not excel at learning poems by heart; at least, not the ones I was told to learn. I have a difficult relationship with the poem, you could say.
So when my mother-in-law asked for me to recite it for her daily poetry readings (and knowing full well what she would get), I said yes. Here’s something like what she got:
Pied Beauty, read by Stewart Russell — much against his better judgment
It’s a great poem, but one that should never be inflicted on a teenage boy. Yer man GMH was quite the one for making up words: brinded isn’t a thing, and I dunno what happened with the accents on ‘áll trádes’, but they’ve gone well into the twee zone. And as for ‘trout that swim’: is there any other kind, Gerry? Mibbee there’s ones that fly where you’re from, but they’re all strictly aquatic here.
There are a million variations on the simple “use sox to play masking pink noise“, such as:
play -n synth pinknoise gain -3
This will play synthesized pink noise until you hit Ctrl-C.
But it you want two independent noise channels rather than mono, that’s a little more complex. It’s probably easier to download/play the MP3 file above than show you the command line.
Note that MP3s really aren’t designed to encode such random data, and it’s likely that your player will cause the audio to clip in a couple of places. I’m not quite sure why it does this, but it does it repeatably.
If you want to create this for yourself (and create a bonus lossless FLAC, which was far too large to upload here), here’s what I did to make this:
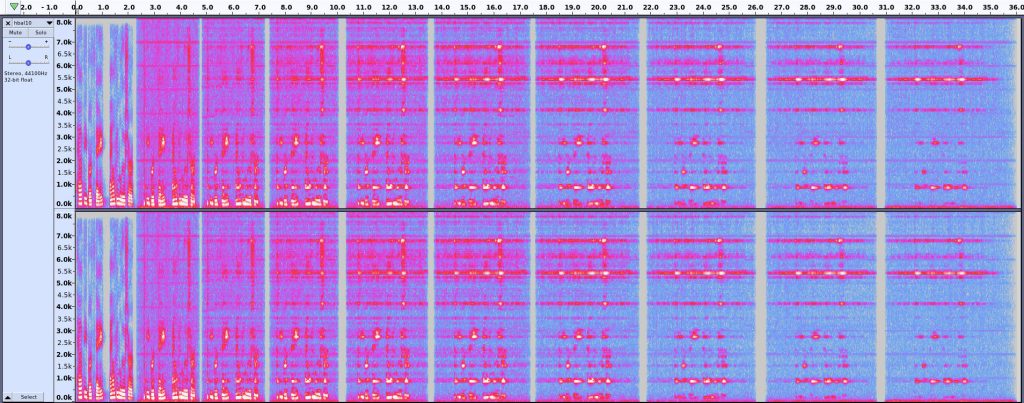
Happy Birthday Alvin Lucier – spectrogram of ten generations of re-recordings
Just over 50 years ago, Alvin Lucier turned on his tape recorder and started to recite. This wasn’t an entirely unusual thing to do, but what he did next was a little different: he played that tape back, while recording it on another device. He kept doing this until all there was left was the ringing resonant frequency of the room, his voice smeared out of any recognizable sound. He called this piece I am sitting in a room, and it’s still a stunning work of sound art.
Alvin Lucier just turned 90 years old, so in recognition, I made this:
Many Happy Returns: for Alvin Lucier at 90
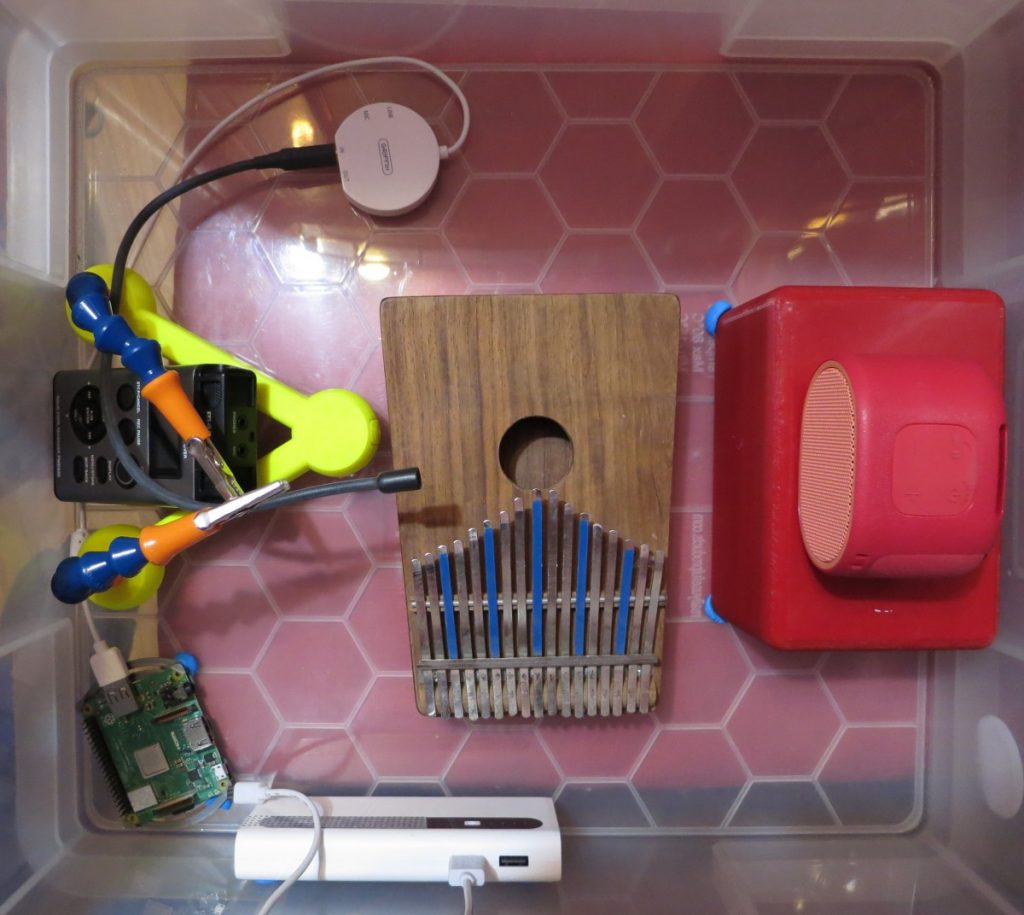
I don’t have a quiet room with two tape decks, but I do have a large plastic tote in which I can fit a whole bunch of battery-powered recording gubbins:
my studio in a box. From L to R: Raspberry Pi 3A+, backup audio recorder, microphone stand, battery pack, microphone, USB audio interface, kalimba (for added resonance) and bluetooth speaker
After setting everything up and running, I put the box on my bed and covered it with several layers of blankets to keep our noisy neighbourhood sounds out. The initial audio was made in PicoTTS, and then playback and recording were controlled over wifi and VNC. I (or more accurately, the bash script I wrote) made 90 generations of recordings. I’ve only included the first 10 due to time constraints.
What I did
I guess I’ve been lucky with whatever audio system Raspberry Pi OS is using, because it recognized and used both my ancient Griffin iMic USB microphone adapter and my Sony Bluetooth speaker as default input/output devices.
One annoyance was having to build PicoTTS from source. Raspberry Pi OS doesn’t provide packages for it, but does have the source package. Building it goes something like this: Compile Pico TTS on Raspbian. You might prefer trying flite or espeak-ng, both of which have binary packages available.
I used this script, which may be rather too specific to my particular goal:
the script creates a folder for the output files, either as specified on the command line, or if not, from the current date/time
I didn’t really know how many iterations I’d want, so I monitored occasional files by pulling them down using scp and listening. When I was satisfied, I’d create a file called STOP in the project folder that would make the loop exit
$gen0 is the name of the source recording
sox -q –norm=-3 infile outfile is a way of normalizing the audio so that it won’t clip
We start the recording in the background (arecord … &) and immediately grab its process ID using $!. This allows us to stop the recording using kill after the audio file has played. arecord doesn’t update the file header when a process is stopped like this, so sox will complain quietly every time
The sleep 0.5 after aplay is to prevent the recording cutting off. Both aplay and sox/play seem to exit as soon as the last block of audio data has been sent to the audio device, and not when the sound has stopped playing. This means you have to edit out increasingly longer gaps from your recordings, but at least you get everything.
What I’d do differently next time
Probably not used a Bluetooth speaker. Sure, they’re self-powered and you can’t complain about the number of wires, but they’re noisy and low quality
Done more work on the microphone interface. The pair of binaural mics I used to use with the Griffin interface (it’s stereo, unlike most USB interfaces) had a dead channel, so I had to fish around for other microphones. Somewhere I have a nice microphone from a Sony Pro Walkman, and I should have used that
Maybe considered a band-pass filter to cut the very high frequency ringing. Yes, I know the whole point of I am sitting in a room is to capture the room dynamics, but when you’re recording in a tiny space with very hard walls, the dynamics take over almost too quickly to be interesting
Spent more time on playback and record levels beyond the “hey, it works!” settings I used here
Used a higher bitrate recording. This might have resulted in more wolf-tones and ringing, though.
Northern Mockingbird (Mimus polyglottos) recorded at Centennial College Ashtonbee campus parking lot near Wexford Woods, 07:52 2020-04-13 (rain, handheld phone, noise filtered)
I went out for a very soggy bike ride this morning just to get out of the house. There were a few more people out than I expected, as it’s a regular work day for most people in Ontario. COVID-19 meant that most workplaces were shuttered.
Splashing through the puddles at Centennial College’s deserted Ashtonbee campus (round about here, if you need a precise location) I heard this mockingbird giving its very best performance. I only got a little over a minute of it, but in that time there was some American Robin, Gull, hawk of some kind and best of all (starting just after 40 s) caralarm.
Centennial’s got a big automotive section, and the empty parking lot’s usually full of cars. Mimus was just repeating what it usually heard. I wonder how long they’ll remember and replay car alarms after we’re gone?
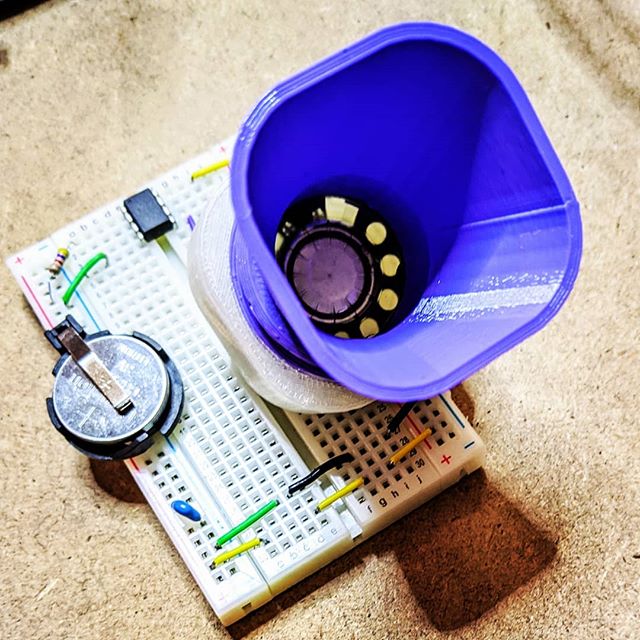
Six whole tunes ready to play on this tiny chiptune player; a couple are included at the end of this article!
I love the ingenuity that goes into making very tiny projects do very big things. I also love chiptunes. So when I read the metafilter post about PROTODOME’s compositions for the ATtiny85, I was very much there for it.
The circuit to play this is no more than a $2 microcontroller, a lithium coin cell and a speaker or piezo buzzer. The microcontroller has 8 KB of program space and 512 bytes of RAM. The output is a single pin, but with very clever pulse width modulation tricks, sounds like three channels plus percussion.
I remembered I had bought a tube of ATtiny microcontrollers a while back. I knew I had a coin cell and tiny speaker. “I can do this!”, I thought.
So what follows is tutorial on compiling embedded code for an ATtiny85 microcontroller on Linux. There are larger tutorials out there, there are better tutorials: but there are also many out-of-date and misleading tutorials. This isn’t a general ATtiny development tutorial, but one specialized on getting PROTODOME’s tunes playing on your microcontroller.
Hardware
The very minimum you will need to play the music is:
a prototyping breadboard. Half size with power rails
a tiny speaker or piezo buzzer. Either will do, and will be pretty quiet — you’re not getting room-filling fidelity out of this project. I used a 28 mm headphone driver I got surplus years ago. The snazzy speaker horn in the picture above is designed to fit this and not much else, alas.
a battery and battery holder. Pretty much anything from 3–5 V will do. I used a CR2032 coin cell in a simple holder to feed 3.2 V to the circuit: SparkFun Coin Cell Battery Holder – 20mm (PTH). Note you’ll need a battery and something to connect it to the breadboard.
a 10 kΩ or higher resistor is highly recommended. All this does is prevent the chip resetting accidentally. Value is not important: I’ve been using a 4.7 kΩone without problem. These are so generic I’m not going to list suppliers (along with the rest of the parts on this list)
a 10 nF ceramic capacitor, while optional, likely makes the power into the µc a tiny bit smoother
jumper wires to connect everything up.
But that’s not all: you’ll need much more kit to program these tiny chips:
a computer running Linux. Yes, you can do this under Windows and Mac OS, but I don’t know how and there are search engines that care about that more than I do. I tested all of this on a Raspberry Pi 4. Tablets and phones are out, sorry
There are two separate toolchains involved — one to build the mmml-compiler to convert PROTODOME’s compositions to µc embedded C code, and another to compile that to ATtiny85 instructions. We can install it all in one go:
git clone https://github.com/protodomemusic/mmml.git
cd mmml/mmml-compiler
gcc -o mmml-compiler mmml-compiler.c
You can then run the compiler on each of the songs; the album title track, for example:
cd ../demo-songs/4000ad/
../../mmml-compiler/mmml-compiler 4000ad.mmml
⚠️ If you get [ERROR 14] Too few channels stated! instead of Successfully compiled! it seems that the compiler isn’t too happy running on some 64-bit systems. I did all my compilation on a Raspberry Pi 4 running Raspbian and all was well. If you can’t get them to compile, I’ve pre-compiled them for you and they’re at the end of this article. (Update: this has been fixed. If you still have the problem, are you running old code?)
You should now have a musicdata.h file that contains all the tune data. Copy it to the same folder as the mmml-player C code:
cp musicdata.h ../../mmml-player/
cd ../../mmml-player/
That folder now contains the player and one tune data file. Now you need to compile it into AVR instruction to write to your chip:
The end result of what that just did is create a single small file mmml.hex containing the ATtiny85 program instructions for the 8+ minute track 4000AD. If you’re compiling for a different µc, you’ll need a different avr-gcc line:
-mmcu=attiny85 will need to be changed for your µc. avr-gcc –target-help lists the supported targets in the “Known MCU names” section way up at the top of its too-copious output. If you’re using the ATmega32P chip made popular by Arduinos, that option should be -mmcu=atmega328p
-DF_CPU=8000000 tells the compiler that the CPU frequency should be 8 MHz. The AVR µcs can run at a huge range of speeds, but PROTODOME’s music is timed to work at 8 MHz only.
→→→ aside
If you find yourself compiling a few simple AVR projects but want to stop short of a fine-but-overly-complex Makefile project for AVR development, this script to create a hex file from a single embedded C source file might be useful:
In addition to creating a hex file, it also runs the avr-size tool to show you much memory your program uses. The 4000AD tune uses 98% of the ATtiny85’s 8192 byte program space — not quite enough to include that 14 minute extra bass solo, sorry …
←←← end aside
Flashing the chip
So now we do some wiring. If you’re using a dedicated programmer, use jumpers to connect its ICSP port to the ATtiny 85 like this:
                        ________
                       |o   A   |
               Reset  -+ 1  T  8+-  VCC
                       |    t   |
                      -+ 2  i  7+-  SCK
                       |    n   |
                      -+ 3  y  6+-  MISO
                       |    8   |
               GND    -+ 4  5  5+-  MOSI
                       |________|


                 MISO    o1 2o   VCC
                 SCK     o3 4o   MOSI
                 Reset   o5 6o   GND

                          ICSP
                        Connector
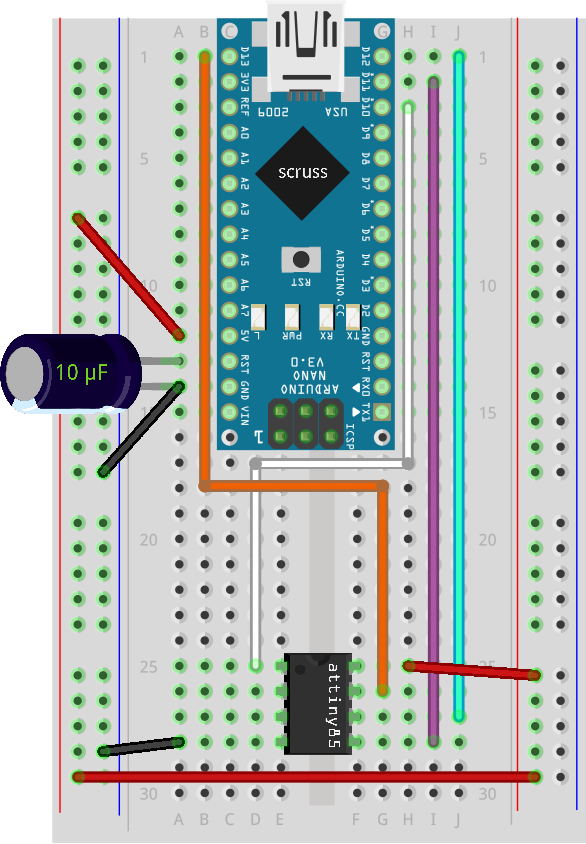
Wire VCC to VCC, MISO to MISO, MOSI to MOSI, SCK to SCK, Reset to Reset and GND to GND. If you’re using an Arduino, you want to do this:
This is “OLD_STYLE_WIRING” for using ArduinoISP, apparently. But it works!
The wiring for that is:
Arduino D10 → ATtiny Pin 1 (Reset)
Arduino GND → ATtiny Pin 4 (GND)
Arduino D11 → ATtiny Pin 5 (MOSI)
Arduino D12 → ATtiny Pin 6 (MISO)
Arduino D13 → ATtiny Pin 7 (SCK)
Arduino 5V → ATtiny Pin 8 (VCC)
You’ll also need to put a 1-10 µF electrolytic capacitor between the Arduino’s Reset and GND pins, but only after you’ve programmed it with the ArduinoISP sketch.
You’re almost there!
Setting up the programmer: USBtinyISP
If you haven’t used one with your computer before, you need to do a little bit of prep so your computer recognizes it. These are modified from a gist:
do sudo vi /etc/udev/rules.d/41-usbtiny.rules
add the line SUBSYSTEM=="usb", ATTR{idVendor}=="1781", ATTR{idProduct}=="0c9f", GROUP="plugdev", MODE="0666"
save and exit
do sudo udevadm control --reload then sudo udevadm trigger
Your system should automatically recognize the device and give you permission to use it without sudo privileges.
Setting up the programmer: ArduinoISP
Load the ArduinoISP sketch (it’s in File → Examples)
Add (or find and uncomment) the line #define USE_OLD_STYLE_WIRING
Upload the code to your Arduino
Connect the 1-10 µF electrolytic capacitor between the Arduino’s Reset and GND pins
To program the mmml.hex you created earlier, you’ll need one of these avrdude commands:
-c usbtiny or -c arduino: programmer type. In addition, the arduino programmer takes additional parameters -P /dev/ttyUSB0 -b 19200 which specify the port (usually /dev/ttyUSB0 or /dev/ttyACM0) and the baud rate (always 19200, unless you changed it in the source of ArduinoISP)
-p attiny85: the chip type, as used in the avr-gcc compiler call way up the top
-U lfuse:w:0xe2:m -U hfuse:w:0xdf:m -U efuse:w:0xff:m: fuses are AVR’s confusing name for configuration bits. You might just have to take my word that this sets an ATtiny85 to use the internal 8 MHz oscillator (as opposed to an external crystal) we told the compiler to use further back. A guide to fuse settings is available at the Engbedded AVR Fuse Calculator
-U flash:w:mmml.hex:i: the hex file we prepared, mmml.hex.
If everything went right with your flashing process, you should see lots of “avrdude: verifying … done. Thank you”. If you don’t, likely you missed a connection somewhere.
♫ Playing the tunes! ♫
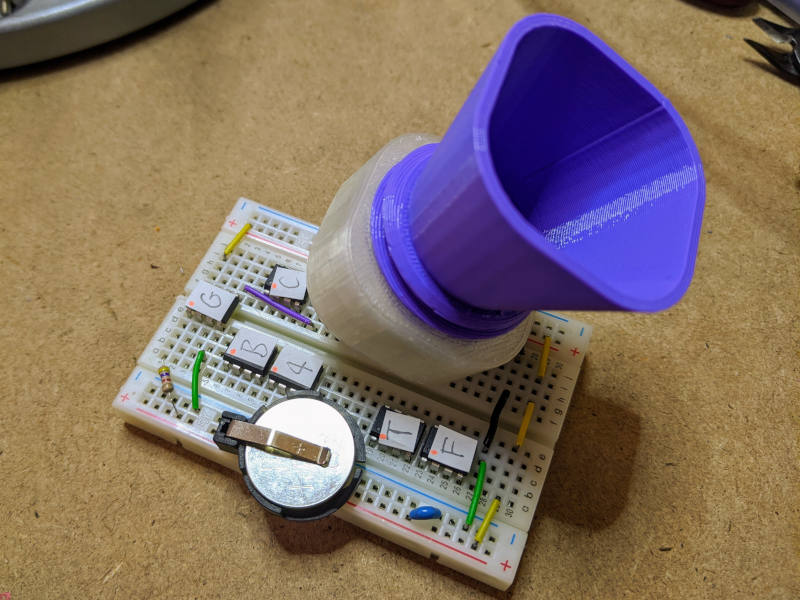
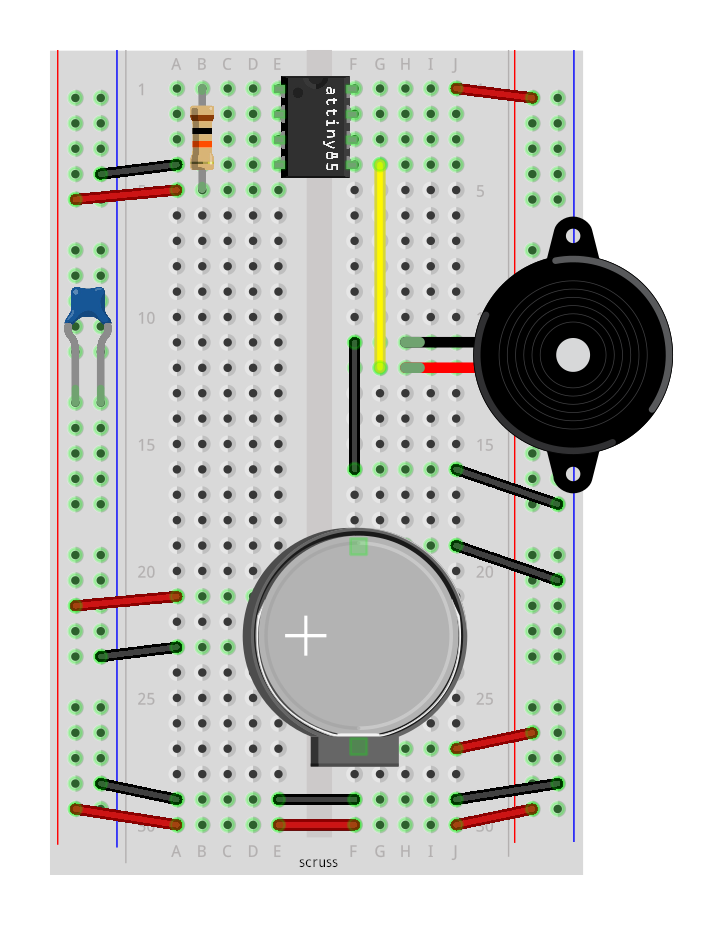
This circuit’s a lot simpler than it looks!
I already described all of the bits in the bill of materials in the Hardware section. If you want it in ASCII art, here’s all there is to it:
                        ________
                       |o   A   |
          VCC--(10kΩ)--+ 1  T  8+--VCC
                       |    t   |
                      -+ 2  i  7+-
                       |    n   |
                      -+ 3  y  6+-      (
                       |    8   |      ((
                  GND--+ 4  5  5+--(SPKR(--GND
                       |________|      ((
                                        (

          Pin 1: RST - held high through pull-up to prevent reset
          Pin 4: GND
          Pin 5: PB0 - through speaker/buzzer to GND
          Pin 8: VCC - can be a CR2032 Lithium coin cell

          Not shown: 100 nF decoupling capacitor between VCC and GND
          Short Pin 1 to GND to restart song
If you weren’t able to compile the tunes, I’ve included (with Blake’s permission) source for any AVR µc plus hex files for ATtiny85s here: protodome-mmml-examples.zip
Last but not least, there are a couple of tracks included in the source that aren’t on the 4000AD album. Blake gave me permission to include them here, too:
Fly Me to the Moon by Bart Howard, arranged for ATtiny85 microcontroller by PROTODOME, 2020. Download: fly_me_to_the_moon.mp3Till There was You by Meredith Willson (from the musical ‘The Music Man’), arranged for ATtiny85 microcontroller by PROTODOME, 2020. Download: till_there_was_you.mp3
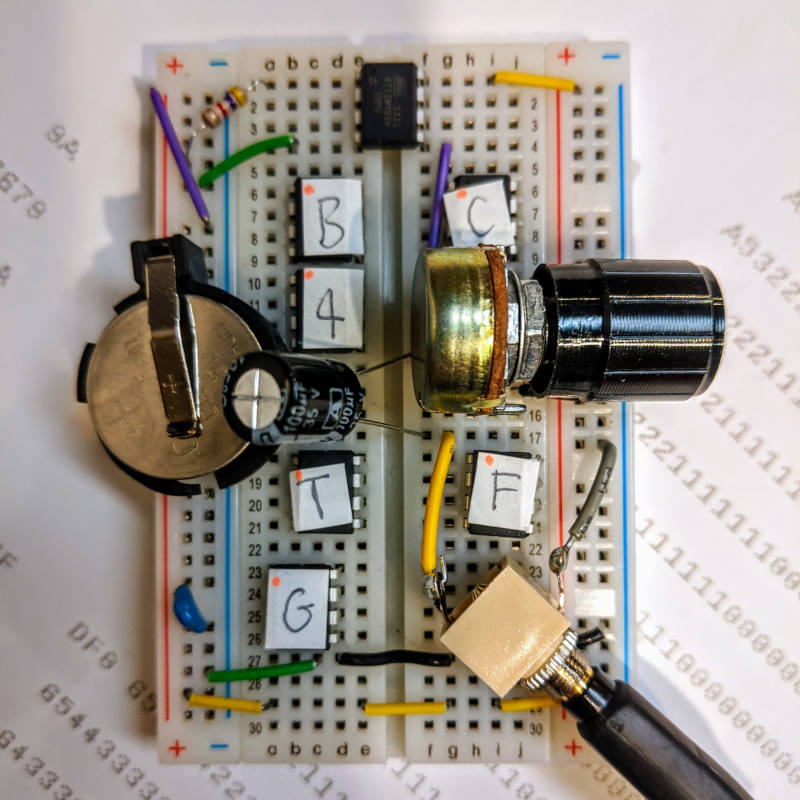
These weren’t recorded from a tiny speaker (that went badly), but directly to a Marantz solid state recorder. The rig’s the same as the playback one, with the speaker replaced by a potentiometer (for level control), a 100 µF capacitor (to take off some of the DC bias and also to cut some of the very high frequencies) and a headphone socket. Have fun!
This guy sets up on the SE corner of Yonge & St Clair most afternoons, and plays endless variations on the above recording. He’s playing an autoharp with the chord bars removed, and run through a homebrew battery-powered amplifier with much reverb and distortion. A bunch of the burbly noises are 8kbit/s voice recorder artifacts from my phone.
Although the themes seem repetitive, I don’t think they repeat exactly every time. He seems to be in a happy place playing them.
If you go to the Incompetech Multi-Color Graph Paper PDF Generator and set the grid spacing to 0.4, 0.8 and 4 lines/cm, you get a nifty HP-GL unit grid with major lines at 1000 units (25 mm), intermediate lines at 500 units (12½ mm) and minor lines at 100 units (2½ mm):
By a very roundabout route, I used GDAL’s simplify function to half the line count of my hypotrochoid plots with little visible degradation. The optimised page took far less time to plot:
Next time, I’d definitely use Shapely instead of messing about with GIS formats. Who knows, I might even integrate it into Chiplotle. Eventually. (Update: though I have some code that does something …)
Plotters are resolutely electromechanical devices. They turn digital command into analogue output, but my one never sounds too happy doing it. It grumbles, sighs and even moos as it plots. A recent plot sounded a bit like this: .
The Raspberry Pi’s hardware and software support has come a long way in the few months it has been in the wild. I first tried this application in the summer, and the results were dismal. Now, thanks much improved USB driver support under Raspbian, I’m pleased to say it works flawlessly.
Earlier this year, I bought a turntable (ack!) for transferring vinyl to mp3. I have a TC-772 USB phono preamp, which spits out a 48 kHz stereo audio stream. If you plug the USB output of the preamp into a Rapberry Pi (running Raspbian Wheezy with all the updates), it’s instantly recognized as an audio device:
$ lsusb
Bus 001 Device 001: ID 1d6b:0002 Linux Foundation 2.0 root hub
Bus 001 Device 002: ID 0424:9512 Standard Microsystems Corp.
Bus 001 Device 003: ID 0424:ec00 Standard Microsystems Corp.
Bus 001 Device 004: ID 08bb:2902 Texas Instruments Japan PCM2902 Audio Codec
If you install the ALSA recording utilities (sudo apt-get install alsa-utils pulseaudio – this should pull in a whole bunch of necessary packages), you can record directly from this device with the following command:
which records from the ‘pulse’ audio device, displaying a stereo text VU meter (handy for setting levels), writing to a two channel 16-bit 48 kHz file called ‘out.wav’ for a maximum of 900 seconds (15 minutes). arecord has a baffling number of recording source options; arecord -L will show them. ‘pulse’ was the first one I tried.
So how does it sound? Here’s a 30 second excerpt from the only single I owned for years, The Music Tapes‘ “The Television Tells Us/Freeing Song by Reindeer”: Freeing Song by Reindeer – excerpt [mp3]. I’ve saved an even smaller snippet as lossless FLAC so you can see that the waveform’s pretty clean: FreeingSongbyReindeer-tiny_excerpt [flac].
That’s the rapid clatter of chopping up Kothu Roti at Amma at the end of our street. You know that tasty spicy food is imminent when you hear that sound. I’m really pleased that Amma’s back under the original management. The other proprietors just didn’t care as much about their food.
Very little urban hum this morning (holiday), and the air conditioners really hadn’t started yet, so please be amused by the sounds of the garden (featuring mostly mockingbird): about quarter to nine. It does a passable seagull and also a red-tailed hawk. The vehicle reversing sound, though, is real.
I’m either getting old or conventional, ‘cos I bought something I said I would never have enough time or space for: a turntable. I won’t forsake my beloved MP3s, but there are somethings you just can’t get electronically. One of them being the 1981 Stampfel & Weber album “Going Nowhere Fast”, which I snagged from Etsy from a west coast seller.
I bought an elderly Technics from Ring Audio, and set it up with a USB phono preamp from Phonopreamps.com. It sounds good, I guess. It certainly sounds different from MP3s, but better …? Dunno. My two cynical theories hypotheses of vinyl snobbery are:
The more you have invested in your system, the more confirmation bias tells you it sounds better.
Vinyl is the record industry’s last-gasp attempt attempt at relevancy, because you can’t home-cut your own discs. As there’s always analogue loss in ripping from vinyl, it’s self-policed rights management by the sound quality snobs. Imagine that: DRM conditioned into the listeners themselves!
I have not got a lot of records:
Albums
Going Nowhere Fast — Stampfel & Weber
The Holy Modal Rounders
The Holy Modal Rounders 2 (are you sensing a pattern here?)
The Television Tells Us / Freeing Song by Reindeer — The Music Tapes (Julian sent me this in 1998, and I think this is the first time I’ve played it. For a few days, it was the only record I had, and it was merciful that Catherine was away, as she only has a normal human tolerance for this sort of thing)
Ghetto Kitty Island Split 7″ – featuring Chicken on a Raft, Of Montreal, Bart Davenport and The Minders.
Speaking of which, I understand that the latter EP is not exactly widely known, is totes OOP, and completists might dig Of Montreal‘s â€Epistle to a Pathological Creep (demo)â€, so here it is ripped for your listening pleasure:
I recorded it with arecord, and edited it with Audacity. The arecord command line (more for my reference than your interest) was:


")