Tag: mmbasic

  • Adding speech to MMBasic

    Yup, it’s another “let’s wire up a SYN6988 board” thing, this time for MMBasic running on the Armmite STM32F407 Module (aka ‘Armmite F4’). This board is also known as the BLACK_F407VE, which also makes a nice little MicroPython platform.

    Uh, let’s not dwell too much on how the SYN6988 seems to parse 19:51 as “91 minutes to 20” …

    Wiring

    SYN6988Armmite F4
    RXPA09 (COM1 TX)
    TXPA10 (COM1 RX)
    RDYPA08
    your choice of 3.3 V and GND connections, of course

    Where to buy: AliExpress — KAIKAI Electronics Wholesale Store : High-end Speech Synthesis Module Chinese/English Speech Synthesis XFS5152 Real Pronunciation TTS

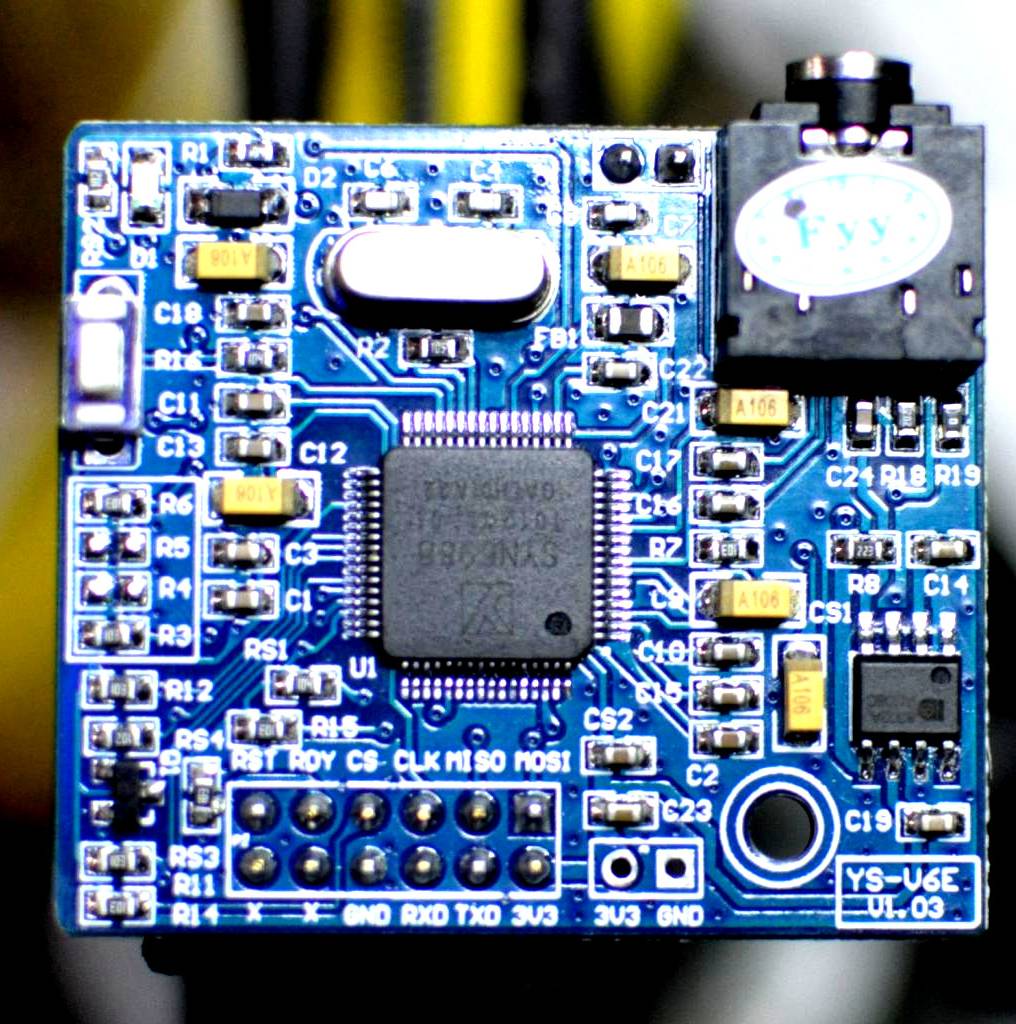
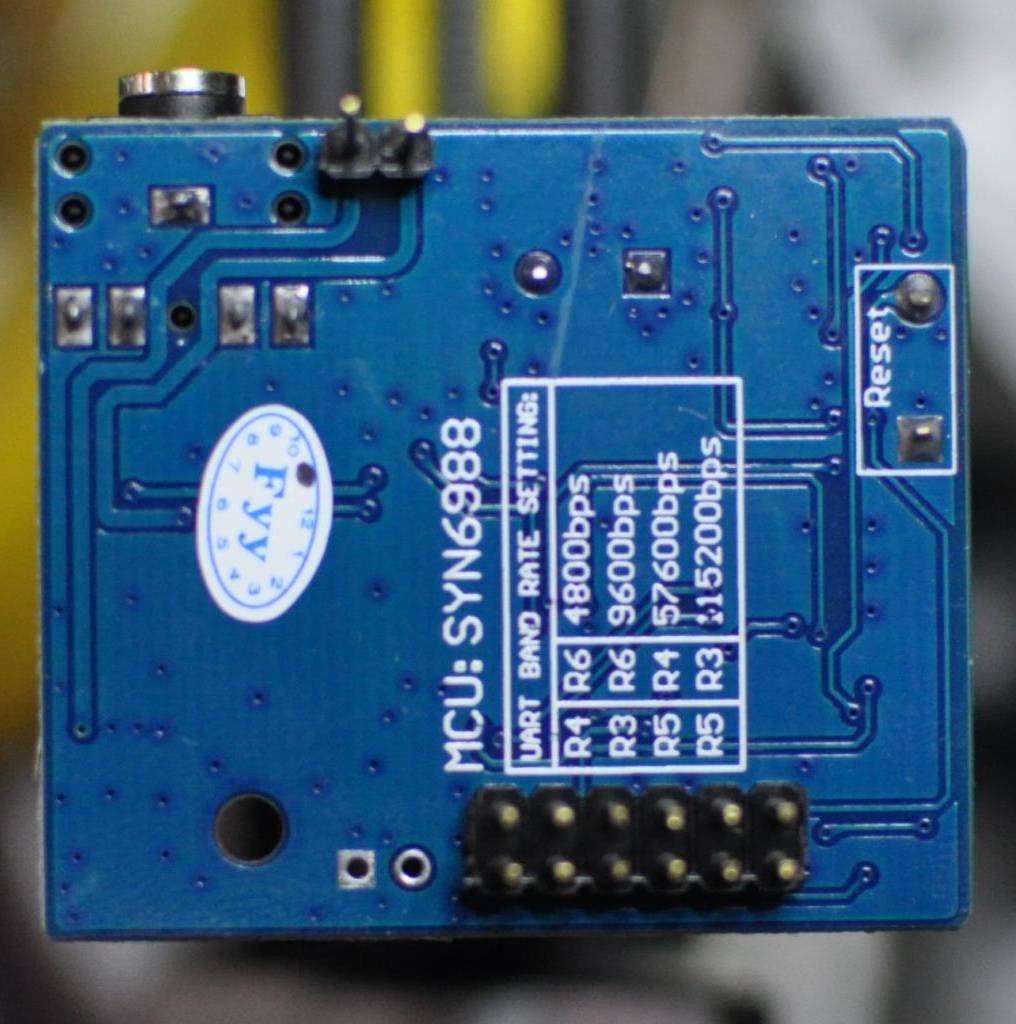
    Yes, I know it says it’s an XFS5152, but I got a SYN6988 and it seems to be about as reliable a source as one can find. The board is marked YS-V6E-V1.03, and even mentions SYN6988 on the rear silkscreen:

    Code

    REM                 SYN6988 speech demo - MMBasic / Armmite F4
    REM                 scruss, 2023-07
    
    OPEN "COM1:9600" AS #5
    REM                 READY line on PA8
    SETPIN PA8, DIN, PULLUP
    
    REM    you can ignore font/text commands
    CLS
    FONT 1
    TEXT 0,15,"[v1]Hello - this is a speech demo."
    say("[v1]Hello - this is a speech demo.")
    TEXT 0,30,"[x1]soundy[d]"
    say("[x1]soundy[d]"): REM    chimes
    TEXT 0,45,"The time is "+LEFT$(TIME$,5)+"."
    say("The time is "+LEFT$(TIME$,5)+".")
    END
    
    SUB say(a$)
      LOCAL dl%,maxlof%
      REM     data length is text length + 2 (for the 1 and 0 bytes)
      dl%=2+LEN(a$)
      maxlof%=LOF(#5)
      REM     SYN6988 simple data packet
      REM      byte  1 : &HFD
      REM      byte  2 : data length (high byte)
      REM      byte  3 : data length (low byte)
      REM      byte  4 : &H01
      REM      byte  5 : &H00
      REM      bytes 6-: ASCII string data
      PRINT #5, CHR$(&hFD)+CHR$(dl%\256)+CHR$(dl% MOD 256)+CHR$(1)+CHR$(0)+a$;
      DO WHILE LOF(#5)<maxlof%
      REM       pause while sending text
        PAUSE 5
      LOOP
      DO WHILE PIN(PA8)<>1
        REM       wait until RDY is high
        PAUSE 5
      LOOP
      DO WHILE PIN(PA8)<>0
        REM       wait until SYN6988 signals READY
        PAUSE 5
      LOOP
    END SUB
    

    For more commands, please see Embedded text commands

    Heres the auto-translated manual for the SYN6988:

  • Autumn in Canada: PicoMite version

    Autumn in Canada: PicoMite version

    So I ported autumn in canada from OpenProcessing to PicoMite BASIC on the Raspberry Pi Pico:

    a small black screen images with text in the centre: autumn in canada scruss, 2021-11 just watch ...
    no leaves
    a small black screen images with text in the centre: autumn in canada scruss, 2021-11 just watch ... with one red and one orange maple leaf sitting on top of it
    a couple of leaves
    a small black screen images with text in the centre: autumn in canada scruss, 2021-11 just watch ... with four red/yellow/orange maple leaves sitting on top of it
    more leaves
    a small black screen images with text in the centre: autumn in canada scruss, 2021-11 just watch ... with sixteen simulated fallen maple leaves mostly covering it
    plenty of leaves
    a small black screen image completely covered with many simulated fallen maple leaves
    far too many leaves

    The biggest thing that tripped me up was that PicoMite BASIC starts arrays at 0. OPTION BASE 1 fixes that oversight. It would have been nice to have OpenProcessing’s HSV colour space, and an editor that could handle lines longer than 80 characters that didn’t threaten to bomb out if you hit the End key, but it’ll serve.

    Source below:

    ' autumn in canada
    ' scruss, 2021-11
    ' a take on my https://openprocessing.org/sketch/995420 for picomite
    
    OPTION base 1
    RANDOMIZE TIMER
    ' *** initialize polar coords of leaf polygon and colour array
    DIM leaf_rad(24), leaf_ang(24), px%(24), py%(24)
    FOR i=1 TO 24
        READ leaf_rad(i)
    NEXT i
    FOR i=1 TO 24
        READ x
        leaf_ang(i)=RAD(x)
    NEXT i
    
    DIM integer c%(8)
    FOR i=1 TO 8
        READ r%, g%, b%
        c%(i)=RGB(r%,g%,b%)
    NEXT i
    
    ' *** set up some limits
    min_scale%=INT(MIN(MM.HRES, MM.VRES)/8)
    max_scale%=INT(MIN(MM.HRES, MM.VRES)/6)
    min_angle=-30
    max_angle=30
    min_x%=min_scale%
    min_y%=min_x%
    max_x%=MM.HRES - min_x%
    max_y%=MM.VRES - min_y%
    
    CLS
    TEXT MM.HRES/2, INT(MM.VRES/3), "autumn in canada", "CM"
    TEXT MM.HRES/2, INT(MM.VRES/2), "scruss, 2021-11", "CM"
    TEXT MM.HRES/2, INT(2*MM.VRES/3), "just watch ...", "CM"
    
    kt%=0
    DO
        cx% = min_x% + INT(RND * (max_x% - min_x%))
        cy% = min_y% + INT(RND * (max_y% - min_y%))
        angle = min_angle + RND * (max_angle - min_angle)
        sc% = min_scale% + INT(RND * (max_scale% - min_scale%))
        col% = 1 + INT(RND * 7)
        leaf cx%, cy%, sc%, angle, c%(7), c%(col%)
        kt% = kt% + 1
    LOOP UNTIL kt% >= 1024
    
    END
    
    SUB leaf x%, y%, scale%, angle, outline%, fill%
        FOR i=1 TO 24
            px%(i) = INT(x% + scale% * leaf_rad(i) * COS(RAD(angle)+leaf_ang(i)))
            py%(i) = INT(y% - scale% * leaf_rad(i) * SIN(RAD(angle)+leaf_ang(i)))
        NEXT i
        POLYGON 24, px%(), py%(), outline%, fill%
    END SUB
    
    ' radii
    DATA 0.536, 0.744, 0.608, 0.850, 0.719
    DATA 0.836, 0.565, 0.589, 0.211, 0.660, 0.515
    DATA 0.801, 0.515, 0.660, 0.211, 0.589, 0.565
    DATA 0.836, 0.719, 0.850, 0.608, 0.744, 0.536, 1.000
    ' angles
    DATA 270.000, 307.249, 312.110, 353.267, 356.540
    DATA 16.530, 18.774, 33.215, 3.497, 60.659, 72.514
    DATA 90.000, 107.486, 119.341, 176.503, 146.785, 161.226
    DATA 163.470, 183.460, 186.733, 227.890, 232.751, 270.000, 270.000
    ' leaf colours
    DATA 255,0,0, 255,36,0, 255,72,0, 255,109,0
    DATA 255,145,0, 255,182,0, 255,218,0, 255,255,0
    

    You could probably use AUTOSAVE and paste the text into the PicoMite REPL. I used an ILI9341 SPI TFT LCD Touch Panel with my Raspberry Pi Pico along with some rather messy breadboard wiring.

    Fun fact: the maple leaf polygon points are derived from the official definition of the flag of Canada.