Blog

  • Canada’s longest running radio program is wrong!

    Rob Cruickshank noted the other day:

    https://twitter.com/robcruickshank/status/1504142948039987200

    Naturally, I had to verify this. So I tuned to the WWV 10 MHz time signal on my amateur rig, tuned a portable radio to CBC Radio 1 FM, which broadcasts on 99.1 MHz in Toronto and recorded them together:

    Noisy recording of two radios. The WWV 13:00:00 EDT tone is at roughly 9 seconds, and the NRC tone broadcast by CBC is at 19 seconds

    Yup: Rob’s right – CBC is broadcasting the NRC 13:00:00 signal at 13:00:10, which for time nerds might as well be the change from Julian to the Gregorian calendar.

    Waveform from Audacity showing a low tone at 9s recorded from WWV, and CBC's long beep coming at 19 seconds
    Annotated waveform: the CBC long beep is ten seconds after the WWV tone

    This recording was made directly from the airwaves. There should be effectively no difference between the signal broadcast times, but here we are with the “National Research Council official time signal” going out at a very wrong time indeed.

    Update, October 2023: Well, CBC has noticed, and rather than trying to fix it, they’re going to end it: The end of the long dash: CBC stops broadcasting official time signal | CBC News

  • Adding RGB LEDs to an illuminated arcade button

    Somewhat painterly view of the button doing its thing. The weird clunking sound is my camera’s continuous focus. For a clearer but more flickery view, see here

    Following on from a customer query at Elmwood Electronics, I can confirm that one can install install addressable RGB LEDs/NeoPixels inside one of these large buttons. It’s not the easiest build, so whether one should attempt this is another matter entirely.

    You’ll need:

    • Large Arcade Button with LED – 60 mm White (tall version) – this is larger and more domed than the flat-top one that Adafruit sells
    • RGB LEDs – I used a generic 8 LED ring, but anything not too tall and under 45 mm in diameter should fit. Either a 7 X WS2812 5050 RGB LED Ring or Adafruit’s NeoPixel Ring – 12 x WS2812 5050 RGB LED with Integrated Drivers could also work
    • Thin (and I mean thin: I used 28 AWG) Silicone Cover Stranded-Core Wire in several colours. You’ll want to cut this quite long at first, as you have to ease it through some tiny holes in the button assembly. If you solder connectors on the end, you won’t be able to disassemble or install the button without cutting them off. Do I speak from experience here? You betcha!
    • The usual soldering/hot gluing/bending/prying/grabbing/cutting tools you already know and love. In addition, you might consider a non-marring spudger and a pair of small(ish) arterial forceps (aka hemostats, aka Kelly forceps, aka fishing hook removal pliers)

    I’m not going to cover soldering the wires to the LED PCB in any depth here. You’ll need three wires: 5 V power, Ground and Data. Even though the LEDs I used need 5 V power, they are quite happy with 3.3 V logic on the data line. They need more than 3.3 V power to light, though.

    a large arcade machine style button on the left: it has a clear domed top and a threaded base. On the right is the combined microswitch and LED holder that fits into the button base
    The button in two pieces, as you might expect to receive it
    the top of the button disassembled into its main parts: bezel ring at top left, threaded lock ring at bottom, and main button mechanism. The mechanism is upside down, so the return spring and button actuators can be seen inside the threaded shaft
    Main parts of the button top, once you’ve removed the lock ring
    Close up of inside the shaft: return spring and its retainer tabs, and button actuators can be seen
    First step is to ease the spring out without bending it too much or breaking the retainer tabs
    Close up of inside the shaft: the tips of a pair of forceps have eased the top of the spring past its retainers
    I used small forceps to ease the spring out. Once you get it started, it unscrews easily from behind the retainers
    Close up of inside the shaft: the button actuators have been pushed down the shaft, allowing the top of the button to be pulled out
    Now the spring is out the way, you can squeeze in the actuator tabs and push them down the shaft to liberate the button top
    button top components arranged: black threaded button base on left, return spring in the middle, and domed clear top with white underside and white actuators sticking down
    The button top disassembled
    clear button top attached to its white underside. A blunt metal tool (spudger) is pointed at the push-fit join between the two parts
    Carefully lever off the clear top with a blunt tool like a spudger. Now would have been a great time to clean dust and other wee bits off your workspace, as they’ll surely end up inside the button, looking nasty
    clear button top separated from its white base. A translucent white diffuser is inside the clear top. The white base has a hollow centre and a circular cavity
    The button top opened up. The cavity is about 45 mm in diameter and only a few millimetres deep
    The microswitch with the LED holder attached on top. The blade of a blunt metal spudger is inserted under a plastic tab that holds the LED holder onto the switch
    Removing the LED holder from the microswitch is done by levering open (gently) the plastic tab that clamps the holder onto the switch.
    the LED holder at left, and the bare microswitch. The LED holder has an LED in a white plastic retainer, and below it two spade contacts. The switch has three spade connectors: Com(mon) on the base, and "NO 3" (Normally Open) and "NC 2" on the right side. Normal operation connects COM and NO
    LED holder and microswitch separated. For normal button operation, the contacts NO and COM become connected when the button is pressed. The spade contacts on the LED holder look like they should come out, and they will (soon)
    LED holder disassembled into two parts. The black LED holder base is on the left, with the two conenctor clips slightly blurry at top. On the right is the LED in its white support, pulled out of the holder base
    Pull the LED out from the holder, and you’ll see the metal clips that held it in place. These clips have to come out: I found the pushing them in slightly while pulling down on the spade connector eased them out eventually
    White button top underside with an 8 RGB LED ring hot glued into it. Three thin insulated wires (from top: yellow (data), red (5 V) and black (GND)) are previously soldered behind the LED board, and are secured against strain with a large deposit of hot glue
    LED ring hot glued into place. Make sure that the wires are properly secured, as you don’t want to take this apart again
    threaded button base with clear top fitted, seen from underneath. The white button actuators have been pushed back into place, and the three coloured wires are feeding through the hole in the shaft. The return spring is outside the wires, and is being fitted around the retainers inside the shaft
    Fit the clear button top back inside the base, feeding the wires through the shaft. Fitting the return spring back in is a bit more chaotic than getting it out. I ended up jamming it in with forceps, and it seemed to sort out okay despite that
    underside of the button shaft, with microswitch attached to LED holder. The wires coming from the LED ring inside the button top have been fed through the small cavities where the original LED holder clips/contacts have been removed. The red/black power wires are on the side towards us, while the yellow data wire is behind the microswitch
    The really fiddly bit: feeding the wires through the tiny gaps where the LED holder clips/contacts used to be. Even using thin (28 AWG) silicone covered wire, all three wires couldn’t fit down one side. Make sure the wires are pulled gently through, and aren’t snagged anywhere
    Fully reassembled button, with microswitch installed into its bayonet connector in the threaded shaft, and the button actuator lined up with the microswitch lever on the left. The yellow data wire is in front of the microswitch at bottom
    Finished! Make sure that the switch actuates properly by lining up the LED holder in the bayonets inside the shaft. Of course, you’ll have wanted to install the button in your project before doing this assembly, as you’ll have to feed those pesky wires back through again if you haven’t …
  • you can colour this in if you want to

    lattice of intersecting squares on diagonals
    Jali pattern, as noted from the sleeve of Garifulla Kurmangaliyev’s recording of Asylzhan (Kazakhstan, 1958) in “Excavated Shellac: An Alternate History of the World’s Music” notes, p.173

    PDF, too, if you like such things: record_label_jali.pdf. Made with OpenSCAD.

  • More Magic Designer Nonsense

    This is what I simulated earlier – except drawn on a real Magic Designer. Something’s off with what I modelled …
    All of these are drawn with the Magic Designer angle set to 57, which puts the crank discs exactly in phase. The blue circle in the middle is an exactly image of a crank disc, if perhaps a very dull plot.
  • Slightly imperfect Hoot-Nanny/Magic Designer simulation

    round figure with three interlaced 6-fold curves picked out in red, green and blue
    I even emulated the locating notches at the edge of the paper …

    Simulated (and not quite right yet) output from a “HOOT-NANNY” or Magic Designer, a proto-Spirograph toy that drew six-sided curves on round paper sheets. It was made by Howard B. Jones and Co. of Chicago, IL and first sold in 1929. The company’s better known for producing Jones Plugs and Sockets, sometimes known as Cinch-Jones connectors. The “HOOT-NANNY” name was dropped when production moved to the Northern Signal Company of Saukville, WI.

    My eBay-acquired Magic Designer is quite beaten up, and doesn’t always produce accurate results. Here’s how one should look, from the instruction pamphlet:

    diagram of the Magic Designer toy: central turntable holding paper is rotated by crank at bottom right. On the left are two crank discs (upper and lower) each with a crank pin that can fit into holes along two arms. These arms are joined at a pivot, and in the centre of this pivot is a pencil.

The upper crank disc can be moved in an arc relative to the lower disc. This is controlled by a locking shift lever on the right
    I can’t shake the feeling this was originally something like an artillery ranging tool or suchlike

    As far as I’ve been able to work out, the parameters of the machine are:

    • central turntable is 6″ in diameter, with 192 gear teeth around the edge;
    • (paper diameter is 5¾”);
    • each crank disc is 1″ diameter (32 teeth), with the crank pin at ⅜” radius;
    • the handle can only be turned clockwise. Consequently, the turntable can only turn anticlockwise;
    • fixed pins at 90° and 180° are 6½” apart;
    • distance between handle centre and fixed crank centre is 5″ on a 7″ PCD. Handle is therefore at ~225.585° and fixed crank at ~134.415°
    • the shift lever has a 10-70° scale, which corresponds to moving the upper crank disc between 30-90° of arc from the lower (fixed) crank disc;
    • the pencil arms have 18 holes labelled A to R, at ¼” spacing from 5¾ to 1½”. The perpendicular distance from the pivot holes to the pencil is 5/16″. This small offset makes very little difference to the overall arm length.

    If we model the toy with a fixed turntable:

    • the crank pins describe epitrochoids around the edge of the paper;
    • the pencil point traces the intersection of two circles of radius the lengths of the pencil arms, each centred on a crank pin.

    Here’s a very simple model in Python that emits a hard-coded (but editable) pattern in HP-GL: Slightly imperfect Python simulation of the “HOOT-NANNY” (or Magic Designer) drawing toy (static local copy: hootnanny.zip). It doesn’t do anything with the fixed circle studs (yet)

  • A new old calendar

    simulated dot-matrix printer on ruled paper layout of an ASCII-art Snoopy in WW1 Air Ace regalia yelling "Curse you Red Baron!" at his imaginary nemesis, and a 2022 calendar laid out on the facing page
    not seen the likes of this since ’78, I’ll be bound

    It’s unlikely anyone wanted a faux-lineprinter ASCII art calendar for 2022, but you’re getting one anyway. You can print this yourself:

    If you want to make your own, here’s a script: snoopycal.sh

    Credits:

    • Original “WW1 Fighter Pilot” Snoopy ASCII art from “SNOOPY.BA” for the DEC PDP-8, written by Mr Kay R. Fisher of DEC some time before July 1973. It’s referred to in the first printing of the “101 Basic Computer Games” book, which was published in 1973.
    • ncal, banner: their respective authors
    • pstext an ascii to PS filter by Dan Judd, usenet comp.lang.postscript, December 1989. I had to really mess around with the output of this program to use a custom font and add the music ruling, but it produces cleaner PostScript than the giant messes that enscript and a2ps have become
    • Font: mnicmp, by me. Based on the DecWriter II font.
    • iffy scripting, scribbly lines: also me.

  • looks like your dodgy uncle

    the dried, lumpy and in places mouldy remains of a carved turnip head lantern
    time hasn’t been kind to the neep lantern‘s fizzog
  • I (U+1F494, BROKEN HEART) UTF-8

    Something has gone very wrong with the database encoding on this blog after a recent update, so all my lovely UTF-8 characters have gone mojibake.

    Trying to find ways to fix it. It may have to be manual. Remember, kids: have backups before letting WordPress upgrade!

    Here’s the Python equivalent of what I think the database has done:

    bytes("I ???? UTF-8", encoding='utf-8').decode(encoding='cp1252')
    'I 💔 UTF-8'

    Quite why my hosting thought a character encoding from last century was appropriate, I’ll never know.

    Update, November 2023: kinda-sort fixed the backend, but the encoding is still weird — can we…?

  • I spent all of yesterday calculating circular key grids …

    12 green forked twig-like motifs arranged around a circle
    a green thing

    … only to realize I don’t really like circular key grids.

  • Autumn in Canada: PicoMite version

    Autumn in Canada: PicoMite version

    So I ported autumn in canada from OpenProcessing to PicoMite BASIC on the Raspberry Pi Pico:

    a small black screen images with text in the centre: autumn in canada scruss, 2021-11 just watch ...
    no leaves
    a small black screen images with text in the centre: autumn in canada scruss, 2021-11 just watch ... with one red and one orange maple leaf sitting on top of it
    a couple of leaves
    a small black screen images with text in the centre: autumn in canada scruss, 2021-11 just watch ... with four red/yellow/orange maple leaves sitting on top of it
    more leaves
    a small black screen images with text in the centre: autumn in canada scruss, 2021-11 just watch ... with sixteen simulated fallen maple leaves mostly covering it
    plenty of leaves
    a small black screen image completely covered with many simulated fallen maple leaves
    far too many leaves

    The biggest thing that tripped me up was that PicoMite BASIC starts arrays at 0. OPTION BASE 1 fixes that oversight. It would have been nice to have OpenProcessing’s HSV colour space, and an editor that could handle lines longer than 80 characters that didn’t threaten to bomb out if you hit the End key, but it’ll serve.

    Source below:

    ' autumn in canada
    ' scruss, 2021-11
    ' a take on my https://openprocessing.org/sketch/995420 for picomite
    
    OPTION base 1
    RANDOMIZE TIMER
    ' *** initialize polar coords of leaf polygon and colour array
    DIM leaf_rad(24), leaf_ang(24), px%(24), py%(24)
    FOR i=1 TO 24
        READ leaf_rad(i)
    NEXT i
    FOR i=1 TO 24
        READ x
        leaf_ang(i)=RAD(x)
    NEXT i
    
    DIM integer c%(8)
    FOR i=1 TO 8
        READ r%, g%, b%
        c%(i)=RGB(r%,g%,b%)
    NEXT i
    
    ' *** set up some limits
    min_scale%=INT(MIN(MM.HRES, MM.VRES)/8)
    max_scale%=INT(MIN(MM.HRES, MM.VRES)/6)
    min_angle=-30
    max_angle=30
    min_x%=min_scale%
    min_y%=min_x%
    max_x%=MM.HRES - min_x%
    max_y%=MM.VRES - min_y%
    
    CLS
    TEXT MM.HRES/2, INT(MM.VRES/3), "autumn in canada", "CM"
    TEXT MM.HRES/2, INT(MM.VRES/2), "scruss, 2021-11", "CM"
    TEXT MM.HRES/2, INT(2*MM.VRES/3), "just watch ...", "CM"
    
    kt%=0
    DO
        cx% = min_x% + INT(RND * (max_x% - min_x%))
        cy% = min_y% + INT(RND * (max_y% - min_y%))
        angle = min_angle + RND * (max_angle - min_angle)
        sc% = min_scale% + INT(RND * (max_scale% - min_scale%))
        col% = 1 + INT(RND * 7)
        leaf cx%, cy%, sc%, angle, c%(7), c%(col%)
        kt% = kt% + 1
    LOOP UNTIL kt% >= 1024
    
    END
    
    SUB leaf x%, y%, scale%, angle, outline%, fill%
        FOR i=1 TO 24
            px%(i) = INT(x% + scale% * leaf_rad(i) * COS(RAD(angle)+leaf_ang(i)))
            py%(i) = INT(y% - scale% * leaf_rad(i) * SIN(RAD(angle)+leaf_ang(i)))
        NEXT i
        POLYGON 24, px%(), py%(), outline%, fill%
    END SUB
    
    ' radii
    DATA 0.536, 0.744, 0.608, 0.850, 0.719
    DATA 0.836, 0.565, 0.589, 0.211, 0.660, 0.515
    DATA 0.801, 0.515, 0.660, 0.211, 0.589, 0.565
    DATA 0.836, 0.719, 0.850, 0.608, 0.744, 0.536, 1.000
    ' angles
    DATA 270.000, 307.249, 312.110, 353.267, 356.540
    DATA 16.530, 18.774, 33.215, 3.497, 60.659, 72.514
    DATA 90.000, 107.486, 119.341, 176.503, 146.785, 161.226
    DATA 163.470, 183.460, 186.733, 227.890, 232.751, 270.000, 270.000
    ' leaf colours
    DATA 255,0,0, 255,36,0, 255,72,0, 255,109,0
    DATA 255,145,0, 255,182,0, 255,218,0, 255,255,0
    

    You could probably use AUTOSAVE and paste the text into the PicoMite REPL. I used an ILI9341 SPI TFT LCD Touch Panel with my Raspberry Pi Pico along with some rather messy breadboard wiring.

    Fun fact: the maple leaf polygon points are derived from the official definition of the flag of Canada.

  • p-touch Pico pin labels

    breadboard with Raspberry Pi Pico attached, and two labels running down the sides with the pin names
    Pico pin labels: not bad for a first try

    This worked better than I expected. The tricky parts are trimming the edges and getting it them straight.

    Here’s the image to print on your label maker:

    combined Pico pin labels printed sideways on a tape label
    print on 12.7 mm tape
  • Raspberry Pi Zero 2 W: slides and thermals

    Raspberry Pi Zero 2 W: slides and thermals

    Slides from last night’s talk:

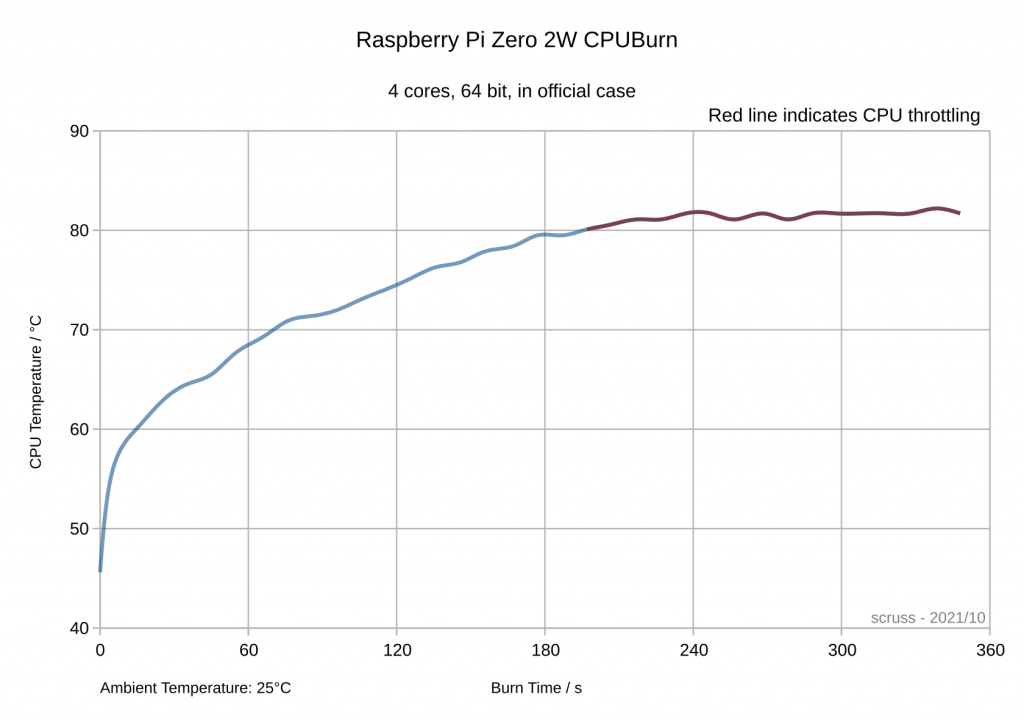
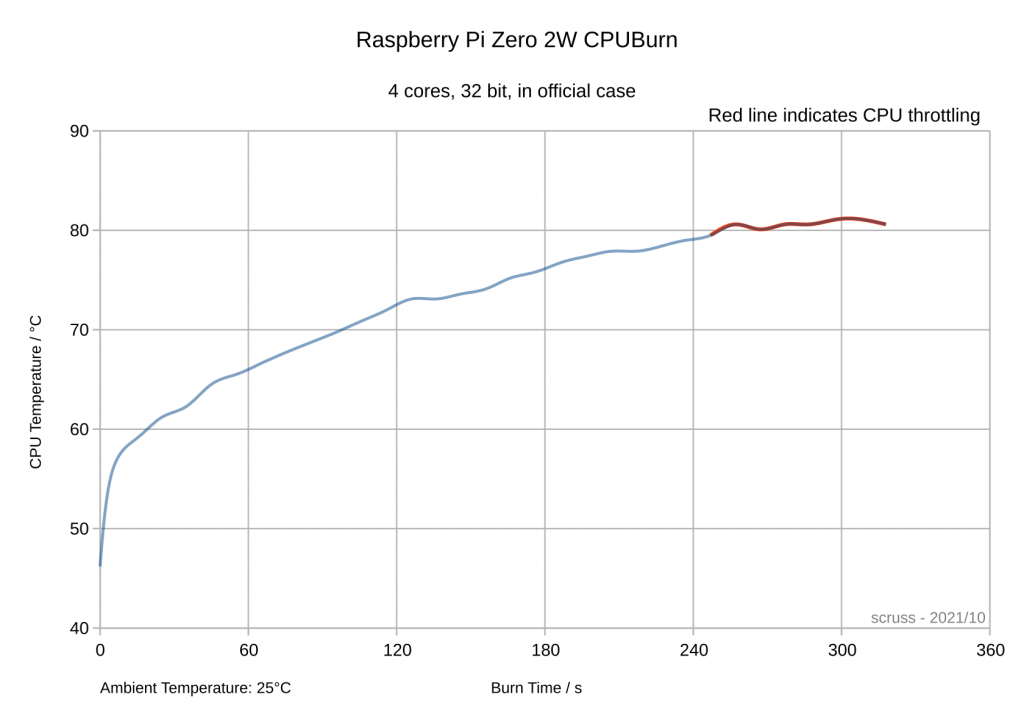
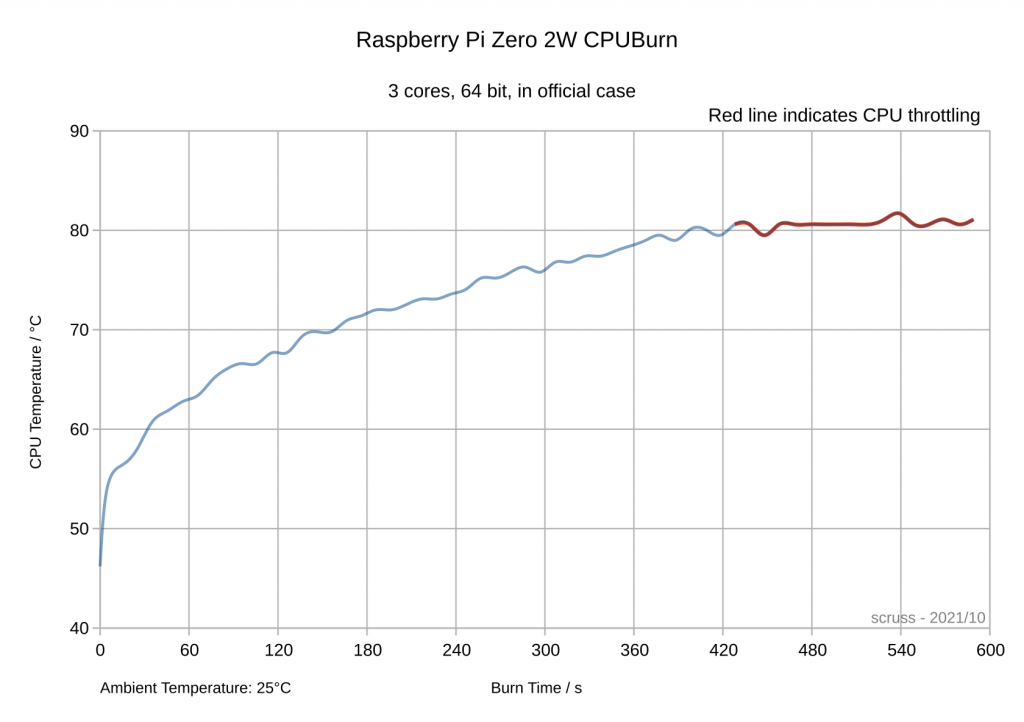
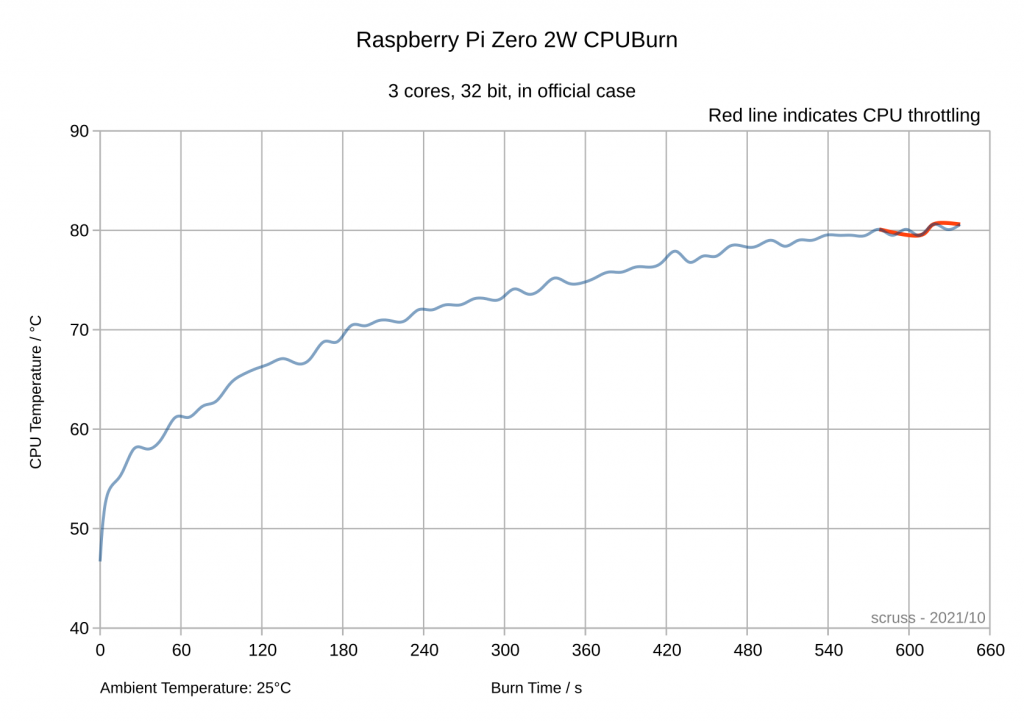
    It’s impossible to have a Raspberry Pi Zero overheat unless you overclock it. That’s why you don’t get any cases for it with fans or heat sinks. The quad-core Raspberry Pi Zero 2 W, though, has the potential to do so. Here are some numbers:

    • Used official case with lid fitted: increases SoC temperature +3 °C over free air
    • Test – CPUBurn: https://github.com/pmylund/cpuburn
    • Tested 4, 3 and 2 cores burning in 32-bit and 64-bit modes: time from idle to throttling (80 °C) measured
    • GPU overheat not tested.
    line graph of cpu temperature against time. Temperature rises sharply from about 47 degrees C to 82 degrees C in around four minutes
    All 4 cores burning, 64-bit mode: time to overheat = under 3½ minutes
    line graph of cpu temperature against time. Temperature rises sharply from about 47 degrees C to 82 degrees C in just over four minutes
    All 4 cores burning, 32-bit mode: time to overheat = just over 4 minutes
    line graph of cpu temperature against time. Temperature rises moderately from about 47 degrees C to 81 degrees C in around seven minutes
    3 out of 4 cores burning, 64-bit mode: time to overheat = just over 7 minutes
    line graph of cpu temperature against time. Temperature rises slowly from about 47 degrees C to 81 degrees C in around ten minutes
    3 out of 4 cores burning, 32-bit mode: time to overheat = 9½ minutes
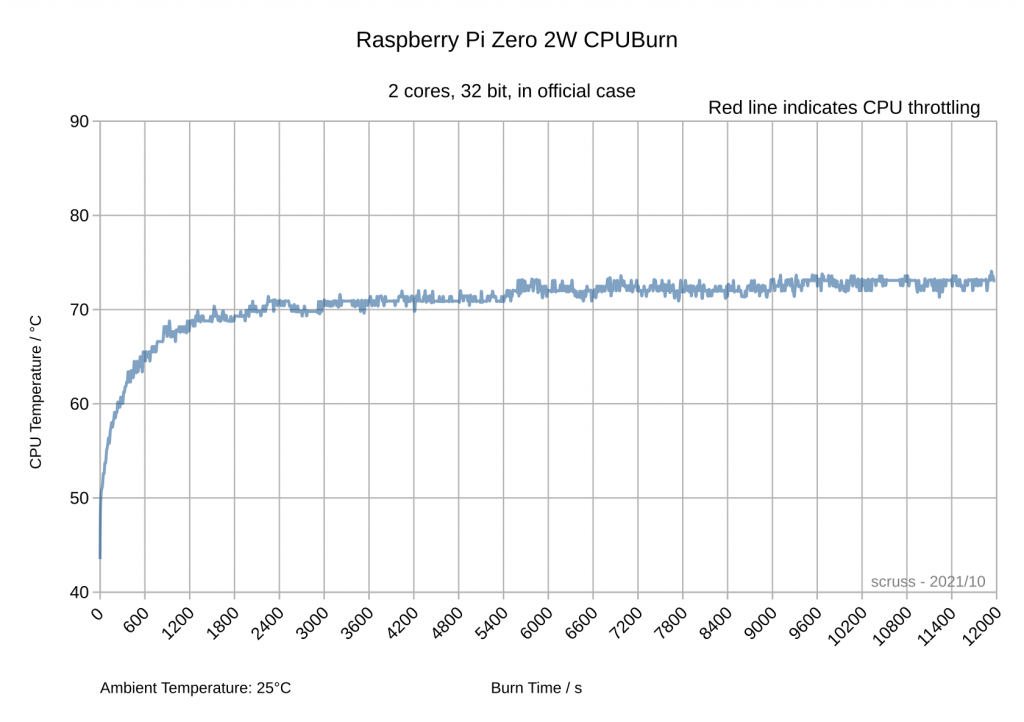
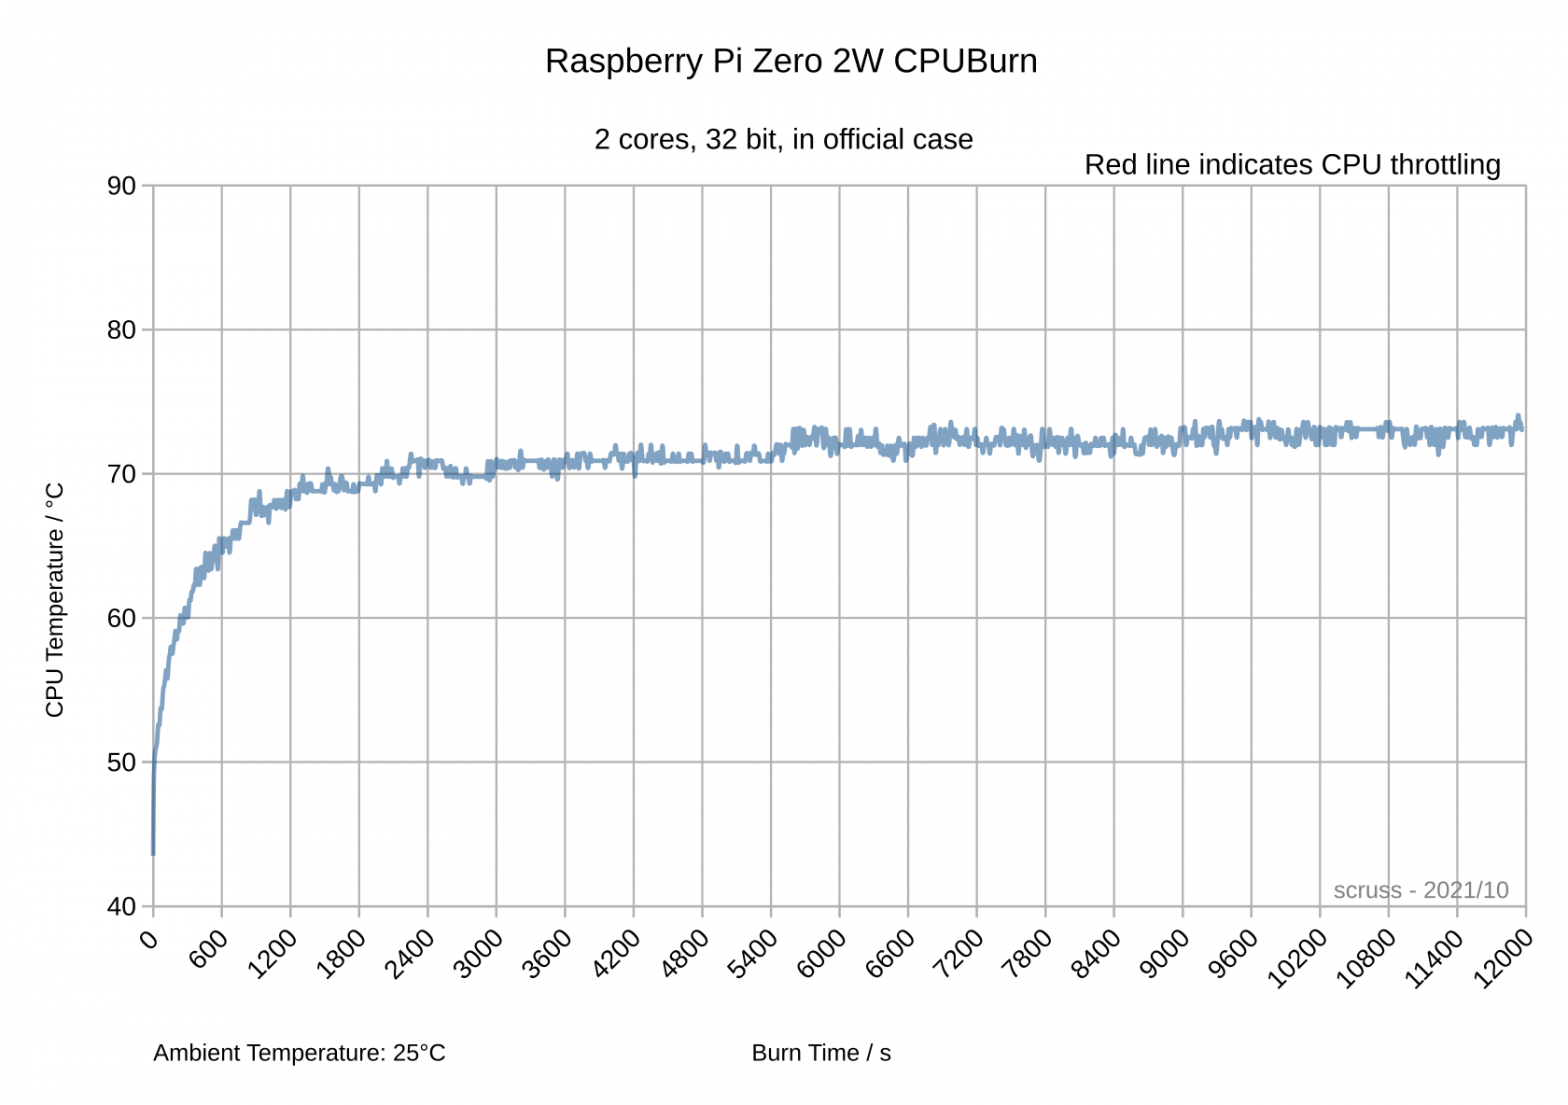
    line graph of cpu temperature against time. Temperature rises very slowly, reach 70 degrees C in 40 minutes and then only rising very slightly to about 73 degrees C in the entire run time of 3 hours 20 minutes
    2 out of 4 cores burning, 32-bit mode: time to overheat = basically never

    Unless you’re doing things that might indicate you should be using a bigger computer, a Raspberry Pi Zero 2 W won’t overheat and doesn’t need any form of cooling. If you’re overclocking, well … it’s your choice to have cooling equipment worth more than the computer it’s trying to cool.

  • Neep Lantern 2021

    carved swede/turnip with eyes cut out as crosses, two nostrils and a lopsided grin lit from inside by a small candle.

(the smell is fairly atrocious, but emotive of the day)
    My neep lantern for Halloween 2021

    What you can’t see is the smell of Halloween: the hum of charred turnip from the candle inside.

  • Raspberry Pi Zero 2 W: initial performance

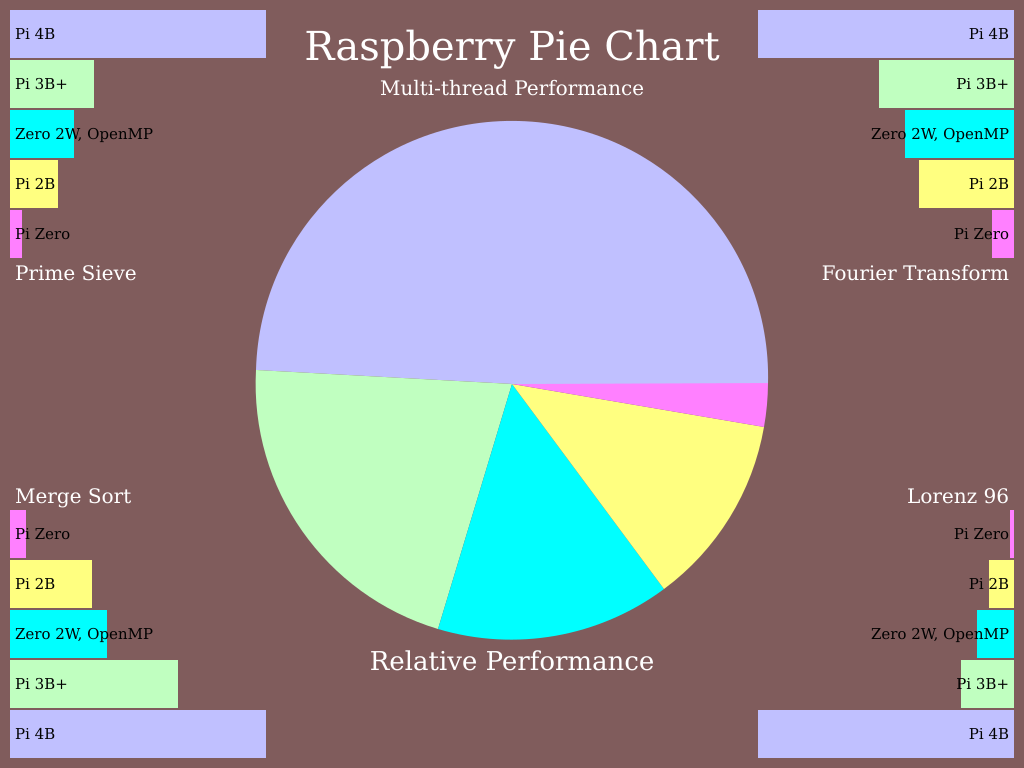
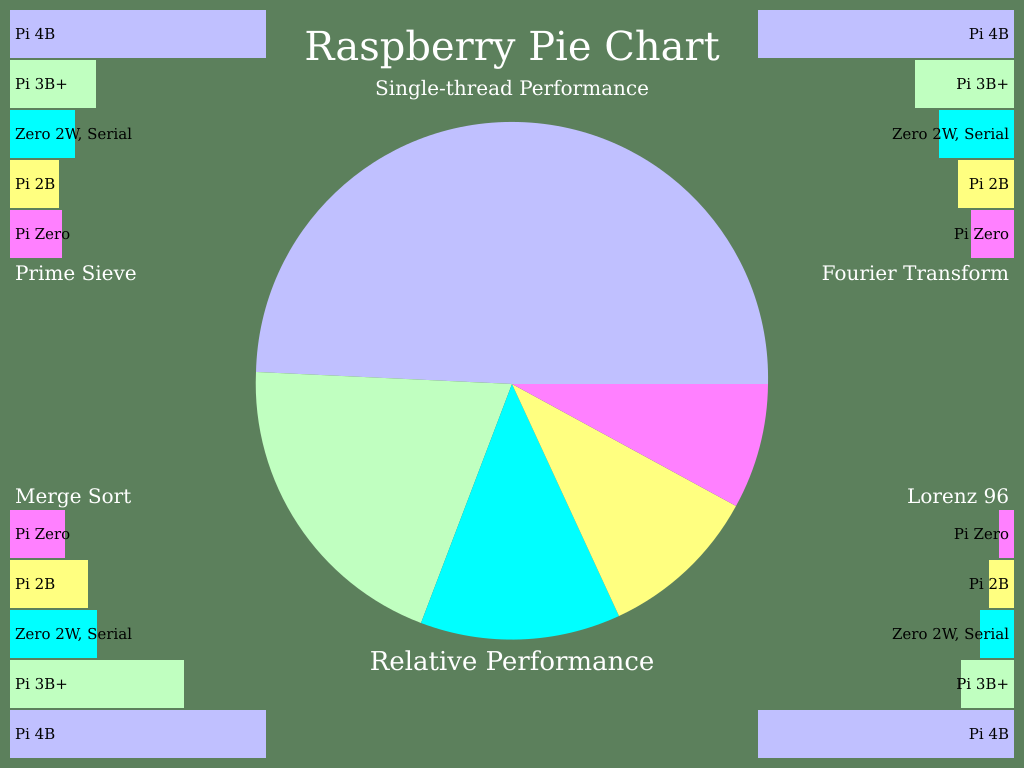
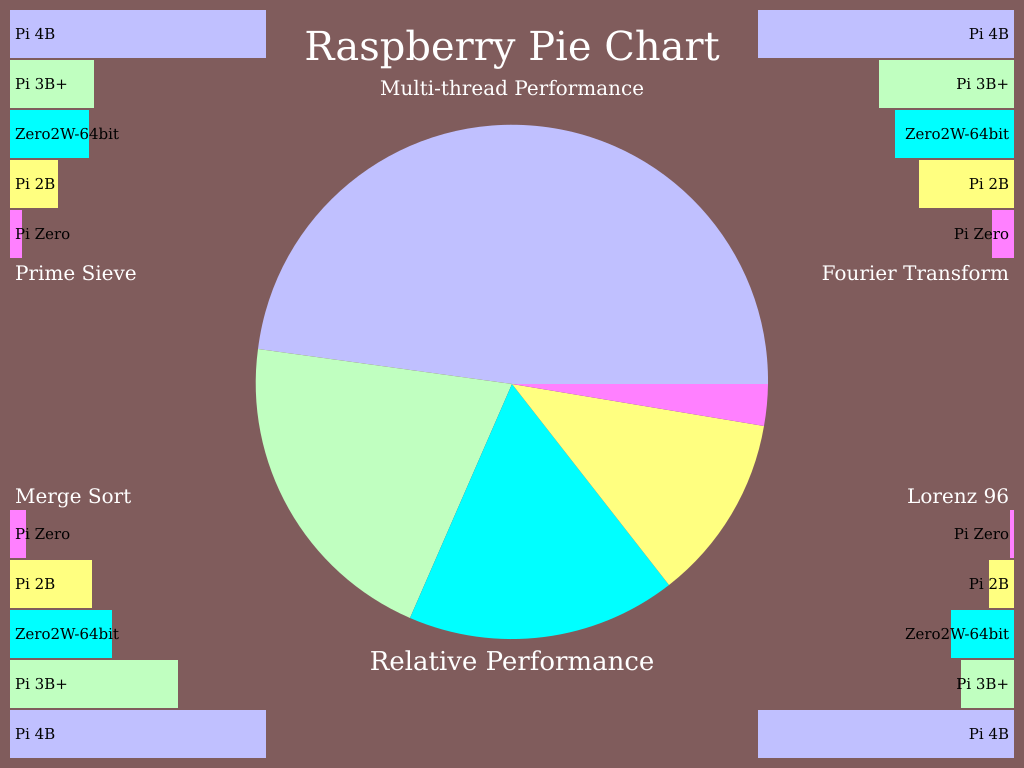
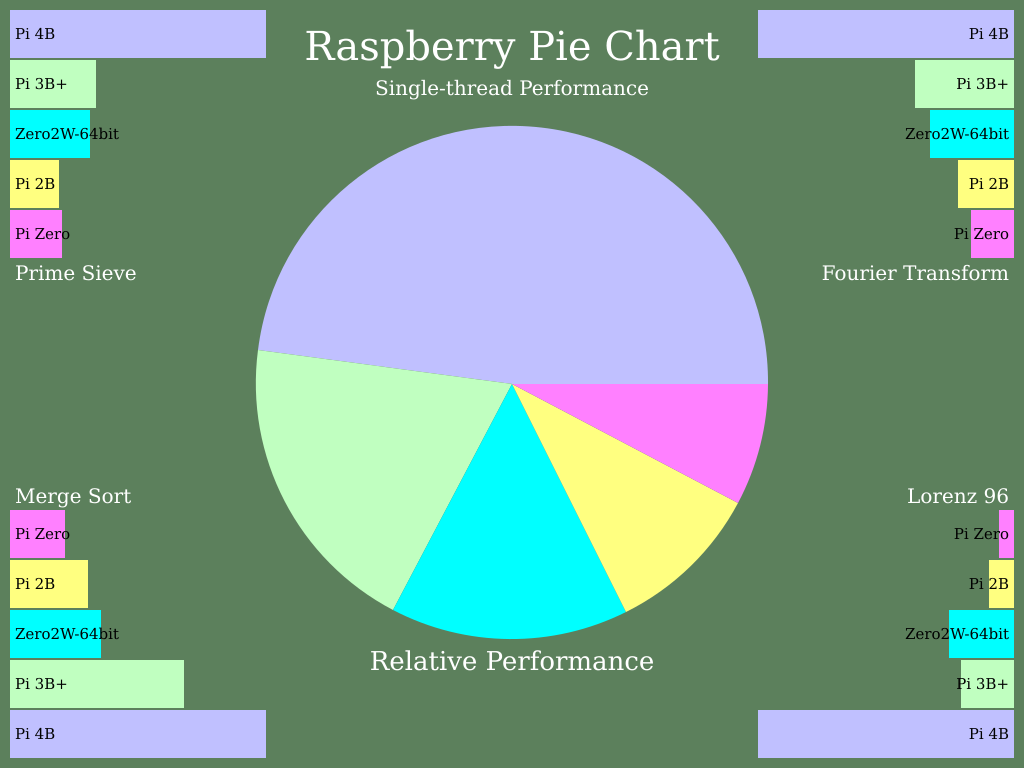
    Running A Pi Pie Chart turned out some useful performance numbers. It’s almost, but not quite, a Raspberry Pi 3B in a Raspberry Pi Zero form factor.

    32-bit mode

    Running stock Raspberry Pi OS with desktop, compiled with stock options:

    pie chart comparing multi-thread numeric performance of Raspberry Pi Zero 2 W: slightly faster than a Raspberry Pi 2B
    multi-thread results
    pie chart comparing single-thread numeric performance of Raspberry Pi Zero 2 W: slightly faster than a Raspberry Pi 2B
    single-thread results
    time ./pichart-openmp -t "Zero 2W, OpenMP"
    pichart -- Raspberry Pi Performance OPENMP version 36
    
    Prime Sieve          P=14630843 Workers=4 Sec=2.18676 Mops=427.266
    Merge Sort           N=16777216 Workers=8 Sec=1.9341 Mops=208.186
    Fourier Transform    N=4194304 Workers=8 Sec=3.10982 Mflops=148.36
    Lorenz 96            N=32768 K=16384 Workers=4 Sec=4.56845 Mflops=705.102
    
    The Zero 2W, OpenMP has Raspberry Pi ratio=8.72113
    Making pie charts...done.
    
    real	8m20.245s
    user	15m27.197s
    sys	0m3.752s
    
    -----------------------------
    
    time ./pichart-serial -t "Zero 2W, Serial"
    pichart -- Raspberry Pi Performance Serial version 36
    
    Prime Sieve          P=14630843 Workers=1 Sec=8.77047 Mops=106.531
    Merge Sort           N=16777216 Workers=2 Sec=7.02049 Mops=57.354
    Fourier Transform    N=4194304 Workers=2 Sec=8.58785 Mflops=53.724
    Lorenz 96            N=32768 K=16384 Workers=1 Sec=17.1408 Mflops=187.927
    
    The Zero 2W, Serial has Raspberry Pi ratio=2.48852
    Making pie charts...done.
    
    real	7m50.524s
    user	7m48.854s
    sys	0m1.370s

    64-bit

    Running stock/beta 64-bit Raspberry Pi OS with desktop. Curiously, these ran out of memory (at least, in oom-kill‘s opinion) with the desktop running, so I had to run from console. This also meant it was harder to capture the program run times.

    The firmware required to run in this mode should be in the official distribution by now.

    pie chart comparing 64 bit multi-thread numeric performance of Raspberry Pi Zero 2 W: slightly faster than a Raspberry Pi 2B
    multi-thread, 64 bit: no, I can’t explain why Lorenz is better than a 3B+
    pie chart comparing 64 bit single-thread numeric performance of Raspberry Pi Zero 2 W: slightly faster than a Raspberry Pi 2B
    single thread, again with the bump in Lorenz performance
    pichart -- Raspberry Pi Performance OPENMP version 36
    
    Prime Sieve          P=14630843 Workers=4 Sec=1.78173 Mops=524.395
    Merge Sort           N=16777216 Workers=8 Sec=1.83854 Mops=219.007
    Fourier Transform    N=4194304 Workers=4 Sec=2.83797 Mflops=162.572
    Lorenz 96            N=32768 K=16384 Workers=4 Sec=2.66808 Mflops=1207.32
    
    The Zero2W-64bit has Raspberry Pi ratio=10.8802
    Making pie charts...done.
    
    -------------------------
    
    pichart -- Raspberry Pi Performance Serial version 36
    
    Prime Sieve          P=14630843 Workers=1 Sec=7.06226 Mops=132.299
    Merge Sort           N=16777216 Workers=2 Sec=6.75762 Mops=59.5851
    Fourier Transform    N=4194304 Workers=2 Sec=7.73993 Mflops=59.6095
    Lorenz 96            N=32768 K=16384 Workers=1 Sec=9.00538 Mflops=357.7
    
    The Zero2W-64bit has Raspberry Pi ratio=3.19724
    Making pie charts...done.

    The main reason for the Raspberry Pi Zero 2 W appearing slower than the 3B and 3B+ is likely that it uses LPDDR2 memory instead of LPDDR3. 64-bit mode provides is a useful performance increase, offset by increased memory use. I found desktop apps to be almost unusably swappy in 64-bit mode, but there might be some tweaking I can do to avoid this.

    Unlike the single core Raspberry Pi Zero, the Raspberry Pi Zero 2 W can be made to go into thermal throttling if you’re really, really determined. Like “3 or more cores running flat-out“-determined. In my testing, two cores at 100% (as you might get in emulation) won’t put it into thermal throttling, even in the snug official case closed up tight. More on this later.

    (And a great big raspberry blown at Make, who leaked the Raspberry Pi Zero 2 W release a couple of days ago. Not classy.)

  • Modding an Adafruit PIR for 3.3 volts

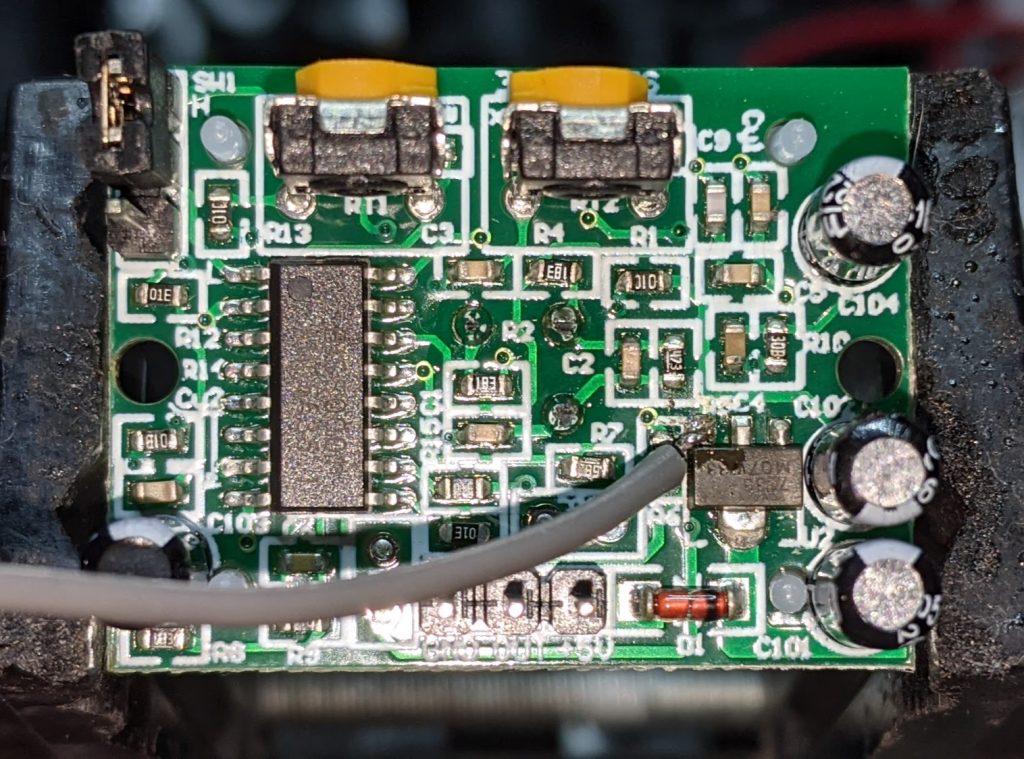
    green circuit board covered in surface mount components. A grey wire has been soldered to the output pin of the SOT-89 package 7133-1 voltage regulator
    slightly dodgy soldering of a grey jumper wire to the Vout pin of the PIR’s voltage regulator

    Consider the Adafruit PIR (motion) sensor (aka PIR Motion Sensor, if you’re in Canada). Simple, reliable device, but only runs from a 5 V supply. Yes, there are smaller PIRs that run off 3.3 V, but if this is what you have, you need to do some soldering. Annoyingly, the sensor on the board is a 3.3 V part, but the carrier was designed in Olden Tymes when King 5 V ruled.

    You can try powering it from 3.3 V, but it’ll go all off on its own randomly as its own power supply won’t be supplying enough voltage. There are a couple of sites on how to modify these PIRs that either describe old kit you can’t get any more, or do it completely wrongly. Just one post on the Adafruit support forum gets it right.

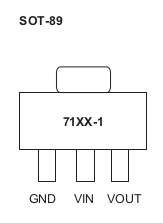
    One way of doing this is to provide 3.3 V directly to the output pin of the voltage regulator, and ignore the 5 V power line entirely. The regulator’s a SOT89-3 part that looks a bit like this:

    71xx-1 SOT-89 package outline, with three pins at the bottom and one large ground tab (connected to centre pin, but not visible) at the top
    wee leggy thing

    In the photo above, it’s flipped over. Whichever way it’s oriented, we want to put power directly into the Vout pin. There may be easier points to solder this to than a tiny surface mount pin (almost definitely one of the capacitors) but this has held for me.

    How to use it in MicroPython? Like the TTP223 capacitive touch sensors I looked at before, a PIR gives a simple off/on output, so you can use something like this:

    from machine import Pin
    from time import sleep_ms
    
    pir = Pin(21, Pin.IN)
    
    while True:
        print("[", pir.value(), "]")
        sleep_ms(1000)
    

    value() will return 1 if there’s movement, 0 if not. There are trigger time and sensitivity potentiometers to fiddle with on the board if you need to tweak the output.

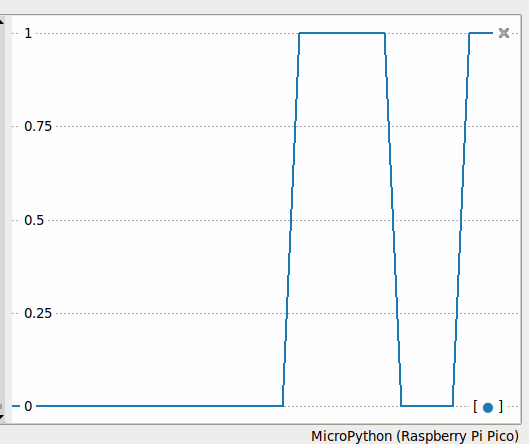
    line graph showing output signal going from 0 to 1, back down to 0 and ending at one over a period of about 20 seconds
    Thonny plotter output showing a couple of movement detections. High output (on my device) stays up for about 4 seconds, so you can be pretty leisurely about polling PIRs

    Just remember: don’t connect the 5 V power line if you make this mod. I’m not responsible for any smoke emitted if you do — but I can always sell you a replacement …

  • Lentil Soup

    Ingredients

    • 6 cups vegetable stock (or 3 veggie stock cubes + 6 cups water)
    • 3-4 medium onions, chopped roughly
    • 4-6 medium carrots; half chopped roughly, half grated
    • 2 cups red split lentils
    • 4-6 tbsp olive oil
    • 2 tbsp baking soda (for soaking lentils)

    Optional ingredients

    • 1 tbsp prepared Dijon mustard
    • 1 tbsp sweet paprika

    Lentil Preparation

    • Rinse and drain lentils at least three times: they should no longer clump, and rinse water should not be very cloudy
    • Soak lentils in water with baking soda for at least an hour, occasionally stirring gently
    • Rinse lentils and soak for at least an hour in clean water; drain.

    Method

    1. Bring stock to a boil in a large pot. Add grated/chopped carrots and half the olive oil
    2. Fry onions in the rest of the olive oil until translucent, optionally with paprika
    3. Add fried onions to soup pot. Stir in Dijon mustard, if desired
    4. Cover and allow to low boil for 5-10 minutes
    5. Stir in drained lentils, and bring to a robust simmer
    6. Cover and simmer for 15 minutes.
    7. Serve and season to taste.

    Notes

    • This is based on my parents’ various lentil soup recipes from Scotland. They might use a ham or lamb-bone based stock
    • Until recently, I’d been overcooking the lentils. Red split lentils are quite delicate, and soaking and lightly simmering gives a pleasing result
    • The soaking in baking soda stage helps to de-gas the lentils
  • Another Raspberry Pi Pico language: MMBasic

    It’s very much a work in progress, but Geoff Graham and Peter Mather’s MMBasic runs nicely on the Raspberry Pi Pico. Development is mostly coordinated on TheBackShed.com forum.

    It supports an impressive range of displays and peripherals. The project gives me a very distinct “This is how we do things” vibe, and it’s quite unlike any other Raspberry Pi Pico project.

    To show you what MMBasic code looks like, here’s a little demo that uses one of those “Open Smart” LED traffic lights on physical pins 14-16 which cycles through the phases every few seconds:

    ' traffic light on gp10-12 (green, yellow, red), pins 14-16
    
    ' set up ports for output
    FOR i=14 TO 16
      SETPIN i, DOUT
      PIN(i)=0
    NEXT i
    
    red=16
    amber=15
    green=14
    
    DO
      ' green on for 5 seconds
      PIN(red)=0
      PIN(green)=1
      PAUSE 5000
      ' amber on for 3 seconds
      PIN(green)=0
      PIN(amber)=1
      PAUSE 3000
      ' red on for 5 seconds
      PIN(amber)=0
      PIN(red)=1
      PAUSE 5000
    LOOP
    
  • gecko at the watering hole, forever

    • Video downloaded using youtube-dl
    • Resized to 360p and 30 fps using ffmpeg
    • Loop found and resized using MoviePy, with ffmpeg used to create the gif
    • gif optimized using gifsicle -O3

    Result: 320×180, 22 frames, 128 colours, ~ 600 KB.

  • Some okay CMYK results from DrawingBot, finally …

    decorative 8-sided symmetrical square tile sketched out in cyan, magenta, yellow and grey felt tip pen on a plotter
    drawn using a Roland DXY-1300 plotter on Strathmore Multimedia using DeSerres medium tip pens, ~60 minutes plotting time, 180 × 180 mm

    After a tonne of faffing about, I finally got something out of my plotter using Drawing Bot. I’d heard about it during the Bold Machines’ Intro to Pen Plotters course I’m taking, and the results that other people were getting looked encouraging. But for me, they weren’t great.

    Maybe I was choosing too large images, but my main problem was ending up with plots with far too many lines: these would take days to plot. The controls on Drawing Bot also seemed limited: density and resolution seemed to be the only controls that do much. Drawing Bot itself wasn’t very reliable: it would sometimes go into “use all the cores!” mode when it was supposed to be idling. It would also sometimes zoom in on part of the image and fail to unzoom without quitting. Is a 32 GB i7 8-core (oldish, but still game) too little for this software? Forget any of the Voronoi plots if you want to see results today.

    The source image was a geometric tile that I’d frisketed out years ago, forgotten about, and then found when I unstuck it from under a stack of papers. It’s somewhat artisanally coloured by me in watercolour, and the mistakes and huge water drop are all part of its charm:

    geometric tile picked out in brown, red, pink, green  and various shades of faded blue, separated by rough white frisket lines
    source image for plotter output

    If WordPress will allow an SVG, here’s what Drawing Bot made of it:

    scribbly linedrawing of the tile image in CMYK process colours
    Drawing Bot SVG output: yes, it’s that faint

    I do like the way that Drawing Bot seems to have ignored some colours, like the rose pink around the outside. The green border really is mostly cyan with a touch of black.

    I haven’t magically found perfect CMYK pens in HP/Roland pen format. I couldn’t even find the Schwan-Stabilo Point 88 pens that Lauren Gardner at Bold Machines recommends. But the local DeSerres did deliver a selection of their own-brand 1.0mm Mateo Markers that are physically close to the Point 88s in size, but use a wider 1 mm fibre tip. They are also cheap; did I mention that?

    The colours I chose were:

    • for cyan: Mint Green; RGB colour: #52C3A5; SKU: DFM-53
    • for magenta: Neon Pink; RGB colour: #FF26AB; SKU: DFM-F23
    • for yellow: Neon Yellow; RGB colour: #F3DE00; SKU: DFM-F01
    • for black: Green Grey 5; RGB colour: #849294; SKU: DFM-80

    The RGB colours are from DeSerres’ website, and show that I’m not wildly off. Target process colours are the top row versus nominal pen colours on the bottom:

    target vs pen CMYK colours
    yes, there are fluo colours in there

    I knew to avoid pure black, as it would overpower everything in the plot.

    To make the pens work with the DXY-1300, I modified juliendorra/3D-printable-plotter-adapters-for-pens-and-refills: Use your favorite pens with vintage HP plotters: parametric code to create custom adapters to work the the DeSerres pens. Here are my changed files, just in case my PR isn’t accepted:

    Overall, it plotted quite well. I plotted directly from Inkscape, one layer/pen at a time, from light (yellow) to dark (grey). Using the pen 1 slot had its disadvantages: the DXY has little pen boots to stop the pens drying, but these unfortunately get filled with old ink. The scribbly dark markings in the NNE and SSW orange kites in the plot are from the yellow pen picking up old black ink from the pen boot. Next time I’ll clean the plotter better.