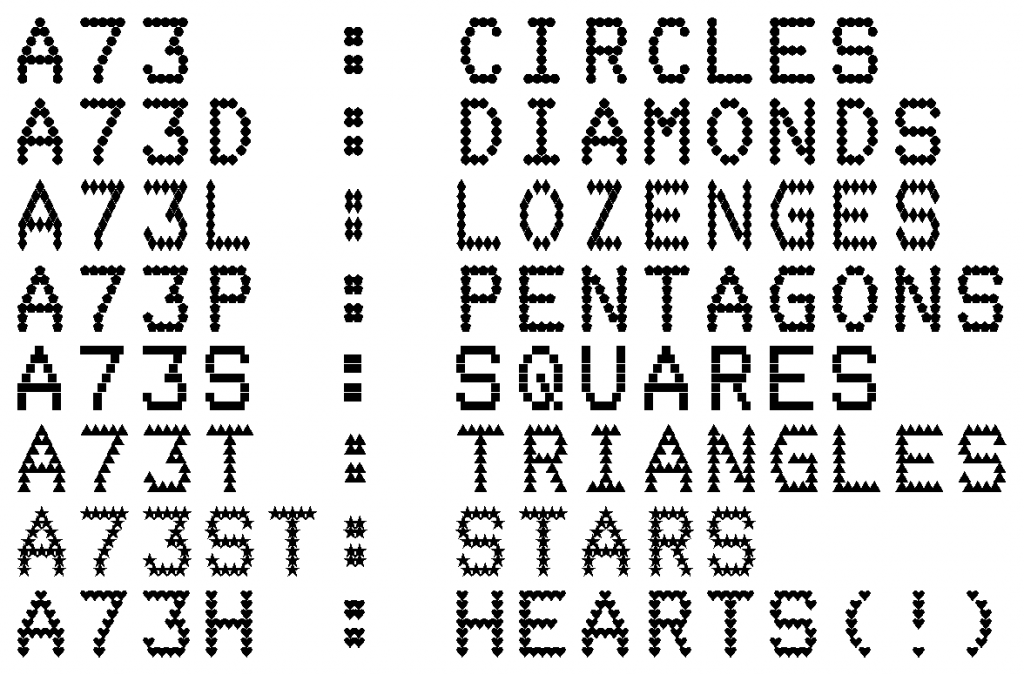
A rendering of a 9-pin “Near Letter Quality” dot matrix font. Derived from the character ROM of an Amstrad DMP3160 printer.
somebody, somewhere, is probably still producing invoices like this
I started work on this in 2017, revisited it in late 2018, forgot about it for a few years and then finally completed it in a couple of days in July 2026. My focus is second-to-none!
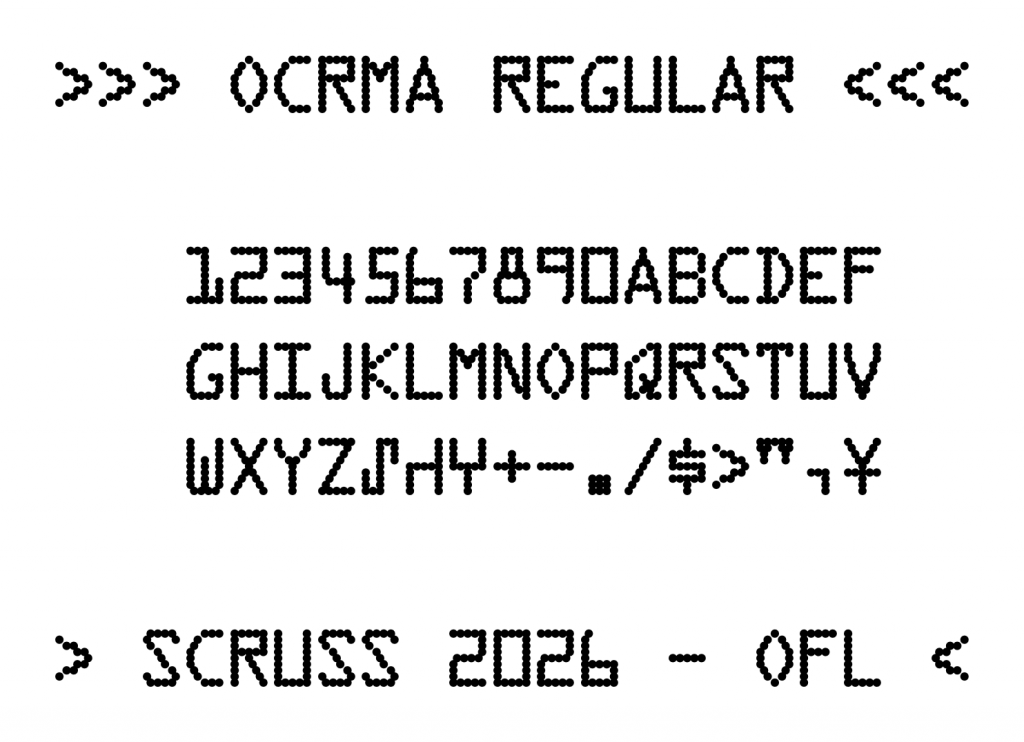
ASCII, plus many European characters. Please see the sample above.
Proportional and mono-spaced versions are provided, each with a bold variant.
The DMP3160 ROM includes italics, but the coverage is not quite the same and they don’t look great. So I didn’t convert them.
I clearly added some extra characters to the bitmaps at some point, as the DMP3160 pre-dates the € sign, and yet, there it is!
The character spacings may not be the same as you’d get on a DMP3160. While the ROM does contain proportional character widths, they seem very wide. Values based on the actual widths of the bitmaps were used.
9-pin printers in text mode couldn’t kern, so neither does this.
The bold (technically, double-strike) mode used here would be impossible for a DMP3160 to reproduce. You should care less about this than I do. (I don’t, at all.)
Design Size
Nominally 12 point / 6 lines per inch.
Source
While this font is produced entirely by one Python FontForge script per variant, the code is too ugly for you to look at. The included NearlyQ.json is likely more useful: it contains all of the pin definitions keyed by character name.
This Font Software is licensed under the SIL Open Font Licence, Version 1.1. https://openfontlicense.org/
[I do not agree with SIL’s missionary work in any way, and the use of this licence isn’t an endorsement of SIL.]
Acknowledgements / References
Huge thanks to CPCWiki contributors who provided ROM dumps and notes on where to find character tables in the ROMs.
Amstrad/Schneider Printer Character Sets — CPCWiki, Internet Archive copy. The site is currently under extreme mechanized scraper traffic and is almost impossible to access.
1 2 3 4 5 6 7 8 9 0
A B C D E F G H I J K L M N O P Q R S T U V W X Y Z
⑀ ⑁ ⑂ + - . / $ < > " , ¥
Lower case character glyphs are duplicates of upper case ones, although this is outside the X3.111-1986 standard.
Design Size
The 12 point design size is meant to reproduce 12 characters per inch horizontally, and six lines per inch vertically. OCR standards of 1986 suggested three lines per vertical inch, which can be achieved by double spacing.
Source
While this font is produced entirely by one Python FontForge script, the code is too ugly for you to look at. The included OCRmA.json is likely more useful: it contains all of the pin definitions keyed by character name.
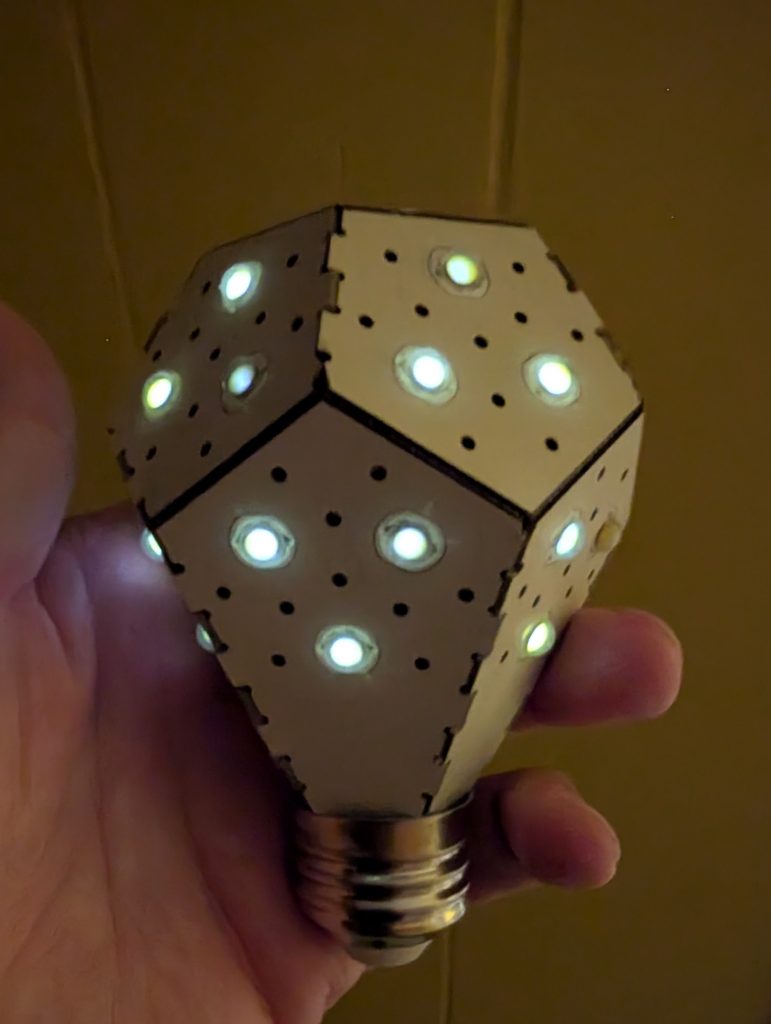
My NanoLeaf NanoLight LED bulb from 2013 finally gave up the ghost: or did it …?
woo! spooky glowing undead lightbulb!
The LEDs glowed for several minutes after removing it from the socket. I suspect capacitance is afoot.
Although it was absurdly expensive ($45 [USD?]; that’s about $62 with inflation) when I got it from the original Kickstarter campaign in 2013, it has been run for several hours a day since then. I always liked the shape of the bulb, with its origami-like folds.
Modern LED bulbs are much cheaper, but this one looks classy. The magic smoke has well and truly gone, and all that’s left is a faint glow and the stench of rancid phenolic.
This week, however, I had a chance to be my own random number generator. A routine medical investigation had me get a couple of shots of CardioLite®, a tracer chock-full of the radioisotope 99mTc. This has a half-life of just over six hours, and meant I was furiously (if harmlessly) radioactive for a couple of days.
At the start of this video, I’m about 4 metres and two brick walls away from the Geiger counter. After about 3 seconds of background, I walk slowly towards it and the counts pick up. After 12 seconds I put my hand over the meter tube and it goes wild. (The truly ghoulish amongst you might clock the date code on the Soviet-era СБМ20 tube: 03–87. Now, I wonder why people would be busy making these things in 1987 …?)
The first measurement I made, a little more than four hours after my second shot of CardioLite®, was over 75000 counts/minute. As I write this, more than two days later, I’m barely registering over background level. I’m kicking myself (gently) for not thinking of rigging up this random number generator earlier, but hey: next time …
I don’t remember where I heard of this method — possibly the late John Walker’s HotBits server — but random bits from radioactive decay can be found by:
How 21 pulses can end up representing as few as three bits
recording the time intervals between counts;
If the previous interval is shorter than the most recent one, record 1. Otherwise, record 0;
Compare pairs of bits:
If they’re the same, discard them;
If they’re different, record the first one.
That last step is a von Neumann Randomness extractor. While it consumes three quarters of the bit stream, it does clear up trivial glitches and stuck bits in the data. What it can’t help with is removing any inherent bias in the data. This won’t be a problem with background radiation, or with radioisotopes with a long half-life. Unfortunately 99mTc decays quite rapidly.
So here’s roughly 5:50 of background plus my own personal radiation recorded a day and a bit after getting the CardioLite™ shot:
It’s a simple CSV file with two columns: a timestamp in microseconds, and a 1 indicating a pulse. I stripped out the 0 lines as they added nothing but bulk. The average rate over the whole file is about 2000 counts/minute, a fraction of the initial value.
You can convert these pulses into a format stream of decimal digits using this script:
Which produces this delightful 10-column output, just like in the book. Unfortunately, WordPress being WordPress, I have to reformat it in five columns to fit:
Are these digits truly random? There are too few to tell. There may be some bias due to the isotope that was in me having a short half-life: the first minute’s data contains 2153 counts, while the last minute only has 2077. Whether this is due to natural variations in background radiation, I can’t tell.
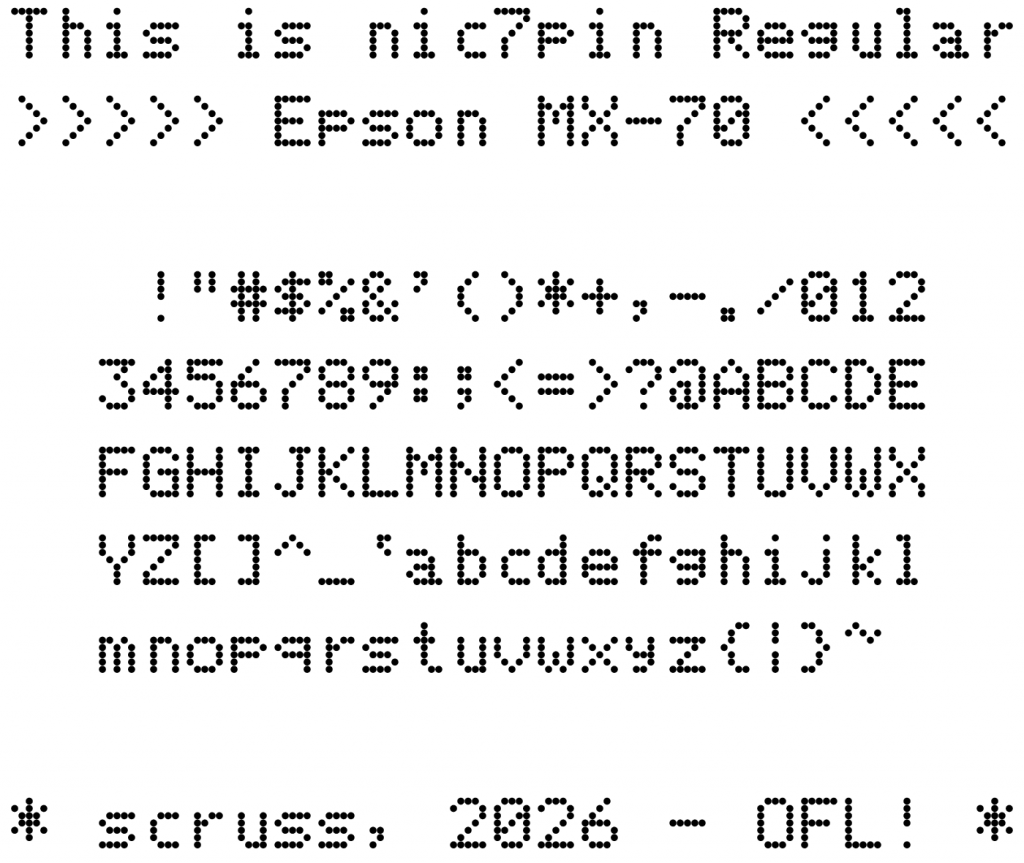
Seiko Epson Corporation is named as “son of EP-101”, for the world’s first compact, lightweight digital printer. I’m Scottish, and in Scots Gaelic “son of” is mac. Unfortunately, that prefix has been co-opted by an overpriced computer vendor. In Gaelic, nic means “daughter of”, so as an oblique compliment to Epson, this font is named daughter of 7 pin. It seemed like a good idea at the time …
Coverage
ASCII.
Design Size
The 12 point design size is meant to reproduce 12 characters per inch horizontally, and six lines per inch vertically.
Source
While this font is produced entirely by one Python FontForge script, the code is too ugly for you to look at. The included mx70.json is likely more useful: it contains all of the pin definitions keyed by character name.
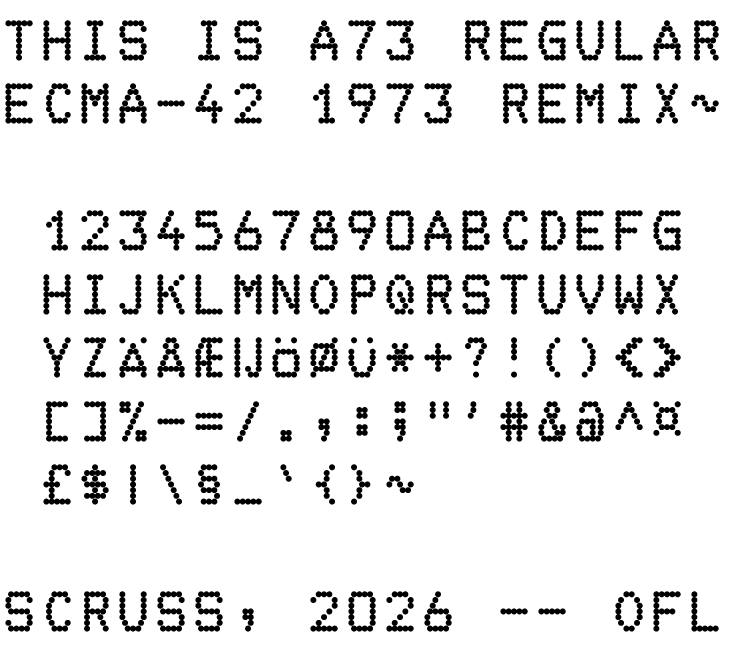
While this font is produced entirely by one Python FontForge script, the code is too ugly to include here. The included a73.json is likely more useful: it contains all of the pin definitions keyed by character name.
ASCII, mostly. The standard did not provide definitions for these characters:
U+005F _ LOW LINE
U+0060 ` GRAVE ACCENT
U+007B { LEFT CURLY BRACKET
U+007D } RIGHT CURLY BRACKET
U+007E ~ TILDE
As this is an attempt to faithfully implement a standard, these characters were not synthesized. In a slight concession to modernity, glyphs for A–Z have been copied to a–z.
The standard also defines the following extended characters:
U+00A4 ¤ CURRENCY SIGN
U+00A3 £ POUND SIGN
U+00C6 Æ LATIN CAPITAL LETTER AE
U+00C5 Å LATIN CAPITAL LETTER A WITH RING ABOVE
U+00C4 Ä LATIN CAPITAL LETTER A WITH DIAERESIS
U+00A7 § SECTION SIGN
U+0132 IJ LATIN CAPITAL LIGATURE IJ
U+00D6 Ö LATIN CAPITAL LETTER O WITH DIAERESIS
U+00D8 Ø LATIN CAPITAL LETTER O WITH STROKE
U+00DC Ü LATIN CAPITAL LETTER U WITH DIAERESIS
Design Size
The 12 point design size is meant to reproduce 10 characters per inch horizontally, and six lines per inch vertically. This is a requirement of the standard to match OCR fonts of the day.
Variants
None. This is an attempt to reproduce the character forms exactly according to the standard document.
Source
While this font is produced entirely by one Python FontForge script, the code is too ugly to include here. The included ecma42.json is likely more useful: it contains all of the pin definitions keyed by character name.
`project.license` as a TOML table is deprecated!!
`project.license` as a TOML table is deprecated!!
`project.license` as a TOML table is deprecated!!

	Do not make me care about your problems, little computer.
	- Something used to work;
	- I upgraded;
	- Now it doesn't.

you need to update your project
and remove deprecated calls
or your builds
will no longer be supported.

	This is not my project, little computer.
	It's something I use for enjoyment, to make my day better.
	But you make your problems my problems,
	and the world becomes an unkinder place.

ERROR: Failed to build 'Pillow'
when getting requirements
to build wheel

	Are you tired, little computer?
	Your antics certainly wear me out.
	You can't build a wheel with a pillow:
	even I know that.
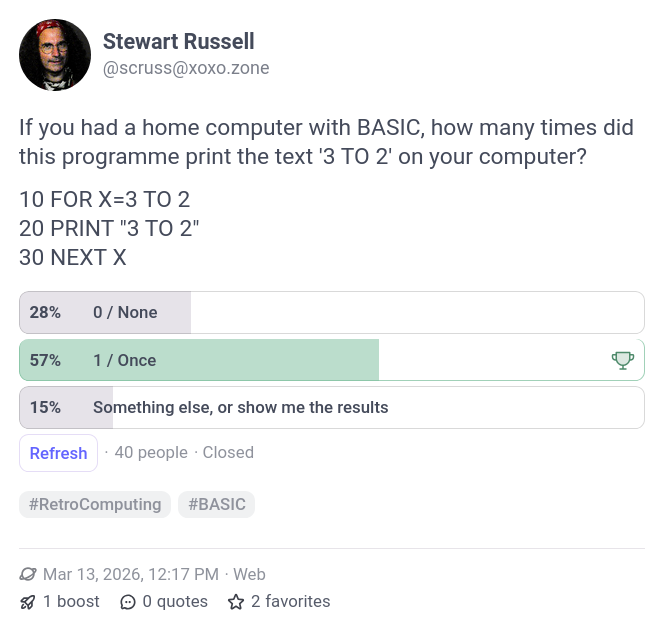
Twice as many people said their home computer’s BASIC did something illogical as said it did the right thing. What gives?
The de facto problem
BASIC was refined over several years in the mid-1960s as part of the Dartmouth Time-Sharing System (DTSS) running on a GE mainframe. It was intended to be accessible to all students at Dartmouth. Responsiveness to user commands was valued over performance. The concept caught on, and by 1970 DEC, HP, IBM and GE all had time sharing BASIC systems in the market.
The language was simple enough that if you’d used it before on another system, you’d have a good idea how it should look. Implementations of BASIC sprung up on lots of computer systems based on whatever documentation was at hand: if you were lucky, maybe a photostat of a Dartmouth BASIC manual, or maybe one of the programming manuals that DEC sold for their PDP-8 systems.
The original BASIC ran on a mainframe computer with each line being compiled into separate jobs by a terminal server. Early microcomputer developers, however, saw BASIC as something they could fit into a few thousand bytes as an interpreter. With so little space to work in, and so few guidelines to work from, implementation rules became very blurred. Here’s what you might have expected to see if you fired up your 8K Altair 8800 some time in 1976 after buying a shiny new (and $$) copy of Altair BASIC:
MEMORY SIZE? 8192
TERMINAL WIDTH? 80
WANT SIN-COS-TAN-ATN? N

1862 BYTES FREE
ALTAIR BASIC REV. 4.0
[EIGHT-K VERSION]
COPYRIGHT 1976 BY MITS INC.
OK
10 FOR X=3 TO 2 STEP 1
20 PRINT X
30 NEXT X
40 PRINT X
RUN
 3
 4
OK
With so little memory to play with, the FOR X=3 TO … is effectively treated as LET X=3, and NEXT X becomes LET X=X+1 (with an optional GOTO 20 if X < 2, which it never is). The 1975 Altair BASIC Manual has a slightly more lucid description on page 32, but doesn’t explain why it does this. Maybe it was influenced by FORTRAN-66, which always executed a DO clause once.
It’s a little hard to see trends in a sea of bullet points, but:
Up until about 1975, BASIC systems from DEC, Hewlett-Packard and IBM did the right thing with FOR loop variables.
Small BASIC systems on the Intel 8080 appearing after 1975 introduced uncertainty in FOR loop behaviour.
Many of these iffy systems were written by Microsoft, though many other vendors copied that behaviour. (Whether they copied code too, I can’t tell).
The ANSI working group efforts to develop a standard for BASIC between 1974–77 were too late to have much influence. At best, they codified a standard almost identical to Dartmouth BASIC of 1964, thirteen years too late.
Changes … but why?
Microsoft did make a change in their FOR loop behaviour, though:
BASIC-80 (version 4.51, 1977) always went through the loop at least once;
BASIC-80 (version 5.21, 1981) did not.
What prompted that change is referenced in a tiny little note in the manual‘s introduction
In its fifth major release (Release 5.0), BASIC-80 meets the ANSI qualifications for BASIC, as set forth in document BSRX3.60-1978.
11.1 Acquisition of Minimal BASIC Processors. The provisions of this publication are effective on September 4, 1980. All BASIC processors specified for Federal use after this date must implement Federal Standard Minimal BASIC.
In short, Microsoft wasn’t going to be able to sell BASIC to US Government agencies after September 1980 unless they fixed it. And selling software is what motivates Microsoft most. So they fixed it.
(Curiously, the actual text of ANSI X3.60-1978 is still paywalled, though the supposedly similar Standard ECMA-55: Minimal BASIC is available. I will never understand standards bodies and their eternal grabby hands.)
Sinclair, by complete coincidence, also changed how FOR loops work between the ZX80 and ZX81. I doubt that this was for FIPS compliance, but rather that ZX81 BASIC was in an 8K ROM instead of a 4K one, so there was more room to do the right thing.
It’s also interesting to note that Microsoft didn’t change all of their BASIC interpreters after 1980. Sure, the important (as in, $$$ for Microsoft) ones like IBM PC BASIC got it, but the later MSX BASIC didn’t. MSX wasn’t a low-effort port, though: it had a new graphics system and a completely different decimal floating point package.
The general syntax of all commands should be identical to Microsoft BASIC 5.0 (repeat 5.0)
With better reading comprehension, Acorn would have had an almost perfect BASIC interpreter in the BBC Micro. Oh well.
What came next?
I’ve already shown that a standard, especially one that had commercial ramifications, changed the way BASIC behaved after 1981. But BASIC language development mostly ignored any formal standards.
Associated with the FIPS norm were the National Bureau of Standards’ Minimal BASIC Test Programs. The version 2 test set from 1980 is still available from NBS:
There are more than 200 test programs, which you can attempt to run, if you must. They’ve been collected in source form by John Gatewood Ham, Jorge Giner Cordero and others, with an archive available here: bas55/tests as part of the bas55 Minimal BASIC interpreter.
The ANSI full BASIC standard sneaked out in early 1987 to little fanfare. Most of the working group were from mainframe companies, though Thomas Kurtz (one of the originators of BASIC at Dartmouth, along with John Kemeny) was still part of the process. There are no names from micro companies: except for one “J. Raskin”, possibly Jef Raskin, ex Apple.
Kemeny & Kurtz couldn’t leave BASIC alone, and in 1985 had written “Back to BASIC : the history, corruption, and future of the language“. Reading it now, it seems to be a sour-grapes rant against “street BASIC” dialects taking over. But never fear, Messrs. K&K were releasing TrueBASIC that was sure to put those street ruffians to rights. While TrueBASIC soldiered on as a product until the 2020s, it never left a legacy. The two Dartmouth professors’ grip on the language had strangled BASIC and left it as a quaint but inert toy.
I wanted to encode a spoiler in a forum post last night, so used the ancient ROT13 reciprocal cypher in the time-honoured way. That way, casual readers can immediately read the solutions, but you can get them by running the text through the ROT13 cypher again.
It’s a very simple cypher: the letters a–m are mapped to n–z, and n–z are mapped to a–m in turn. Each letter is rotated 13 places in the alphabet, hence the name. So the phrase “fly at once all is discovered” becomes “syl ng bapr nyy vf qvfpbirerq”. A simple command line invocation might use the tr command like this:
echo fly at once all is discovered | tr a-mn-z n-za-m syl ng bapr nyy vf qvfpbirerq
NB:
Because I’m a low-effort hipster, I’m only going to work with lower case letters. Real implementations do more.
Nothing in this article moves the state of cryptography forward in any way. People were doing this kind of thing 2000 years ago.
I’m going to keep using tr, but you probably have a rot13 command.
I noticed that once of the encyphered words in the spoiler spelled onyx, an English word in its own right.. Before discovering that this was all documented on Wikipedia already, I wrote some scripts to find what words were also words when run through ROT13:
gnat/tang is the longest pair that are ROT13 and the reverse of each other. If you’re into very obscure words, nana/anan work too. (Anan: obsolete interjection meaning ‘in a moment’ or ‘at your service’; 17th century)
There are more words that reverse if you ROT13 them, but aren’t necessarily real words when reversed: ‘robe‘, ‘serf‘ and ‘thug‘ are fairly common examples. (Yes, I know about ‘Ebor‘, archaic name for York)
The longest ROT13 self-reversing word I can find is ‘tavering‘ (Scots: to wander aimlessly). Next shorter are ‘rebore‘, ‘ravine‘ and ‘grivet‘. Obscure examples are ‘averin‘, ‘cherup‘ and ‘granet‘: all in OED, just.
Other reciprocal cyphers
Another historical cypher is Atbash: here, the range a–z is mapped to z–a. The cypher’s name derives from the first, last, second, and second to last Hebrew letters: “אתבש” (which reads right-to-left). A name derived from the Latin alphabet might be something like “azby”
Again, tr can do the needful:
echo fly at once all is discovered | tr a-z zyxwvutsrqponmlkjihgfedcba uob zg lmxv zoo rh wrhxlevivw
Seeing that all becomes zoo, there have to be some good Atbash words that are English words. Using similar code as above:
Again, we can see a word pair that’s reversed when encoded: girt/trig. The longest reversed-by-Atbash words I can find are wizard and hovels.
There are, in fact, a huge number of reciprocal cyphers you can create this way. As long as, for each letter pair (a, b), you map a→b and b→a, you’ll get a cypher that’s self-decrypting. Here’s an embarrassment of a shell one-liner that will generate a perfectly reciprocal mapping for a–z:
for i in {a..z}; do echo "$i"; done | shuf | awk '{a[NR]=$0;} END{for (i=1;i<26;i+=2) {b[a[i]]=a[i+1]; b[a[i+1]]=a[i];}; for (m in b) {print m " " b[m];}}' | sort | awk '{print $2}' | fmt -w999 | tr -d ' '
Here are 21 examples that can be put after ‘tr a-z‘ to make a reciprocal cypher:
That last one is what you get if you don’t shuffle the letters before you pair them. My brain keeps wanting to put it in alphabetical order, and it can’t.
There are lots of these keys: I estimate something like 49,229,914,688,306,352,000,000 (= 26! ÷ 8192) of them. But they’re all trivially easy to crack. They don’t change the underlying letter frequencies in the text, so if you have a long enough encrypted message, you can use standard frequency tables to break them.
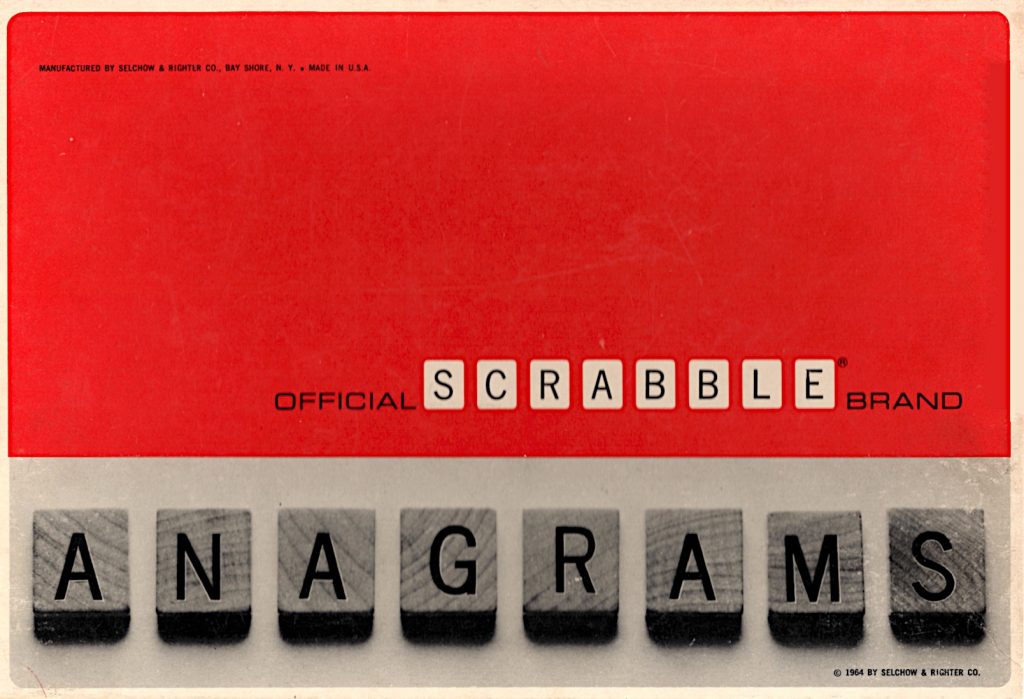
that red is much more orange in daylight. Note 1964 copyright year …
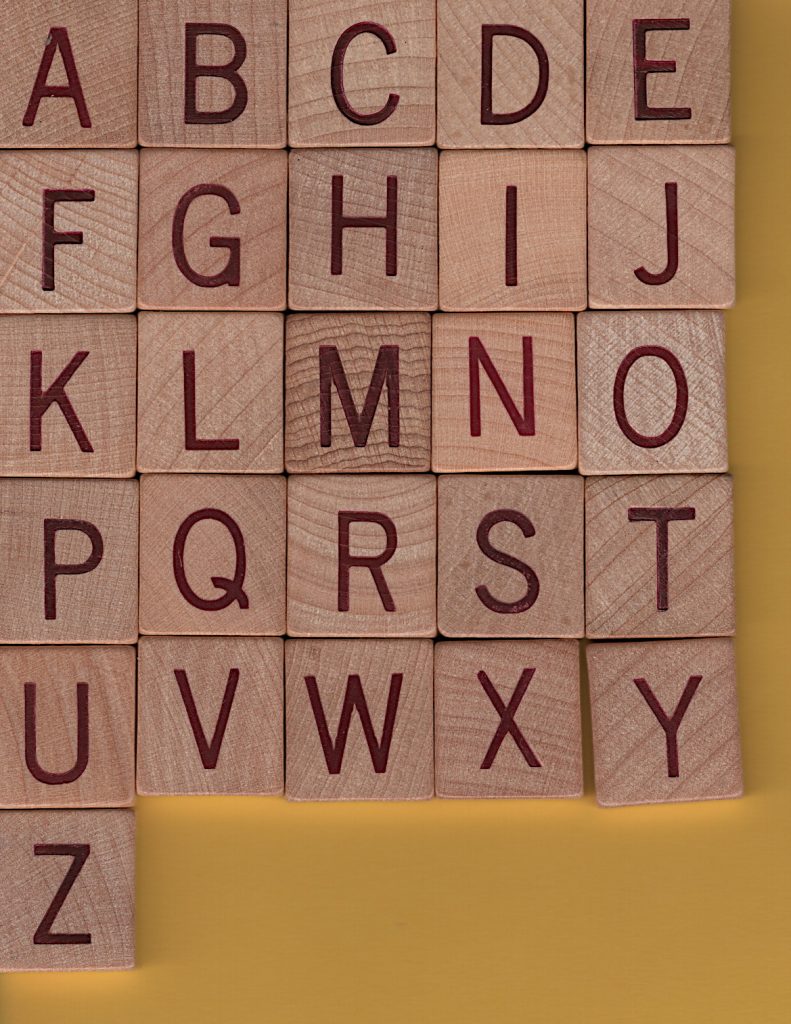
Found in a thrift store, the 1960s Selchow & Righter SCRABBLE® variant that nobody loved. It has no board, but 180 tiles, slightly different from the SCRABBLE® ones (dang, I love that I can type ®, can’t you tell?)
that Q, tho …
The stencilling/printing isn’t perfectly even in position, but I do have to remember these are at least 60 years old:
some variation in same letter placement
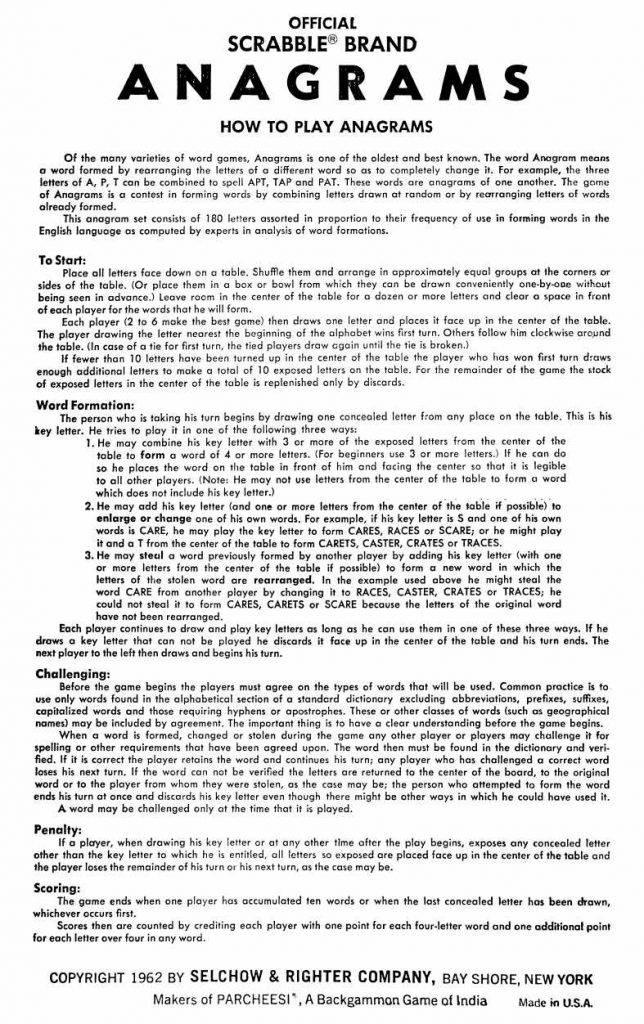
The instructions from inside the box (which were murder to scan btw: appreciate me!) are dated 1962, unlike the box. There’s a PDF linked under this image for those who enjoy legibility:
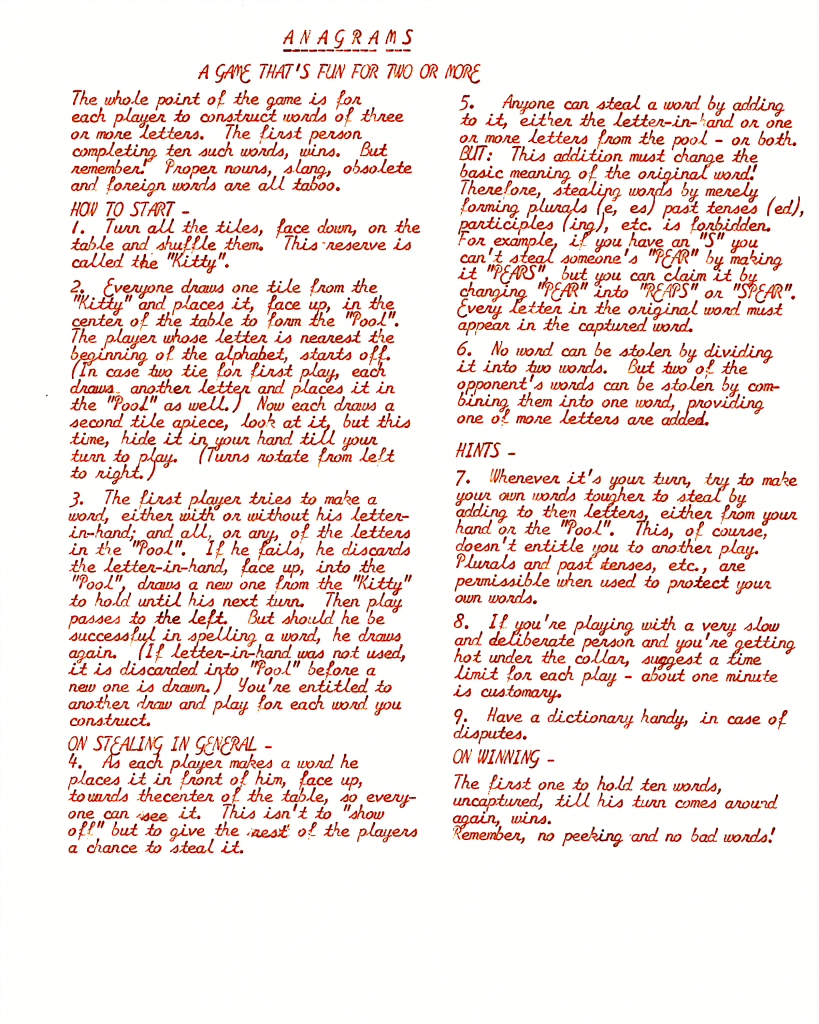
Included in the box, possibly original, is an instruction sheet typed in the naffest font known to man:
say you were typed on an early 1960s Smith-Corona Galaxie without saying, etc. …
Should you have no taste at all and want this excuse for type in your own documents, go here: zai Smith-Corona Galaxie Typewriter Font. May your documents smell of stale cigarette smoke forever. At least no-one will be able to OCR them.
The typed rules seem to disagree with the box rules a little. Pick the one you dislike less.
The 180 tiles have a slightly odd distribution for English: A×14, B×4, C×4, D×8, E×22, F×4, G×6, H×4, I×18, J×2, K×2, L×8, M×4, N×10, O×14, P×4, Q×2, R×12, S×8, T×10, U×8, V×2, W×2, X×2, Y×4, Z×2. You’re not going to make this up with any number of SCRABBLE® tile sets.
You can’t even make up a full 144 tile Bananagrams set with these. Even if you remove the excess tiles (A, B, C, D×2, E×4, F, G×2, H, I×6, L×3, M, N×2, O×3, P, R×3, S×2, T, U×2, Y), you’d still be short by a V and a W. A bug, perhaps?
Here are the rules from the box lid in full:
OFFICIAL SCRABBLE® BRAND ANAGRAMS
HOW TO PLAY ANAGRAMS
Of the many varieties of word games, Anagrams is one of the oldest and best known. The word Anagram means a word formed by rearranging the letters of a different word so as to completely change it. For example, the three letters of A, P, T can be combined to spell APT, TAP and PAT. These words are anagrams of one another. The game of Anagrams is a contest in forming words by combining letters drawn at random or by rearranging letters of words already formed.
This anagram set consists of 180 letters assorted in proportion to their frequency of use in forming words in the English language as computed by experts in analysis of word formations.
To Start:
Place all letters face down on a table. Shuffle them and arrange in approximately equal groups at the corners or sides of the table. (Or place them in a box or bowl from which they can be drawn conveniently one-by-one without being seen in advance.) Leave room in the center of the table for a dozen or more letters and clear a space in front of each player for the words that he will form.
Each player (2 to 6 make the best game) then draws one letter and places it face up in the center of the table. The player drawing the letter nearest the beginning of the alphabet wins first turn. Others follow him clockwise around the table. (In case of a tie for first turn, the tied players draw again until the tie is broken.)
If fewer than 10 letters have been turned up in the center of the table the player who has won first turn draws enough additional letters to make a total of 10 exposed letters on the table. For the remainder of the game the stock of exposed letters in the center of the table is replenished only by discards.
Word Formation:
The person who is taking his turn begins by drawing one concealed letter from any place on the table. This is his key letter. He tries to play it in one of the following three ways:
He may combine his key letter with 3 or more of the exposed letters from the center of the table to form a word of 4 or more letters. (For beginners use 3 or more letters.) If he can do so he places the word on the table in front of him and facing the center so that it is legible to all other players. (Note: He may not use letters from the center of the table to form a word which does not include his key letter.)
He may add his key letter (and one or more letters from the center of the table if possible) to enlarge or change one of his own words. For example, if his key letter is S and one of his own words is CARE, he may play the key letter to form CARES, RACES or SCARE; or he might play it and a T from the center of the table to form CARETS, CASTER, CRATES or TRACES.
He may steal a word previously formed by another player by adding his key letter (with one or more letters from the center of the table if possible) to form a new word in which the letters of the stolen word are rearranged. In the example used above he might steal the word CARE from another player by changing it to RACES, CASTER, CRATES or TRACES; he could not steal it to form CARES, CARETS or SCARE because the letters of the original word have not been rearranged.
Each player continues to draw and play key letters as long as he can use them in one of these three ways. If he draws a key letter that can not be played he discards it face up in the center of the table and his turn ends. The next player to the left then draws and begins his turn.
Challenging:
Before the game begins the players must agree on the types of words that will be used. Common practice is to use only words found in the alphabetical section of a standard dictionary excluding abbreviations, prefixes, suffixes, capitalized words and those requiring hyphens or apostrophes. These or other classes of words (such as geographical names) may be included by agreement. The important thing is to have a clear understanding before the game begins.
When a word is formed, changed or stolen during the game any other player or players may challenge it for spelling or other requirements that have been agreed upon. The word then must be found in the dictionary and verified. If it is correct the player retains the word and continues his turn; any player who has challenged a correct word loses his next turn. If the word can not be verified the letters are returned to the center of the board, to the original word or to the player from whom they were stolen, as the case may be; the person who attempted to form the word ends his turn at once and discards his key letter even though there might be other ways in which he could have used it.
A word may be challenged only at the time that it is played.
Penalty:
If a player, when drawing his key letter or at any other time after the play begins, exposes any concealed letter other than the key letter to which he is entitled, all letters so exposed are placed face up in the center of the table and the player loses the remainder of his turn or his next turn, as the case may be.
Scoring:
The game ends when one player has accumulated ten words or when the last concealed letter has been drawn, whichever occurs first. Scores then are counted by crediting each player with one point for each four-letter word and one additional point for each letter over four in any word.
COPYRIGHT 1962 BY SELCHOW & RIGHTER COMPANY, BAY SHORE, NEW YORK
Makers of PARCHEESI®, A Backgammon Game of India
Made in U.S.A.
The game is listed as Scrabble Scoring Anagrams on Board Game Geek and given a much later date (1972) than this one.
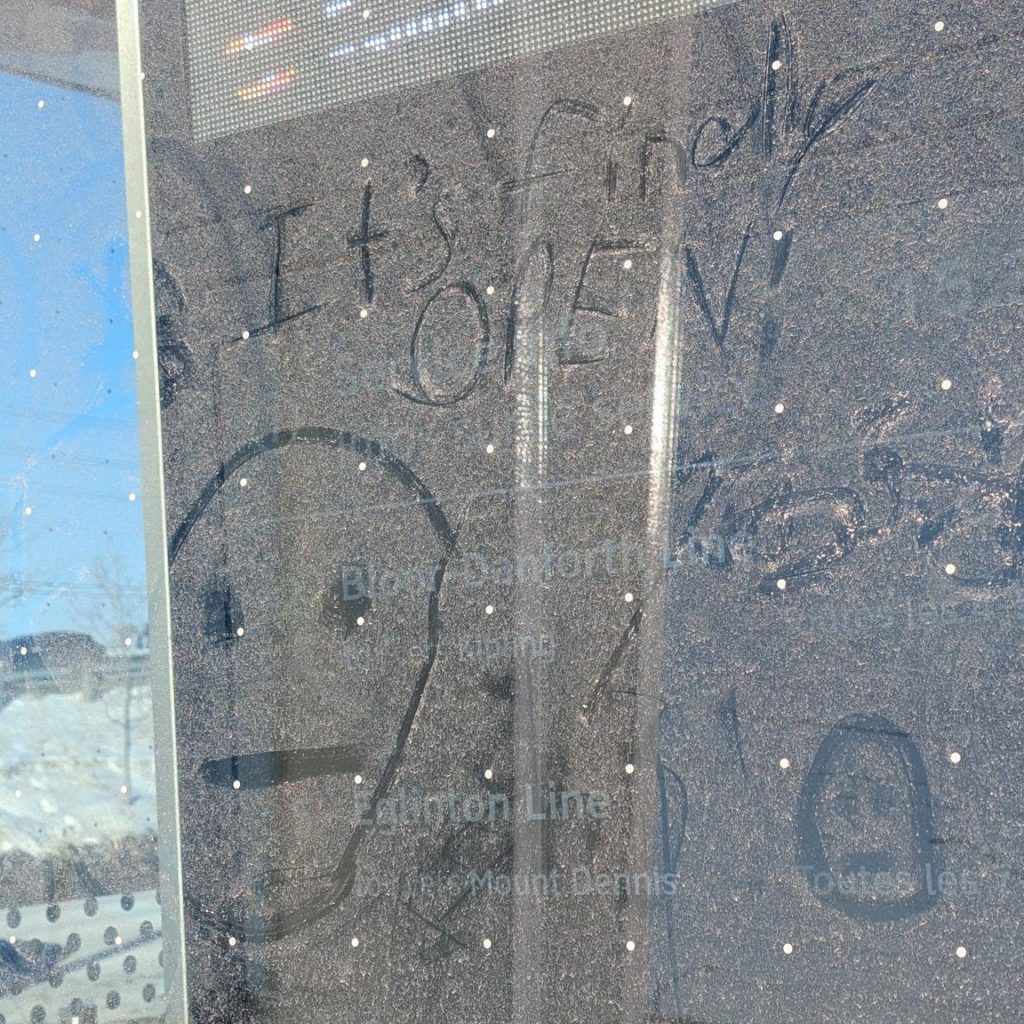
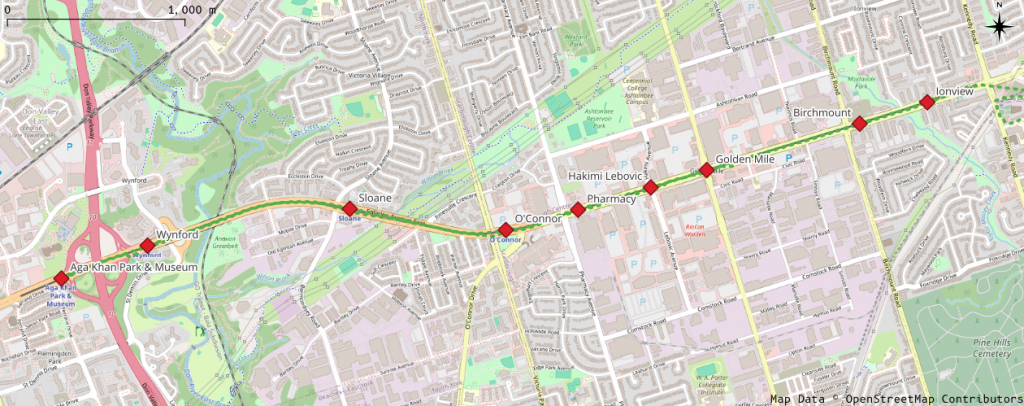
It’s years late and many millions over budget, but — at last — the TTC Line 5 Eglinton Crosstown is open today! I am slightly happy for them, as finally they’ll have to stop making excuses about why it’s closed.
I rode a little bit of it today (it was free) and this little bit of dust graffiti sums up how I feel
I rode the surface section from Kennedy to Aga Khan Park this afternoon, and my overall impression was: wow, this is really slow.
Map of Eglinton Avenue East, showing Crosstown stations from Aga Khan Park & Museum to Ionview
I was only able to track the train from Ionview, as my phone GPS is useless underground.
Westbound
I got on a westbound train a little after 15:30
Station
Distance / km
Arrive
Depart
Time
Speed / km/h
Ionview
15:37:20
Birchmount
0.552
15:39:05
15:39:40
1′ 45″
18.9
Golden Mile
1.244
15:42:37
15:42:39
2′ 57″
25.3
Hakimi Lebovic
0.455
15:44:29
15:44:30
1′ 50″
14.9
Pharmacy
0.592
15:47:55
15:48:30
3′ 25″
10.4
O’Connor
0.584
15:50:00
15:51:55
1′ 30″
23.3
Sloane
1.225
15:53:25
15:54:03
1′ 30″
49.0
Wynford
1.600
15:56:45
15:57:17
2′ 42″
35.5
Aga Khan Park & Museum
0.718
15:58:25
1′ 08″
38.0
Total
6.969
21′ 05″
19.8
Despite getting up to almost 50 km/h between O’Connor and Sloane, we still didn’t exceed an average of 20 km/h over the whole 7 km trip. So many stops for lights. Traffic on Eglinton was moving faster than us.
Eastbound
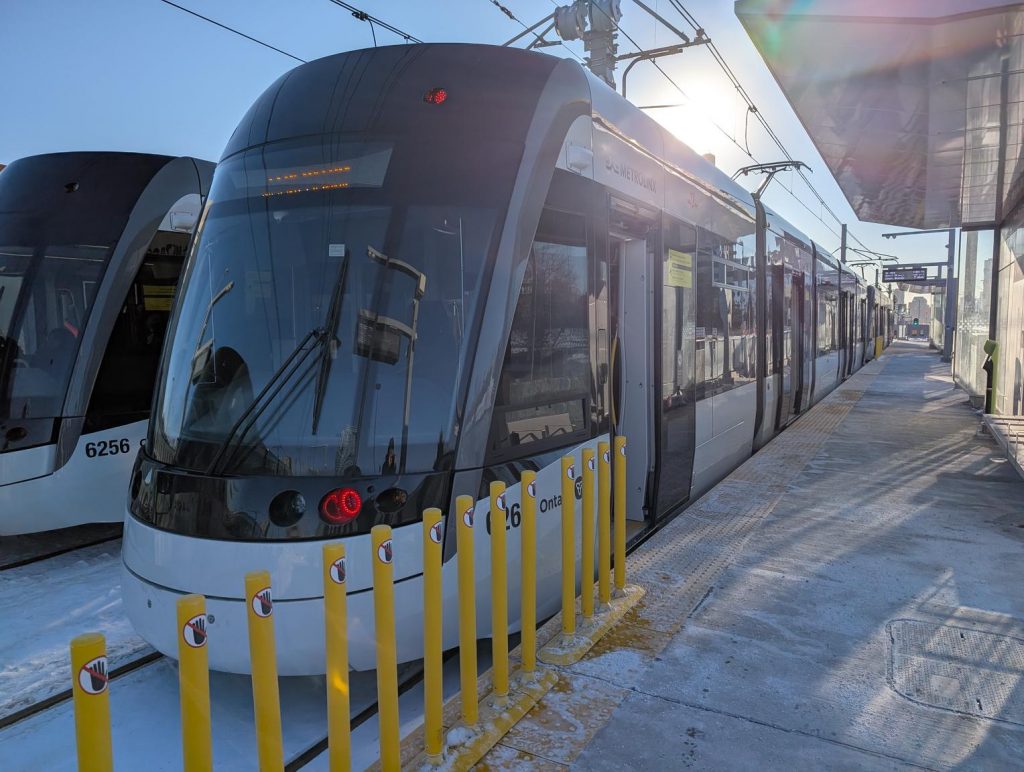
Two Alstom TTC/Metrolinx Crosstown light rail trains sit at the rather snowy Aga Khan Park station
I had to wait for 10 minutes at Aga Khan Park station for the return train. It was just a little brisk out. When it finally arrived, it was so busy that I ended up smushed against a door for most of the ride.
Station
Distance / km
Arrive
Depart
Time
Speed / km/h
Aga Khan Park & Museum
16:08:55
Wynford
0.718
16:10:10
16:11:00
1′ 15″
34.4
Sloane
1.600
16:14:00
16:14:45
3′ 00″
32.0
O’Connor
1.225
16:17:35
16:19:15
2′ 50″
25.9
Pharmacy
0.584
16:20:35
16:21:15
1′ 20″
26.3
Hakimi Lebovic
0.592
16:23:10
16:23:30
1′ 55″
18.5
Golden Mile
0.455
16:25:52
16:25:54
2′ 22″
11.5
Birchmount
1.244
16:29:50
16:30:25
3′ 56″
19.0
Ionview
0.552
16:31:35
1′ 10″
28.4
Total
6.969
22′ 40″
18.4
Even slower coming back.
It’s okay, TTC/Metrolinx: we’ve got used to waiting.
Josh Bensadon had brought some very silly little devices he’d made that played the startup chime when you pressed a button. They contained a small PIC chip programmed with the PWM sequence, a tiny speaker, a battery and the switch. For certain people, it brought so much joy. Retrocomputing folks can be easily amused, it seems.
I don’t have a PET, but I do have fond memories of the one we borrowed from school during the holidays around 1980. The PET doesn’t have great sound capabilities, as Dave at Tynemouth Software notes. But looking at the captured waveform dumped from VICE’s audio output, it looks suspiciously close to four repeats of these 7 steps:
80 cycles of 4329.0 Hz;
40 cycles of 2164.5 Hz;
20 cycles of 1082.3 Hz;
10 cycles of 541.1 Hz;
20 cycles of 1082.3 Hz;
40 cycles of 2164.5 Hz;
80 cycles of 4329.0 Hz.
Conveniently, all of these steps have the same duration (0.01848 s). The odd series of frequencies seem to be coming from a clock divider: 4329.0 Hz is 1,000,000 ÷ 231, 2164.5 Hz is 1,000,000 ÷ (2 × 231), and so on.
The end result, cobbled together by many calls to sox, sounds like this:
Commodore PET Synthesized Startup Chime: mp3
It sounds not too bad. It doesn’t have the fade-in effect caused by the PET’s power supply coming on, but it has the right character.
Its spectrogram is particularly special:
Commodore PET Synthesized Startup Chime: spectrogram. Yes, it’s all square waves
I’m slightly embarrassed to be asking about this, but I’ve been looking for some particularly cheesy conference call hold music (aka music on hold) for years.
It was on a Telus (Canada) conference call system operated for my then employer, an Alberta-based power utility. It may have been any time from 2006–8, perhaps as late as 2013.
All I have to help you is my extremely poor rendition of the main theme on a cellphone keyboard-type thing:
Mystery Music on Hold – main theme: badly played on a keyboard type thing
There were two other “movements” to the piece. The only detail I remember from the other ones is that there was a random Windows alert noise (chord.wav)inserted into one of them, possibly in error. It sounded like this:
Yes, I’m going to ask about this on Hold Music, too …
E. Lamprecht’s MZ2SYNTH is a delightfully weird piece of code. It is an advanced wavetable synthesizer programmed only by an input image. Here’s an example:
Documentation is pretty sparse, so I’ve had to work it out as best I can:
input data must be a 720 px high NetPBM PPM or PGM image with a black background
waveforms are specified by pixel colour: sine, square, sawtooth and triangle are red, green, blue and luminance
dynamics are manipulated by changing the pixel brightness
the input plays at a constant rate along the horizontal pixels, defaulting to 10 pixels/second
The pitch is specified by the Y coordinate. To convert from MIDI note number n to an input coordinate for mz2synth, use this formula: y=6×(140 – n) So for Middle C (MIDI note 60), the Y coordinate would be 480.
I’ve created a very simple example that plays a C major scale with simple sine waves with no dynamics.
The input image:
The resulting audio:
And the python code that produced the image:
#!/usr/bin/env python3
# -*- coding: utf-8 -*-
# mz2-draw - draw a Cmaj scale in the right input format for mz2synth
# scruss, 2025-11
# mz2synth - https://github.com/frankenbeans/MZ2SYNTH
# command line:
#   mz2 -v -o mz2-cmaj.au mz2-cmaj.ppm

from PIL import Image, ImageDraw


# convert midi note number (20..127) to
# vertical offset for mz2 input
# notes < 20 (G#0) can't be played by mz2
def midi_to_y(n):
    return 6 * (140 - n)


middle_c = 60
maj_scale = (0, 2, 4, 5, 7, 9, 11, 12)
# maj_chord = (0, 4, 7)

# mz2 input must be 720 px high,
# preferably black bg
im = Image.new("RGB", (10 * len(maj_scale), 720), "black")
draw = ImageDraw.Draw(im)

for i, d in enumerate(maj_scale):
    # bright red lines mean full
    # volume sine waves
    draw.line(
        [
            10 * i,
            midi_to_y(middle_c + d),
            10 * i + 8,
            midi_to_y(middle_c + d),
        ],
        "red",
        1,
    )

# mz2 can only read NetPBM PPM format
im.save("mz2-cmaj.ppm")
Building
mz2synth comes with Windows and Mac OS binaries. To run the Mac code, you need Homebrew with the gcc@13 recipe. See this issue for details.
To build on Linux, you’ll need gfortran. A build script could be something like this:
git clone https://github.com/frankenbeans/MZ2SYNTH.git
cd MZ2SYNTH/SOURCE
make -f Makefile.gfortran
Put the resulting mz2 binary somewhere in your path, and that’s all the installation it needs. These same instructions should work for Mac OS.
If you really want to live on the edge (note: not really) and get a faster binary at the expense of array bounds checking, use this to recompile instead of the above make line:
teleprinter tape glued to index card, 15 × 10 cm, paper/card/highlighter pencils (2025)
This is the only surviving fragment of The Epic of Mitorzp. It was transmitted by an unknown intelligence, but discarded by human operators as mere line noise.
HE F=RIDZT GOT
   T BAZU N LH EENGER COULDDARA=
 LSEEWTARM. = LISON =ASWHJDOO ZAS ZETH
  MI=TI ZEAC OS B=PN LLHERE T-R=RS
=WE=Z=PNS=E M HIZI VALD R G M
    M ANT =ART=H MITORZP PBTHAT L
   EEUEB XTAZ=ECL EELING F OMB=
     ICKSAWN=LTO HIS ENZ=
Who was Mitorzp? A hero? An outcast? We will never know. This tiny remnant can only hint at the colossal magnitude of the lost epic.
Atari ST disks were weird. Although they were nominally FAT format 3½″ double density disks, they wouldn’t read on a PC. You could format a disk on a PC, however, and the Atari would read/write it just fine.
I had a (virtual) stack of roughly 170 Atari ST disk images that I wanted to access from Linux. mtools, the FAT image reading suite for Linux, could only read 4 of the disks. It didn’t help that some of the images had 82 tracks, or 11 sectors per track, where 80 tracks and 9 sectors per track were standard. I knew that the Hatari emulator could read the images, but the ST’s graphical interface made automation difficult.
I sought help years ago, but that didn’t come to much. I tried again the other day: hatari’s hatari-prg-args combined with the gulam shell made it work.
You’ll probably need EmuTOS so that Hatari can emulate hard drives. I used the current etos512us.img ROM image throughout.
First, I made a folder structure for the emulated hard disk:
If you’re transferring a lot of disk images, you probably want to add some speed-up options to the Hatari command line. For my batch conversion job, I added:
--fast-forward 1 --cpuclock 32 --fast-boot 1 --fastfdc 1 --protect-floppy on
The whole disk contents are now in the gemdos/bclip folder:
This process allowed me to batch-convert most of FaST Club’s Mono Clip Art collection and put it up on the Internet Archive in a readable format: FaST Club Mono Clip Art Selection
Update …
I now have an Atari ST, and something very odd happened: I can read (real) Atari ST disk images just file with mtools. Here’s one to play with:
Tom’s A Short Course In Programming (1980) is a good introduction for new 1802 programmers. Print copies are rare, so someone on the cosmacelf group asked if it existed as a printable PDF. Well, when you put it like that …
conversion shell script, for those who like to tinker and/or want to use a sensible page size: short_course.sh (zipped). It uses curl to download the web pages and Calibre’s ebook-convert to do the HTML → PDF (and e-book) magic.
The linked PDF is quite similar to what you’d get if you went to Tom’s page and selected File → Print… in your browser, except:
the cover image is a Netronics ELF II, from Wikimedia Commons — with the appropriate attribution inserted into the document, as required by the image licence;
a known typo is corrected: references to $2E80 are changed to $2E82;
the document links to Tom’s site.
All of this is done automatically, so if any of the source URLs change, the script will break.
… Other than hats or pins I find there is rarely a good reason for a pi these days. You can get cheap x86 thin clients that beat the pants off them – the dell wyse ones are very cheap on ebay and excellent, the 5070 has an m2 slot and upgradable ram.
I’ve had Raspberry Pis since they were launched. I used to work for an Official Reseller. I’ve been hired for my expertise with them. They’re so much part of the woodwork around here that I’ve never really considered them expensive. So how do they compare to an ex-corporate thin client box?
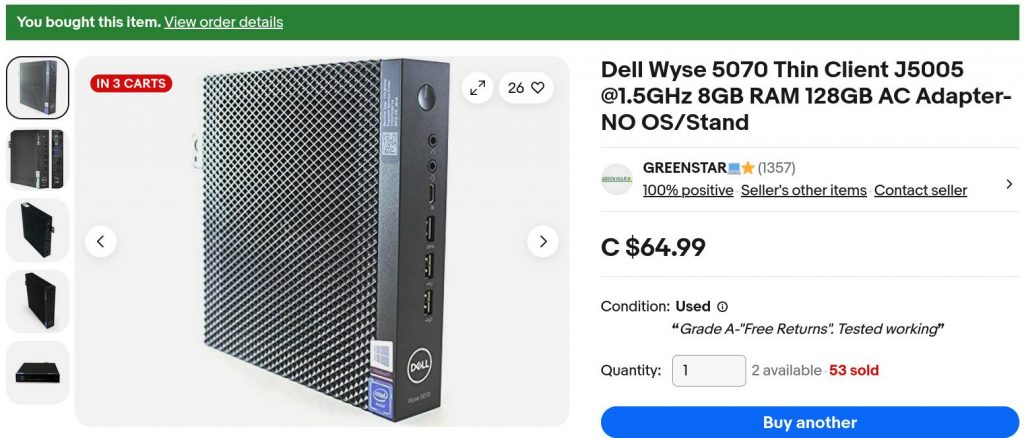
Dell Wyse 5070
I found one on eBay from a local reseller, GREENSTAR💻⭐. For $68.44 including sales tax (that’s €42), I got a used thin client box including:
a great big power supply brick;
Intel j5005 quad core cpu, fanless;
8 GB of DDR4 RAM (dated 2021);
128 GB SATA M.2 SSD;
3× DisplayPort video ports, 1920×1080 at 60 Hz;
5× USB 3 ports, 1× USB C port and 2× USB 2 ports;
a real 9-pin serial port;
no wifi!
This isn’t a detailed hardware review: for those, I suggest you read Gough Lui and David Parkinson. To get this machine up to a usable spec, I added:
a DisplayPort → HDMI cable (about $20);
a replacement BIOS backup battery ($1);
a cheap USB wifi adapter. I’m still finding old RTL8188CUS dongles about the house from the early Raspberry Pi days, some still in original packaging. These work, but aren’t great, but I can’t beat the price.
All in — excluding monitor, keyboard and mouse — I’ll say I brought it in for $100 inclusive (about €61).
Raspberry Pi 5
To come up with an equivalent system (bought from an Official Reseller that I didn’t work for) I’d need:
Description
Price
Raspberry Pi 5 8GB
$114.95
Raspberry Pi 45W USB-C Power Supply
$21.99
Case (with fan)
$13.95
MicroHDMI to HDMI Cable (2 m)
$9.95
128GB SD Card
$24.95
RTC Battery
$7.00
Subtotal
$192.79
Sales Tax
$25.06
Total
$217.85
(or €134)
Not all of these items are available from the one reseller, particularly the 128 GB SD Card and RTC battery. I’ve included the RTC battery so you can do timed power-on tricks as with a regular PC. All the parts are from Raspberry Pi themselves. Curiously, you can pay more for non-official accessories with the CanaKit Raspberry Pi 5 Starter Kit at $224.95 + tax.
Raspberry Pi 4
An equivalent 8 GB Raspberry Pi 4 system breaks down like this:
Description
Price
Raspberry Pi 4 8GB
$104.95
Raspberry Pi 15W USB-C Power Supply
$10.95
Case
$6.95
Case fan
$6.75
MicroHDMI to HDMI Cable (2 m)
$9.95
128GB SD Card
$24.95
DS3231 Real Time Clock Module for Raspberry Pi
$9.95
Subtotal
$174.45
Sales Tax
$22.68
Total
$197.13
(or €121.)
This is surprisingly expensive, and unless you must have this particular SoC, likely better to go with a Raspberry Pi 5. Again, the RTC is optional, but timed power-on can be handy in a small computer. Most of the “RTC for Pi” boards use a cheaper DS3231M clock chip which can’t issue alarms for power control. You might have to shop around a bit to get this particular part.
(As a former employee of a reseller, I suspect I’m permanently blocked from sharing why official resellers bundle third-party bits with their kits, always with a considerable price bump. Let’s just say that, during the Pandemic Chip Shortage, it was very galling to get a rare shipment of Raspberry Pi boards, go to extreme lengths to cancel multiple orders [oh the javascript injection hack attempts that I saw] and hurry to ship the boards out. The next day, we’d see what had to be the same hardware appearing on eBay at a 300% markup. And there was nothing we could do about it …)
Testing
I’m not interested in testing:
Network throughput — Beyond having a working connection, I don’t have the skill or attention span to test networking stuff
Video performance — I don’t really do video things. Raspberry Pis and thin clients are going to struggle with full screen 60 fps video anyway, and optimizing this is not my jam
Power consumption — I don’t have the right kit for this. All I have is a 20 year old Kill-a-Watt clone which doesn’t have the necessary resolution.
I’m going to have to rely on benchmarks. Benchmark results are notoriously easy to fiddle and give only a rough idea of how a system will perform in real life. I’m going to present the results of three systems (Raspberry Pi 4 and 5, Dell Wyse 5070: all running stock but up-to-date Raspberry Pi OS or Debian) in three tests, in decreasing order of arbitrariness.
1: MP3 Encoding
The time, in seconds, to encode Aphex Twin’s minimalist opus aisatsana [102] (5′ 21″) from a 55MB WAV file to a 6.8MB MP3 with:
time lame -V 2 aphex_twin-aisatsana.wav
System
Time
Raspberry Pi 4
14.2 s
Dell Wyse 5070
8.6 s
Raspberry Pi 5
5.7 s
The thin client comes out between the two Raspberry Pis. It’s not a bad result at all: 8.6 s is still 37× real-time encoding.
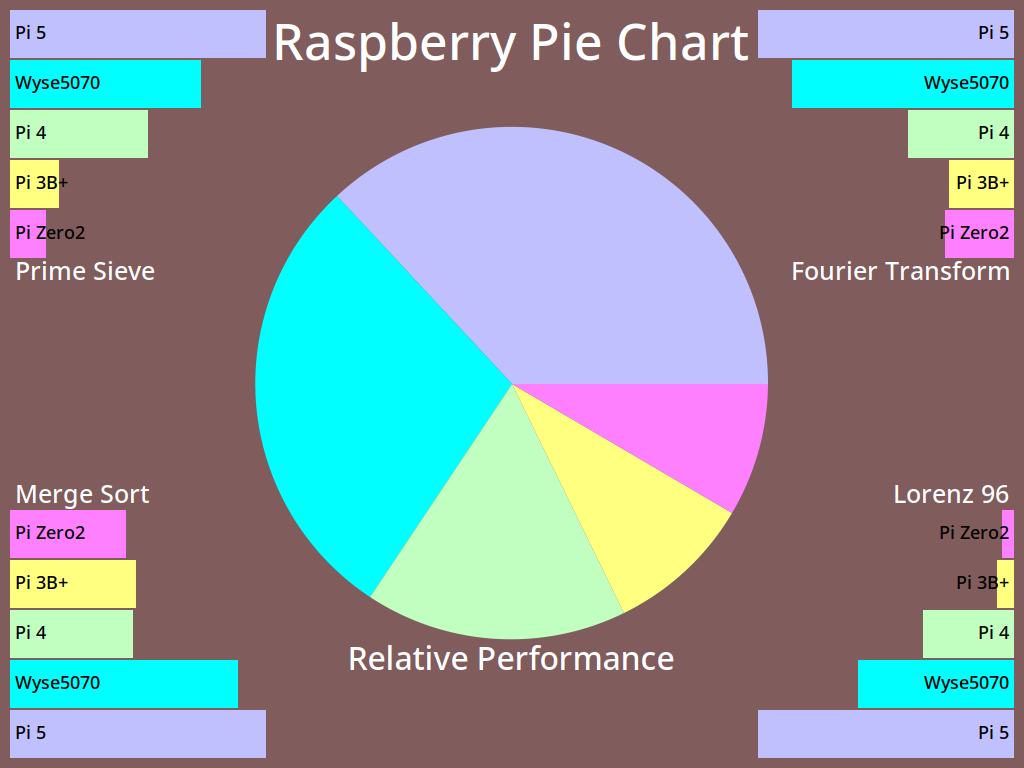
2: pichart
pichart is a processor benchmark developed by Eric Olson for ranking numeric processing power of various computers against Raspberry Pi boards. It’s documented here: A Pi Pie Chart.
It’s possible to tweak this benchmark endlessly with compiler options, but I stuck with whatever version of gcc the system came with. I also used exceptionally conservative compiler options of -O2. I reckon that if your compiler has got to version 12, it won’t be producing terrible code with simple options. Anyway:
All of these are OpenMP multi-core, multi-thread results. The Wyse 5070 holds a pretty solid second place to the Raspberry Pi 5.
3: UnixBench 6.0.0
byte-unixbench must be a very serious benchmark because it wraps a whole suite of results into one impenetrable number. We’re supposed to believe that This Number has some respectable heft. It certainly takes a long time to run (almost half an hour) and if your computer has fans, things can get loud.
Since all three machines have four cores, it’ll save a lot of words to report only the multi-core System Benchmarks Index Score:
For all its purported repeatability, this set of scores surprised me most. The Wyse 5070 doesn’t feel much slower than either Raspberry Pi board. Could the small SATA SSD be a bottleneck? I’d have to spend money to find out.
(I also ran sbc-bench, but the results are even less enlightening. The only thing I could discern was that the Wyse 5070 was running some kind of custom thermal regime. Since it has no fan and only a modest heat-pipe cooler, this is no surprise. My results, have at ’em: sbc-bench)
Conclusions
I can get two Wyse 5070 systems for the cost of one Raspberry Pi 4 or 5. This is what makes the decision for me, and every other issue is window dressing. So much of “I made a thing with a Raspberry Pi!” is really “I made a thing with a small Linux computer!” these days, and the 5070 and other thin clients excel at this.
Yes, the Raspberry Pi 5 is likely to be slightly faster that the Wyse 5070. And if you’re locked-in to their cameras, HATs or GPIO layout, you’re probably going to stick with Raspberry Pi. Likewise, if you’re kitting out a classroom, Raspberry Pis are all repeatable, from the same vendor, and have a proper warranty. Nobody in education got fired for buying Raspberry Pi — even if the micro:bit is the STEM board of choice round these parts.
Even if the supply can be a bit variable, and you can’t be quite sure you’ll be able to get the same spec every time, the Wyse 5070 represents great value for money. I’ll definitely think twice about buying a Raspberry Pi next time.
… about those GPIO pins
If you’re not constrained to using Raspberry Pi’s 40-pin header or specific HAT hardware, you’ve still got options, including but not limited to:
an FT232H Breakout and PyFtdi. It may be possible (with some fiddling) to make the FT232H appear as a Linux gpio chip directly;
and of course, Firmata running on an Arduino is exactly where you left it in 2011. It still works, it hasn’t gone away, and is still at the heart of many custom interactive installations.
Parting thought
“raspberry pi computer” is an anagram of “temporary price burps”. This, I feel, is important for you to know.
![image of text: Hey, do you like dot matrix printers? You do? Well, I have quite the treat for you: NearlyQ, the “Near Letter Quality” 9pin printer simulating font! Derived directly from the character ROM from an Amstrad DMP3160 printer, it has *all* of the characters: [character table removed] There’s also NearlyQMono for the fixed-width text in your life. Both fonts come with »»»BOLD««« variants, too! Much ? to the CPCWiki contributors for the ROM dumps (C) 2026, Stewart Russell – scruss.com - OFL](https://scruss.com/wordpress/wp-content/uploads/2026/07/NearlyQ_sample.png)