Rather than use the Adafruit trade name, these are more properly called WS2812 LEDs. Each one contains a tiny microcontroller and it only takes three connections to drive a long chain of addressable colour LEDs. The downside is that the protocol to drive these is a bit of a bear, and really needs an accurate, fast clock signal to be reliable.
The STM32F411 chip does have just such a clock, and the generic micropython-ws2812 library slightly misuses the SPI bus to handle the signalling. The wiring’s simple:
F411 GND to WS2812 GND;
F411 3V3 to WS2812 5V;
F411 PA7 (SPI1_MOSI) PB15 (SPI2_MOSI) to WS2812 DIn
Next, copy ws2812.py into the WeAct F411’s flash. Now create a script to drive the LEDs. Here’s one to drive 8 LEDs, modified from the library’s advanced example:
# -*- coding: utf-8 -*-

import time
import math

from ws2812 import WS2812

ring = WS2812(spi_bus=2, led_count=8, intensity=0.1)

def data_generator(led_count):
    data = [(0, 0, 0) for i in range(led_count)]
    step = 0
    while True:
        red = int((1 + math.sin(step * 0.1324)) * 127)
        green = int((1 + math.sin(step * 0.1654)) * 127)
        blue = int((1 + math.sin(step * 0.1)) * 127)
        data[step % led_count] = (red, green, blue)
        yield data
        step += 1

for data in data_generator(ring.led_count):
    ring.show(data)
    time.sleep_ms(100)
Previously I said you’d see your WS2812s flicker and shimmer from the SPI bus noise. I thought it was cool, but I suspect it was also why the external flash on my F411 board just died. By pumping data into PA7, I was also hammering the flash chip’s DI line …
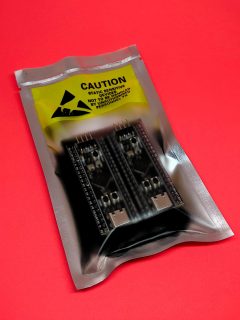
Volker Forster at Universal Solder was kind enough to send me a couple of these boards for free when I asked about availability. By way of thanks, I’m writing this article about what’s neat about these micro-controller boards.
always neat packaging from Universal Solder
Can I just say how nicely packaged Universal Solder’s own or customized products are? They want it to get to you, and they want it to work.
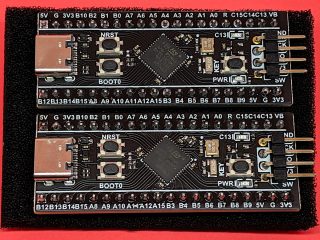
I’d previously played around with Blue Pill and Black Pill boards with limited success. Yes, they’re cheap and powerful, but getting the toolchain to work reliably was so much work. So when I read about the WeAct STM32F411CEU6 board on the MicroPython forum, I knew they’d be a much better bet.
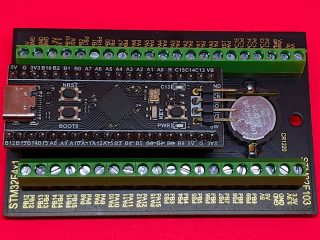
Canaduino Black Pill Carrier Board with STM32F411 (and battery) installed
Let’s start with the STM32 Screw Terminal Adapter:
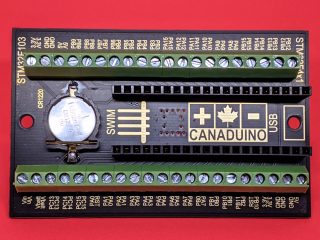
Canaduino Black Pill Carrier Board (front)
It’s a neat, solid board built on a black 1.6 mm thick PCB. Apart from the obvious screw terminals — essential for long-term industrial installations — it adds three handy features:
a real-time clock battery. If you’re using a micro-controller for data logging, an RTC battery helps you keep timestamps accurate even if the device loses power.
mounting holes! This may seem a small thing, but if you can mount your micro-controller solidly, your project will look much more professional and last longer too.
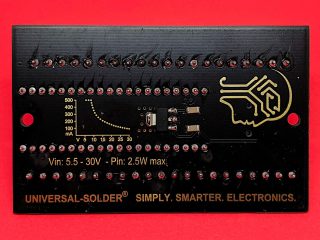
A 6–30 V DC regulator. Connect this voltage between Vin and GND and the regulator will keep the board happy. From the helpful graph on the back of the board, it doesn’t look as if things start getting efficient until around 12 V, but it’s really nice to have a choice.
Canaduino Black Pill Carrier Board (back)
I made a little slip-case for this board so it wouldn’t short out on the workbench. The project is here: Canaduino STM32 Screw Terminal board tray and you can download a snapshot here:
Gone are the lumpy pin headers of the earlier Blue and Black Pill boards, replaced by tactile switches. The iffy micro USB connectors are replaced by much more solid USB C connectors. According to STM32-base, the STM32F411 has:
100 MHz ARM Cortex-M4 core. This brings fast (single-precision) floating point so you don’t have to fret over integer maths
512 K Flash, 128 K RAM. MicroPython runs in this, but more flash is always helpful
Lots of digital and analogue I/O, including a 12-bit ADC
A user LED and user input switch.
About the only advanced features it’s missing are a true RNG, a DAC for analogue outputs, and WiFi. But on top of all this, Volker added:
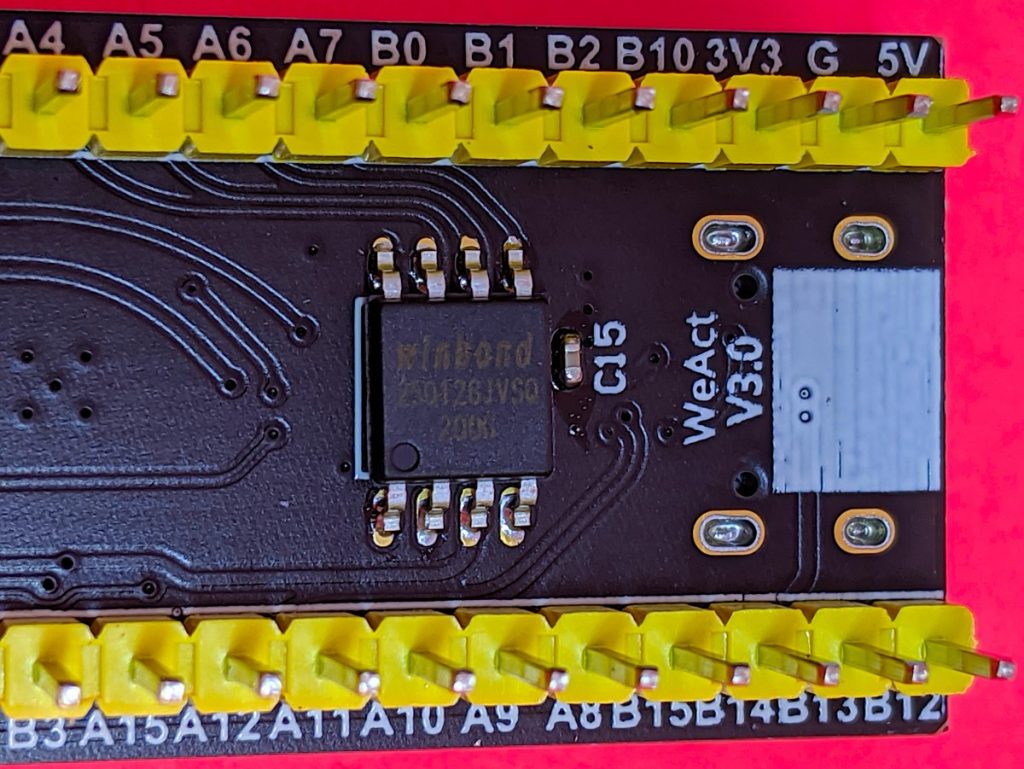
the all-important 128 Mbit flash chip (and capacitor) fitted by Universal Solder
128 Mbit of Flash! This gives the board roughly 16 MB of storage that, when used with MicroPython, appears as a small USB drive for your programs and data. I found I was able to read the ADC more than 22,000 times/second under MicroPython, so who needs slow-to-deploy compiled code?
I had to run make a couple of times before it would build, but it built and installed quickly. This board doesn’t take UF2 image files that other boards use, so the installation is a little more complicated than other. But it works!
Once flashed, you should have a USB device with two important MicroPython files on it: boot.py and main.py. boot.py is best left alone, but main.py can be used for your program. I’m going into more details in a later article, but how about replacing the main.py program with the fanciest version if Blink you ever saw:
# main.py -- fancy Blink (scruss, 2020-05)

from pyb import LED
from machine import Timer
tim = Timer(-1)
tim.init(period=1000, mode=Timer.PERIODIC,
         callback=lambda t: LED(1).toggle())
None of that blocking delay() nonsense: we’re using a periodic timer to toggle the user LED every second!
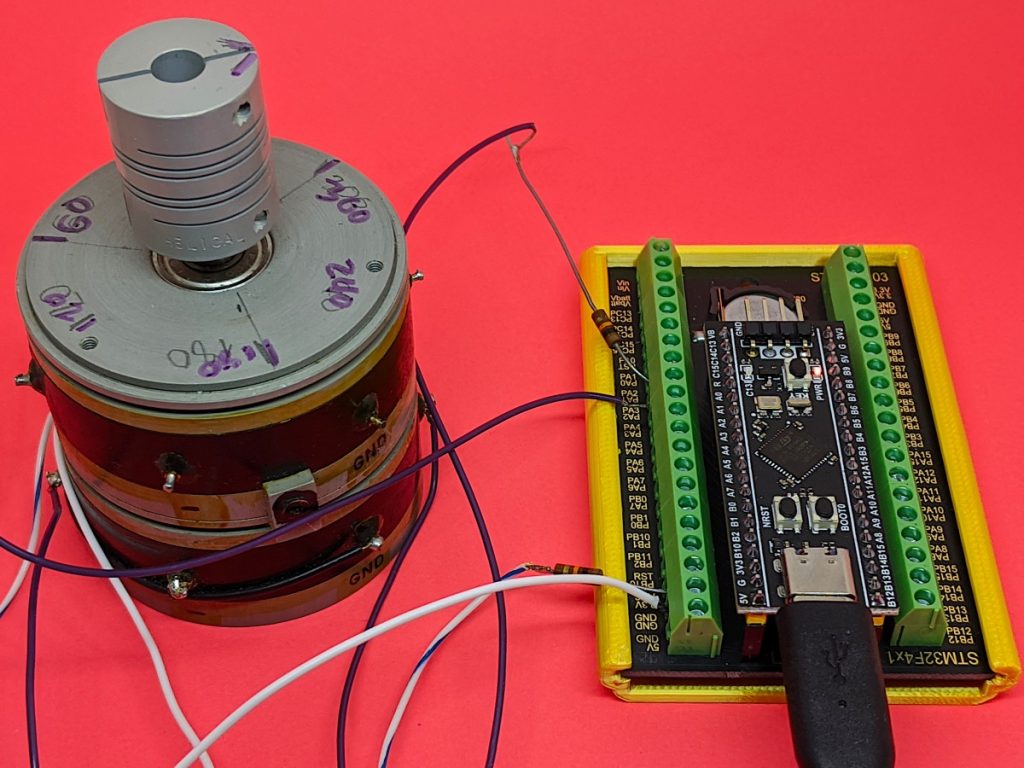
debugging the mystery huge potentiometer using two ADC channels
I’m really impressed with the Universal Solder-modified board as an experimentation/discovery platform. MicroPython makes development and testing really quick and easy.
[and about the mystery huge potentiometer: it’s a Computer Instruments Corporation Model 206-IG multi-turn, multi-track potentiometer I picked up from the free table at a nerd event. I think it’s a 1950s (so Servo-control/Cybernetics age) analogue equivalent of a shaft encoder, looking at the patent. Best I can tell is that each pot (there are two, stacked, with precision bearings) appears to have two 120° 10k ohm sweep tracks offset 90° to one another. The four wipers are labelled -COS, -SIN, +COS and +SIN. If anyone knows more about the thing, let me know!]
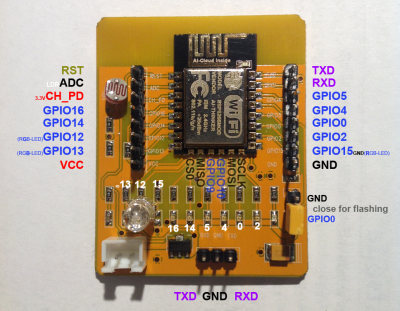
It’s not really in a useful form factor, but it’s got some sensors and outputs:
an LDR on the ADC channel
RGB LED for PWM on pins 15, 12 & 13
red LEDs pins 16, 14, 5, 4, 0, 2 with inverted logic: set them low to light them.
My board can’t quite be the earliest of the early, as it has 1 MB of flash. This is enough to install MicroPython, so I wrote a tiny test program for the outputs:
run a binary counter every second on the six red LEDs;
cycle through a colour wheel on the RGB LED while this is happening.
Here’s the code:
# esp8266 old explorer board
# see https://www.esp8266.com/wiki/lib/exe/detail.php?id=esp8266-dev-boards&media=esp8266-12_mod.png

from time import sleep
from machine import Pin, PWM
# LEDs are 16, 14, 5, 4, 0, 2 - L to R
# inverted logic: 1 = off
leds = [Pin(2, Pin.OUT, value=1), Pin(0, Pin.OUT, value=1), Pin(4, Pin.OUT, value=1), Pin(
    5, Pin.OUT, value=1), Pin(14, Pin.OUT, value=1), Pin(16, Pin.OUT, value=1)]

# RGB for PWM on [15, 12, 13]
rgb = (PWM(Pin(15)), PWM(Pin(12)), PWM(Pin(13)))
# LDR on ADC


def cos_wheel(pos):
    # Input a value 0 to 255 to get a colour value.
    # scruss (Stewart Russell) - 2019-03 - CC-BY-SA
    from math import cos, pi
    if pos < 0:
        return (0, 0, 0)
    pos %= 256
    pos /= 255.0
    return (int(255 * (1 + cos(pos * 2 * pi)) / 2),
            int(255 * (1 + cos((pos - 1 / 3.0) * 2 * pi)) / 2),
            int(255 * (1 + cos((pos - 2 / 3.0) * 2 * pi)) / 2))


i = 1
while True:
    i = i + 1
    i = i % 64
    w = cos_wheel(4 * i)
    for j in range(3):
        rgb[j].duty(4 * w[j])

    for k in range(6):
        if i & (1 << k):
            leds[k].value(0)
        else:
            leds[k].value(1)
    sleep(1)
The PC I put together a few years ago (well, Scott Sullivan told me which bits to get, I bought them and assembled it) is still working really well. It was quite spiffy in its day — i7-4790K, 32 GB DDR3, Asus H97M-E — and is quite fast enough for me.
One thing, though, has never worked. The hardware serial port (the old kind, not the USB kind) refused to do anything. Only in the last day or so did I work out why and managed to fix it.
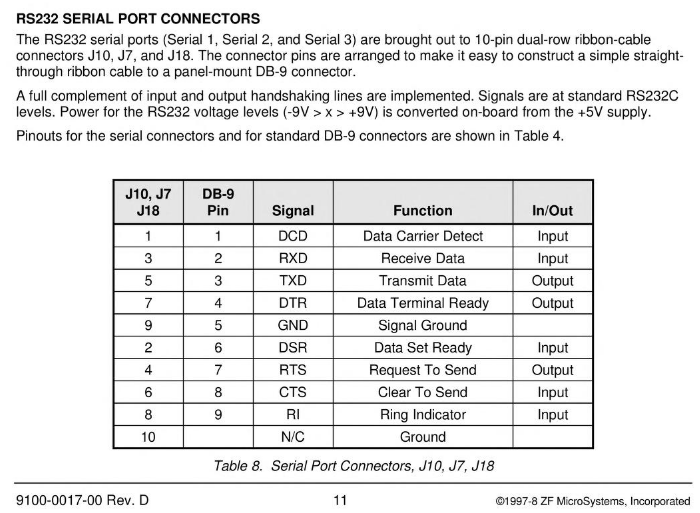
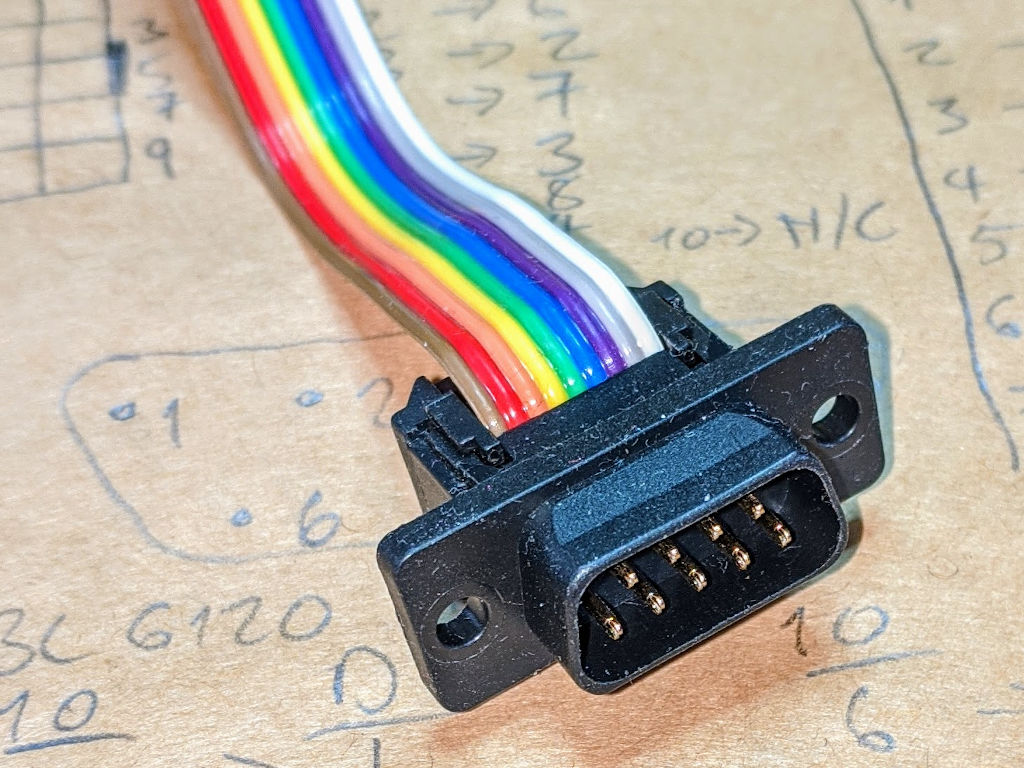
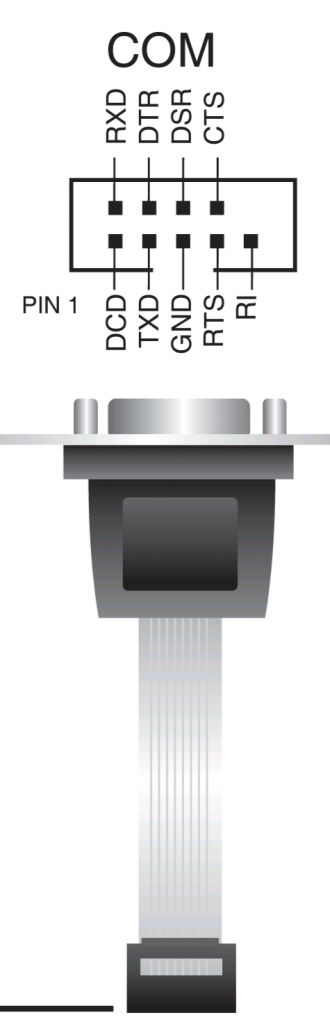
PC serial ports for roughly the last 25 years connected to the motherboard like this:
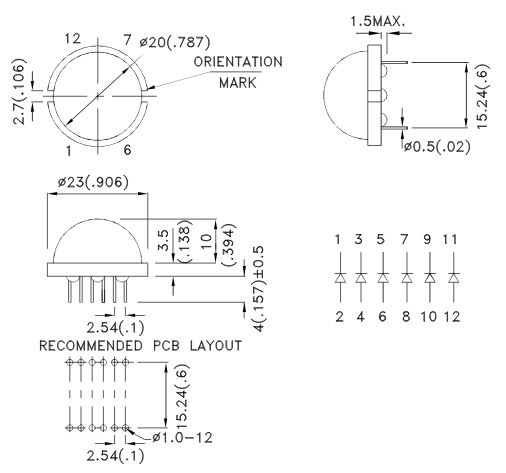
For it-seemed-like-a-good-idea-at-the-time reasons, I’ve ended up with a couple of tubes of the big dome LEDs. A tube is a lot; something over 20 pieces. Oh well, I’ll find uses for them eventually.
No Fritzing model of the part yet, but here’s a sketch that works, but quite fails to use any interesting PWM functions at all:
// do a whirly thing with the 6 LEDs inside a LEDTronics L806T_UG-LIME 20 mm Big Dome unit
// scruss - 2020-04
// https://www.ledtronics.com/Products/ProductsDetails.aspx?WP=281
// each thru 100R resistor - which might be rather small

#define MAXPINS 5
int pwmpins[] = { 3, 5, 6, 9, 10, 11 };
int i = 0;

void setup() {
  // pwm pins as output, all initially off
  for (i = 0; i <= MAXPINS; i++) {
    pinMode(pwmpins[i], OUTPUT);
    analogWrite(pwmpins[i], 0);
  }
}

void loop() {
  if (i > MAXPINS) {
    i = 0;
  }
  analogWrite(pwmpins[i], 255);
  analogWrite((i > 0) ? pwmpins[i - 1] : pwmpins[MAXPINS], 0);
  delay(30);
  i++;
}
One of the quirks of the SBC6120-RBC boards I just built is that its serial port talks a protocol that’s very rarely seen these days: 7 bits, mark parity, 1 stop bit. minicom supports it, but seemingly can’t set it from the command line.
Kermit, of course, can. Kermit (not the frog, but named after him) is the connect-to-anything, with-anything comms package. It’s been in constant development since 1981, and there’s hardly a computer system that exists that it won’t run on. The Unix/Linux variant, C-Kermit, has an incredibly intricate hand-crafted makefile that predates autoconf or cmake or any of those newfangled toys. Unfortunately, though, this means it may need a lot of reading and a little hand to compile.
There may be some additional dependencies, but to build a simple version of C-Kermit 9.0.304 Dev.23 on Ubuntu 19.10 and Raspbian Buster you need this patch, and do something like:
mkdir ckermit
cd ckermit
wget http://www.kermitproject.org/ftp/kermit/test/tar/cku304-dev23.tar.gz
tar xvzf cku304-dev23.tar.gz
wget https://src.fedoraproject.org/rpms/ckermit/raw/master/f/ckermit-9.0.302-fix_build_with_glibc_2_28_and_earlier.patch
patch < ckermit-9.0.302-fix_build_with_glibc_2_28_and_earlier.patch
make linux
and it should build correctly. There are many, many options: make linux+ssl gives some extra network security features; make install puts it in the system path.
The command line I use to connect to the SBC6120-RBC is:
kermit -l /dev/ttyUSB0 -p m -b 38400 -m none -c
That drops you straight into a connection. To get you back to Kermit’s command mode, type Ctrl + \ + C.
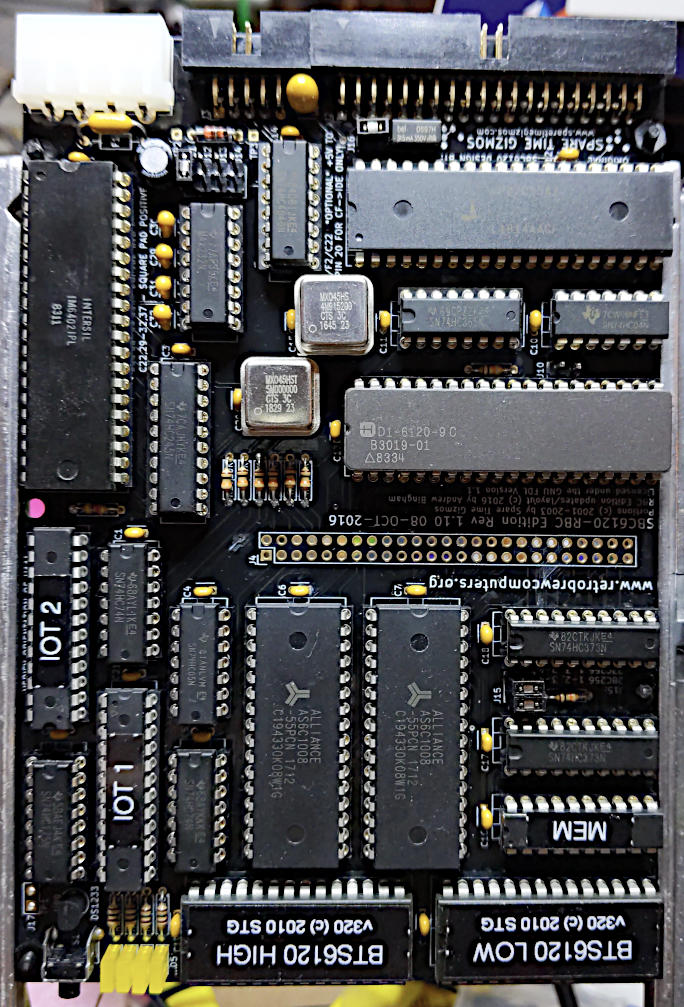
A couple of years back, I said I was building a single board computer and then things went quiet. Yes, I screwed up. A mix of dry joints and possibly burning through traces caused by following old instructions, impatience and a very unforgiving solder type made the original board almost unusable. I finally got a replacement board (thanks, Andrew!) and put in a humongous Digikey order for all the projects that I want to finish, and got going.
I swapped out the 5 MHz crystal for a blazingly fast 8 MHz one
I took quite a bit more care building this, but it was still only a couple of evenings to put it together. While I still used lead-free solder, I hardly needed extra flux at all. The nice ($$$) turned-pin sockets hold the chips much more securely than the cheaper plain sockets I used before.
After a minor hiccup (homebrew null modem cable needs both RX and TX to be useful), it lives!
SBC6120 ROM Monitor V320 Checksum 3752 6072 3515 09-APR-10 21:15:39
Copyright (C) 1983-2010 by Spare Time Gizmos. All rights reserved.
NVR: Not detected
IDE: 489MB - LEXAR ATA FLASH
IOB: Not detected
B
-IDA0
.BASIC
NEW OR OLD--OLD
FILE NAME--ASCART
READY
LIST
ASCART BA 5B
100 FOR Y=-12 TO 12
110 FOR X=-39 TO 39
120 C1=X*.0458
130 C2=Y*.08333
140 A=C1
150 B=C2
160 FOR I=0 TO 15
170 T=A*A-B*B+C1
180 B=2*A*B+C2
190 A=T
200 IF (A*A+B*B)>4 GOTO 240
210 NEXT I
220 PRINT " ";
230 GOTO 270
240 IF I<=9 GOTO 260
250 I=I-57
260 PRINT CHR$(48+I);
270 NEXT X
280 PRINT
290 NEXT Y
300 END
READY
RUN
ASCART BA 5B
000000011111111111111111122222233347E7AB322222111100000000000000000000000000000
000001111111111111111122222222333557BF75433222211111000000000000000000000000000
000111111111111111112222222233445C 643332222111110000000000000000000000000
011111111111111111222222233444556C 654433332211111100000000000000000000000
11111111111111112222233346 D978 BCF DF9 6556F4221111110000000000000000000000
111111111111122223333334469 D 6322111111000000000000000000000
1111111111222333333334457DB 85332111111100000000000000000000
11111122234B744444455556A 96532211111110000000000000000000
122222233347BAA7AB776679 A32211111110000000000000000000
2222233334567 9A A532221111111000000000000000000
222333346679 9432221111111000000000000000000
234445568 F B5432221111111000000000000000000
864332221111111000000000000000000
234445568 F B5432221111111000000000000000000
222333346679 9432221111111000000000000000000
2222233334567 9A A532221111111000000000000000000
122222233347BAA7AB776679 A32211111110000000000000000000
11111122234B744444455556A 96532211111110000000000000000000
1111111111222333333334457DB 85332111111100000000000000000000
111111111111122223333334469 D 6322111111000000000000000000000
11111111111111112222233346 D978 BCF DF9 6556F4221111110000000000000000000000
011111111111111111222222233444556C 654433332211111100000000000000000000000
000111111111111111112222222233445C 643332222111110000000000000000000000000
000001111111111111111122222222333557BF75433222211111000000000000000000000000000
000000011111111111111111122222233347E7AB322222111100000000000000000000000000000
READY
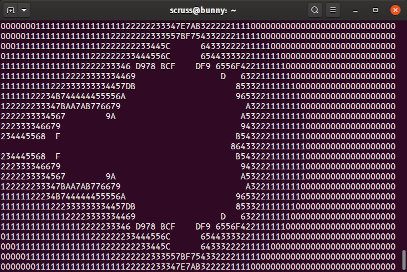
If WordPress’s line wrapping has mangled the above, it should look like this
It compiles and runs a slightly modified ASCIIART.BAS Mandelbrot set benchmark in 144 seconds. This is comparable to many 8-bit computers. The modifications were:
PDP-8 BASIC doesn’t quite use ASCII. Its six-bit character set has digits 0-9 at decimal 48-57 like ASCII, but characters A-F are at decimal 1-6 (instead of 65-70). The manual claims that CHR$() works modulo 64, so maybe I didn’t need to make this change.
Variable names can be called Letter+Number at most, so the original’s CA and CB had to become C1 and C2.
PDP-8 BASIC doesn’t support a familiar IF … THEN … structure, but only effectively an IF … GOTO …. I mean, sure, you can use THEN if you want, but only a line number or a GOTO … following it will avoid the dreaded terse NM error. ELSE? Who needs it?!
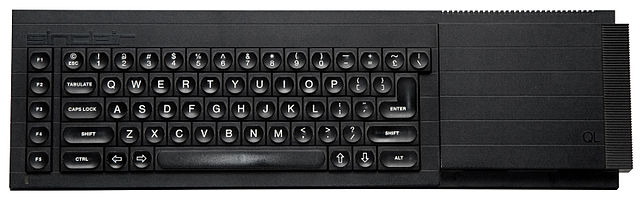
Back in the mid-80s — right around the “computers are the future, innit?†phase of history — Strathclyde University decided that every student should have access to a computer. Unfortunately, the computer they chose was the Sinclair QL:
Sinclair QL by EWX, CC BY-SA 3.0, https://commons.wikimedia.org/w/index.php?curid=13983436
In UK computing, the QL is basically a punchline. With Clive Sinclair’s legendary lavish spending and attention to detail, it shipped late, was initially fiercely buggy, had a keyboard that was 100% nope and used microdrives (an endless loop of magnetic tape in a tiny cartridge) to provide occasionally-retrievable data storage.
My brother was at Strathclyde while these computers were available, so he plunked down the deposit and brought one home. It looked good — especially hooked up to a TV through its SCART port. But it didn’t have much software, outside the tools that were homebrewed for my brother’s course.
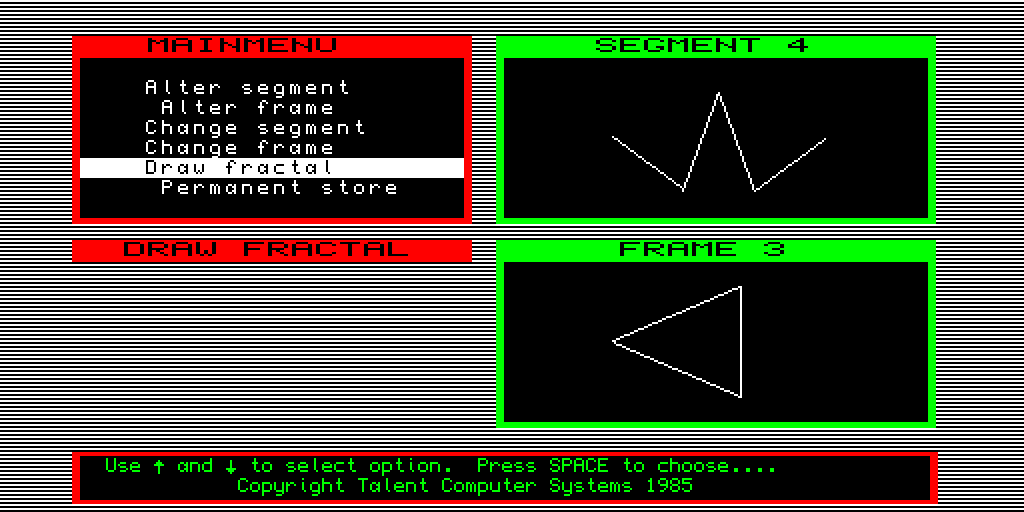
One piece of software that has stuck with me in the ~35 years since then was a fractal graphics creator. I remembered you could draw segments and overlay them on shapes to make geometric figures. I thought this was magic, especially with the QL’s (at the time) quite nippy 68008 processor.
I don’t know what prompted me to look for it today. I’d half-heartedly looked in the past, but found nothing. But today I remembered it was written by a software company based at Strathclyde, and that got me to the Talent Graphics Toolkit:
Talent Graphics Toolkit
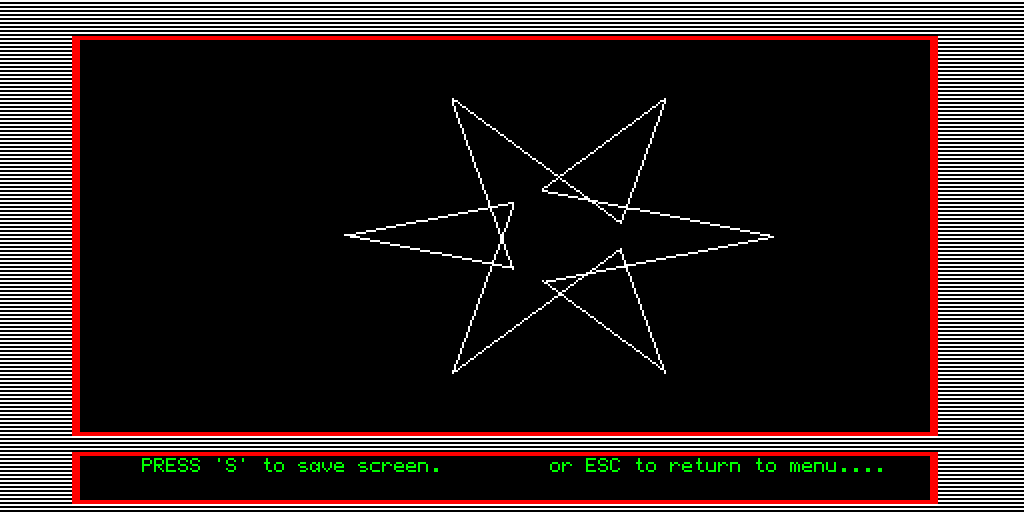
I remembered the “windowed†layout and even the pinstripes. Maybe the graphics were a bit plainer than I remember, but it still delighted me:
why yes, I am easily delighted …
The emulator (uQLx) was not particularly easy to install, but I so wanted to run this again that I persevered.
By the time I got to Strathclyde a few years later, the QLs were history. It was rumoured that there was a storage room full of ’em, and there may even have been a thriving market in not-entirely-legit sales of liberated machines. But that wasn’t my jam back then: we had Atari STs with FaST BASIC cartridges in the engineering lab, and a couple even had connections to the VAX cluster …
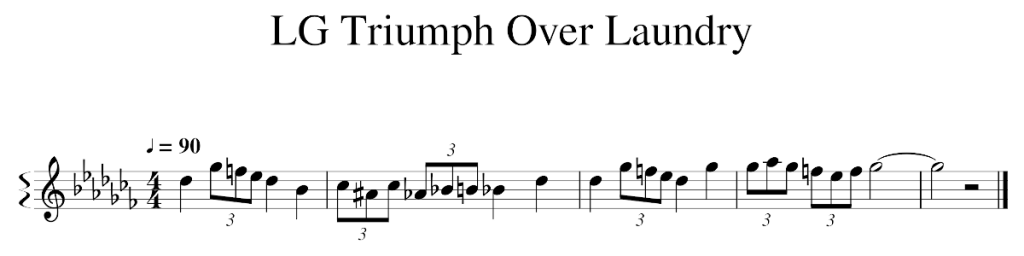
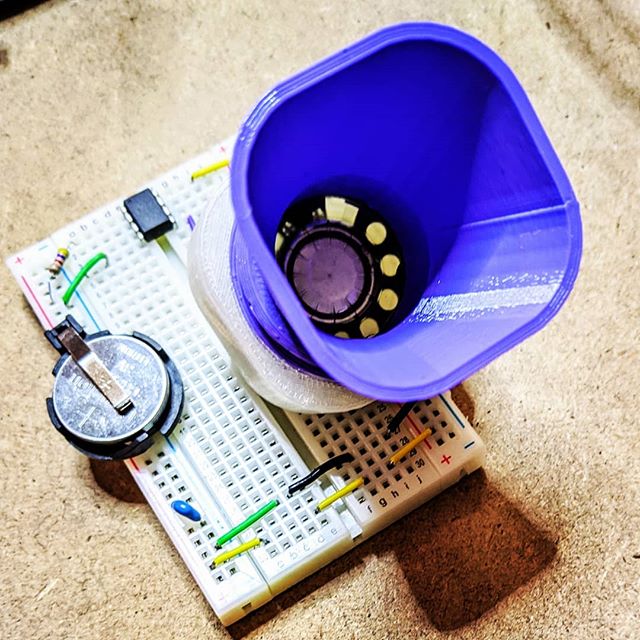
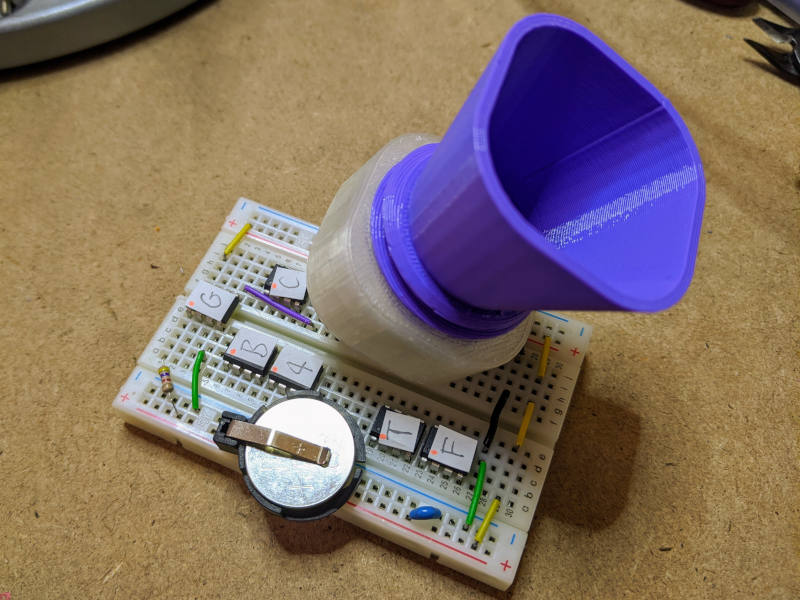
Six whole tunes ready to play on this tiny chiptune player; a couple are included at the end of this article!
I love the ingenuity that goes into making very tiny projects do very big things. I also love chiptunes. So when I read the metafilter post about PROTODOME’s compositions for the ATtiny85, I was very much there for it.
The circuit to play this is no more than a $2 microcontroller, a lithium coin cell and a speaker or piezo buzzer. The microcontroller has 8 KB of program space and 512 bytes of RAM. The output is a single pin, but with very clever pulse width modulation tricks, sounds like three channels plus percussion.
I remembered I had bought a tube of ATtiny microcontrollers a while back. I knew I had a coin cell and tiny speaker. “I can do this!”, I thought.
So what follows is tutorial on compiling embedded code for an ATtiny85 microcontroller on Linux. There are larger tutorials out there, there are better tutorials: but there are also many out-of-date and misleading tutorials. This isn’t a general ATtiny development tutorial, but one specialized on getting PROTODOME’s tunes playing on your microcontroller.
Hardware
The very minimum you will need to play the music is:
a prototyping breadboard. Half size with power rails
a tiny speaker or piezo buzzer. Either will do, and will be pretty quiet — you’re not getting room-filling fidelity out of this project. I used a 28 mm headphone driver I got surplus years ago. The snazzy speaker horn in the picture above is designed to fit this and not much else, alas.
a battery and battery holder. Pretty much anything from 3–5 V will do. I used a CR2032 coin cell in a simple holder to feed 3.2 V to the circuit: SparkFun Coin Cell Battery Holder – 20mm (PTH). Note you’ll need a battery and something to connect it to the breadboard.
a 10 kΩ or higher resistor is highly recommended. All this does is prevent the chip resetting accidentally. Value is not important: I’ve been using a 4.7 kΩone without problem. These are so generic I’m not going to list suppliers (along with the rest of the parts on this list)
a 10 nF ceramic capacitor, while optional, likely makes the power into the µc a tiny bit smoother
jumper wires to connect everything up.
But that’s not all: you’ll need much more kit to program these tiny chips:
a computer running Linux. Yes, you can do this under Windows and Mac OS, but I don’t know how and there are search engines that care about that more than I do. I tested all of this on a Raspberry Pi 4. Tablets and phones are out, sorry
There are two separate toolchains involved — one to build the mmml-compiler to convert PROTODOME’s compositions to µc embedded C code, and another to compile that to ATtiny85 instructions. We can install it all in one go:
git clone https://github.com/protodomemusic/mmml.git
cd mmml/mmml-compiler
gcc -o mmml-compiler mmml-compiler.c
You can then run the compiler on each of the songs; the album title track, for example:
cd ../demo-songs/4000ad/
../../mmml-compiler/mmml-compiler 4000ad.mmml
⚠️ If you get [ERROR 14] Too few channels stated! instead of Successfully compiled! it seems that the compiler isn’t too happy running on some 64-bit systems. I did all my compilation on a Raspberry Pi 4 running Raspbian and all was well. If you can’t get them to compile, I’ve pre-compiled them for you and they’re at the end of this article. (Update: this has been fixed. If you still have the problem, are you running old code?)
You should now have a musicdata.h file that contains all the tune data. Copy it to the same folder as the mmml-player C code:
cp musicdata.h ../../mmml-player/
cd ../../mmml-player/
That folder now contains the player and one tune data file. Now you need to compile it into AVR instruction to write to your chip:
The end result of what that just did is create a single small file mmml.hex containing the ATtiny85 program instructions for the 8+ minute track 4000AD. If you’re compiling for a different µc, you’ll need a different avr-gcc line:
-mmcu=attiny85 will need to be changed for your µc. avr-gcc –target-help lists the supported targets in the “Known MCU names” section way up at the top of its too-copious output. If you’re using the ATmega32P chip made popular by Arduinos, that option should be -mmcu=atmega328p
-DF_CPU=8000000 tells the compiler that the CPU frequency should be 8 MHz. The AVR µcs can run at a huge range of speeds, but PROTODOME’s music is timed to work at 8 MHz only.
→→→ aside
If you find yourself compiling a few simple AVR projects but want to stop short of a fine-but-overly-complex Makefile project for AVR development, this script to create a hex file from a single embedded C source file might be useful:
In addition to creating a hex file, it also runs the avr-size tool to show you much memory your program uses. The 4000AD tune uses 98% of the ATtiny85’s 8192 byte program space — not quite enough to include that 14 minute extra bass solo, sorry …
←←← end aside
Flashing the chip
So now we do some wiring. If you’re using a dedicated programmer, use jumpers to connect its ICSP port to the ATtiny 85 like this:
                        ________
                       |o   A   |
               Reset  -+ 1  T  8+-  VCC
                       |    t   |
                      -+ 2  i  7+-  SCK
                       |    n   |
                      -+ 3  y  6+-  MISO
                       |    8   |
               GND    -+ 4  5  5+-  MOSI
                       |________|


                 MISO    o1 2o   VCC
                 SCK     o3 4o   MOSI
                 Reset   o5 6o   GND

                          ICSP
                        Connector
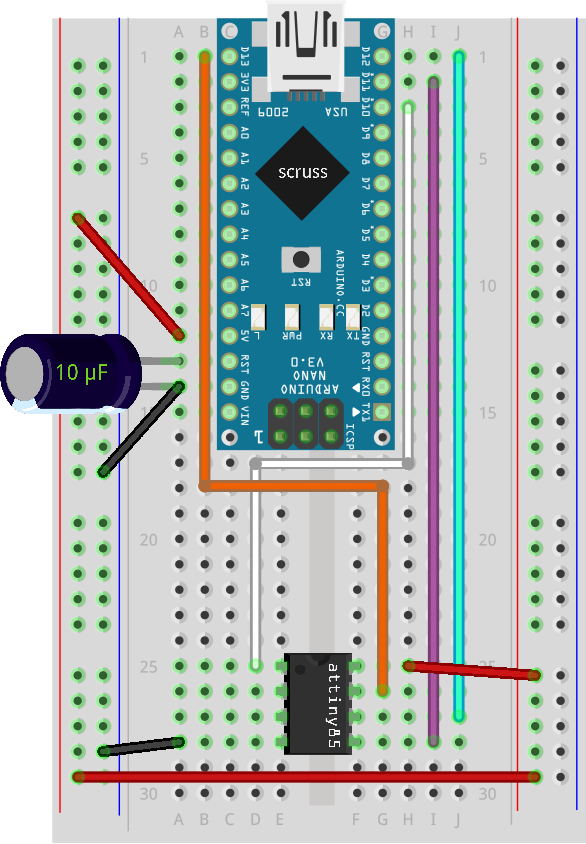
Wire VCC to VCC, MISO to MISO, MOSI to MOSI, SCK to SCK, Reset to Reset and GND to GND. If you’re using an Arduino, you want to do this:
This is “OLD_STYLE_WIRING” for using ArduinoISP, apparently. But it works!
The wiring for that is:
Arduino D10 → ATtiny Pin 1 (Reset)
Arduino GND → ATtiny Pin 4 (GND)
Arduino D11 → ATtiny Pin 5 (MOSI)
Arduino D12 → ATtiny Pin 6 (MISO)
Arduino D13 → ATtiny Pin 7 (SCK)
Arduino 5V → ATtiny Pin 8 (VCC)
You’ll also need to put a 1-10 µF electrolytic capacitor between the Arduino’s Reset and GND pins, but only after you’ve programmed it with the ArduinoISP sketch.
You’re almost there!
Setting up the programmer: USBtinyISP
If you haven’t used one with your computer before, you need to do a little bit of prep so your computer recognizes it. These are modified from a gist:
do sudo vi /etc/udev/rules.d/41-usbtiny.rules
add the line SUBSYSTEM=="usb", ATTR{idVendor}=="1781", ATTR{idProduct}=="0c9f", GROUP="plugdev", MODE="0666"
save and exit
do sudo udevadm control --reload then sudo udevadm trigger
Your system should automatically recognize the device and give you permission to use it without sudo privileges.
Setting up the programmer: ArduinoISP
Load the ArduinoISP sketch (it’s in File → Examples)
Add (or find and uncomment) the line #define USE_OLD_STYLE_WIRING
Upload the code to your Arduino
Connect the 1-10 µF electrolytic capacitor between the Arduino’s Reset and GND pins
To program the mmml.hex you created earlier, you’ll need one of these avrdude commands:
-c usbtiny or -c arduino: programmer type. In addition, the arduino programmer takes additional parameters -P /dev/ttyUSB0 -b 19200 which specify the port (usually /dev/ttyUSB0 or /dev/ttyACM0) and the baud rate (always 19200, unless you changed it in the source of ArduinoISP)
-p attiny85: the chip type, as used in the avr-gcc compiler call way up the top
-U lfuse:w:0xe2:m -U hfuse:w:0xdf:m -U efuse:w:0xff:m: fuses are AVR’s confusing name for configuration bits. You might just have to take my word that this sets an ATtiny85 to use the internal 8 MHz oscillator (as opposed to an external crystal) we told the compiler to use further back. A guide to fuse settings is available at the Engbedded AVR Fuse Calculator
-U flash:w:mmml.hex:i: the hex file we prepared, mmml.hex.
If everything went right with your flashing process, you should see lots of “avrdude: verifying … done. Thank you”. If you don’t, likely you missed a connection somewhere.
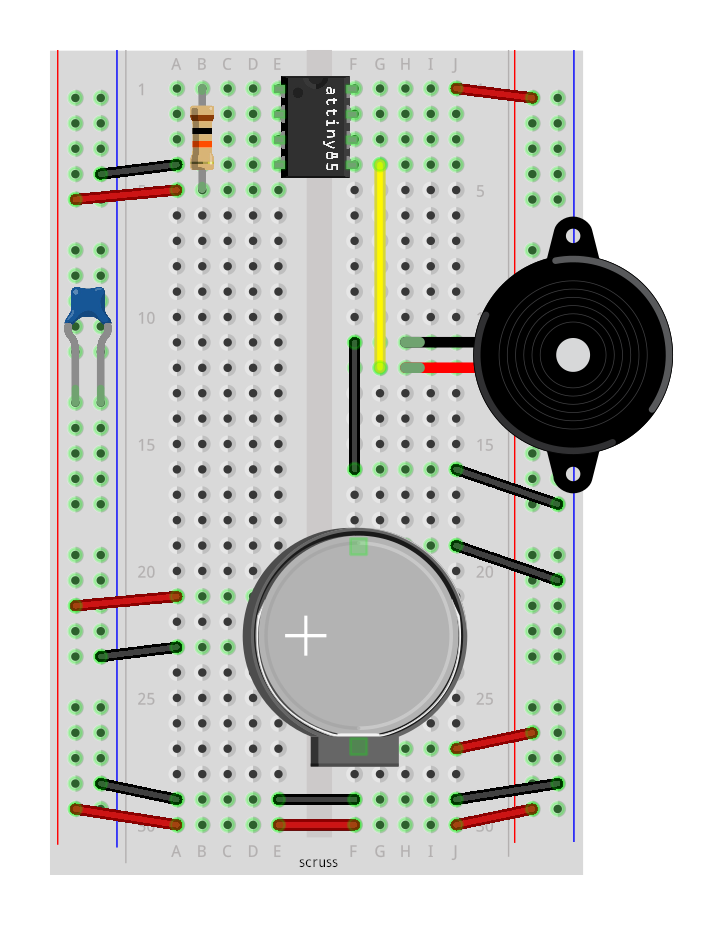
♫ Playing the tunes! ♫
This circuit’s a lot simpler than it looks!
I already described all of the bits in the bill of materials in the Hardware section. If you want it in ASCII art, here’s all there is to it:
                        ________
                       |o   A   |
          VCC--(10kΩ)--+ 1  T  8+--VCC
                       |    t   |
                      -+ 2  i  7+-
                       |    n   |
                      -+ 3  y  6+-      (
                       |    8   |      ((
                  GND--+ 4  5  5+--(SPKR(--GND
                       |________|      ((
                                        (

          Pin 1: RST - held high through pull-up to prevent reset
          Pin 4: GND
          Pin 5: PB0 - through speaker/buzzer to GND
          Pin 8: VCC - can be a CR2032 Lithium coin cell

          Not shown: 100 nF decoupling capacitor between VCC and GND
          Short Pin 1 to GND to restart song
If you weren’t able to compile the tunes, I’ve included (with Blake’s permission) source for any AVR µc plus hex files for ATtiny85s here: protodome-mmml-examples.zip
Last but not least, there are a couple of tracks included in the source that aren’t on the 4000AD album. Blake gave me permission to include them here, too:
Fly Me to the Moon by Bart Howard, arranged for ATtiny85 microcontroller by PROTODOME, 2020. Download: fly_me_to_the_moon.mp3Till There was You by Meredith Willson (from the musical ‘The Music Man’), arranged for ATtiny85 microcontroller by PROTODOME, 2020. Download: till_there_was_you.mp3
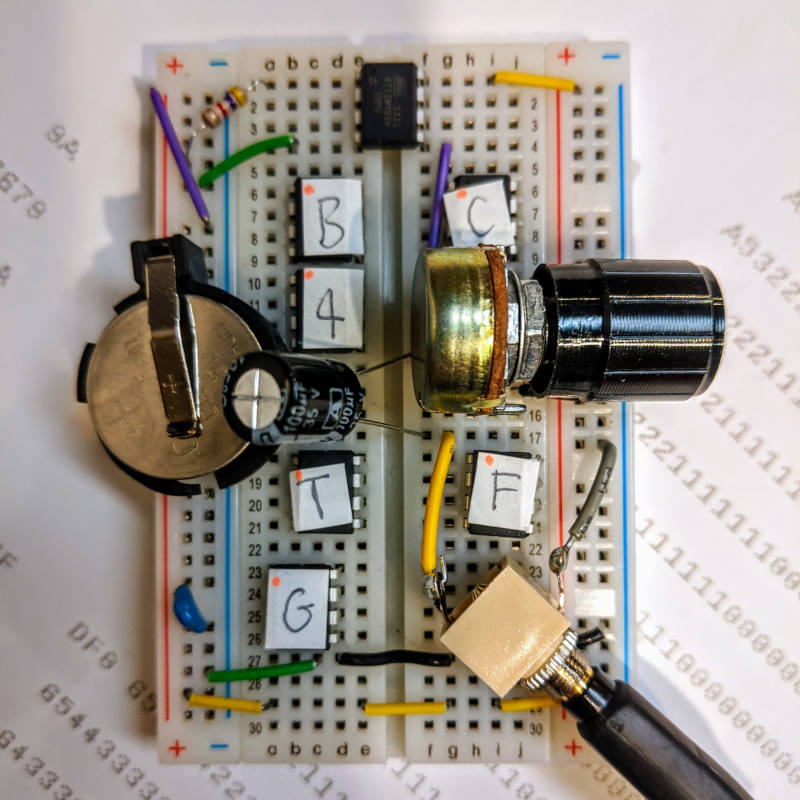
These weren’t recorded from a tiny speaker (that went badly), but directly to a Marantz solid state recorder. The rig’s the same as the playback one, with the speaker replaced by a potentiometer (for level control), a 100 µF capacitor (to take off some of the DC bias and also to cut some of the very high frequencies) and a headphone socket. Have fun!
The old X10 devices were getting really unreliable: seldom firing at all, getting far too hot, bringing a whole lot of not working to my life. So while it was kind of cool to have my lights controlled by an original 256 MB Raspberry Pi Model B from 2012, it was maybe working one schedule out of ten.
So it had to go: replaced by a Raspberry Pi Zero W and a whole lot of IKEA TRÅDFRI kit. I was deeply unimpressed with the IKEA Home smart app, though: you couldn’t use even basic schedules with more than one light cycle per day. So while I know there are lots of clever home automation systems, I wanted to replace my old cron scripts and set about writing some simple command tools. The result is ihsctrl: very limited, but good enough for me. It’s been working exactly as expected for the last week, so I’ll finally get to wade through 8 years of cobwebs and dismantle the old X10 setup. I already miss the 06:30 clonk of the X10 controller turning the front light on — that was my alarm clock (or alarm clonk) every morning.
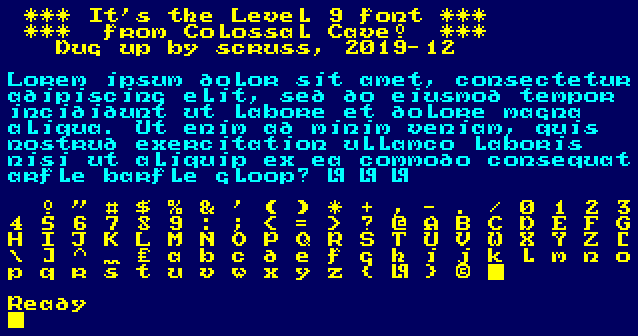
Though I didn’t really have the patience for text adventures, Level 9 used what I thought was the coolest font (circa 1985). After checking through them all on the Internet Archive Amstrad CPC software library, I couldn’t find a version that used this bitmap font. I eventually found it on nvg. After lots of messing about, I extracted it and present it here. I’m sure I’ll make a TTF of it soon enough.
Tastes change a bit, don’t they?
 10 REM     *** L9FONT.BAS ***
 15 REM bitmap font from Level 9's
 20 REM Colossal Cave adventure
 30 REM  on the Amstrad CPC 464
 40 REM (it was so cool at the time…)
 50 REM Dug up by scruss, 2019-12
 60 REM ==============================
 100 SYMBOL AFTER 32
 110 MODE 1
 120 GOSUB 1000
 130 PRINT" *** It's the Level 9 font ***"
 140 PRINT" ***  from Colossal Cave!  ***"
 150 PRINT"   Dug up by scruss, 2019-12"
 160 PRINT
 170 PEN 2
 180 PRINT"Lorem ipsum dolor sit amet, consectetur"
 190 PRINT"adipiscing elit, sed do eiusmod tempor"
 200 PRINT"incididunt ut labore et dolore magna"
 210 PRINT"aliqua. Ut enim ad minim veniam, quis"
 220 PRINT"nostrud exercitation ullamco laboris"
 230 PRINT"nisi ut aliquip ex ea commodo consequat"
 240 PRINT"arfle barfle gloop? | | |"
 250 PRINT
 260 PEN 1
 270 FOR i%=32 TO 127
 280 PRINT CHR$(i%); " ";
 290 NEXT i%
 300 PRINT
 310 PRINT
 990 END
 1000 SYMBOL 33,&18,&24,&24,&24,&18,&0,&18,&0
 1010 SYMBOL 34,&66,&66,&44,&88,&0,&0,&0,&0
 1020 SYMBOL 35,&0,&24,&7E,&24,&24,&7E,&24,&0
 1030 SYMBOL 36,&12,&7C,&D0,&7C,&16,&FC,&10,&0
 1040 SYMBOL 37,&E4,&A4,&E8,&10,&2E,&4A,&4E,&0
 1050 SYMBOL 38,&70,&D8,&D8,&72,&D6,&CC,&76,&0
 1060 SYMBOL 39,&30,&30,&20,&40,&0,&0,&0,&0
 1070 SYMBOL 40,&1C,&38,&70,&70,&70,&38,&1C,&0
 1080 SYMBOL 41,&70,&38,&1C,&1C,&1C,&38,&70,&0
 1090 SYMBOL 42,&10,&54,&38,&FE,&38,&54,&10,&0
 1100 SYMBOL 43,&0,&10,&10,&7C,&10,&10,&0,&0
 1110 SYMBOL 44,&0,&0,&0,&0,&30,&30,&20,&40
 1120 SYMBOL 45,&0,&0,&0,&F8,&0,&0,&0,&0
 1130 SYMBOL 46,&0,&0,&0,&0,&0,&60,&60,&0
 1140 SYMBOL 47,&0,&4,&8,&10,&20,&40,&0,&0
 1150 SYMBOL 48,&7C,&C6,&CE,&D6,&E6,&C6,&7C,&0
 1160 SYMBOL 49,&8,&18,&38,&18,&18,&18,&3C,&0
 1170 SYMBOL 50,&3C,&66,&C,&18,&30,&62,&7E,&0
 1180 SYMBOL 51,&7E,&4C,&18,&3C,&6,&66,&3C,&0
 1190 SYMBOL 52,&4,&C,&1C,&2C,&7E,&C,&1E,&0
 1200 SYMBOL 53,&3E,&66,&60,&7C,&6,&6,&7C,&0
 1210 SYMBOL 54,&3C,&66,&60,&7C,&66,&66,&3C,&0
 1220 SYMBOL 55,&7E,&46,&6,&C,&C,&18,&18,&0
 1230 SYMBOL 56,&3C,&66,&34,&18,&2C,&66,&3C,&0
 1240 SYMBOL 57,&3C,&66,&66,&3E,&6,&66,&3C,&0
 1250 SYMBOL 58,&0,&30,&30,&0,&0,&30,&30,&0
 1260 SYMBOL 59,&0,&30,&30,&0,&30,&30,&20,&40
 1270 SYMBOL 60,&1C,&30,&60,&C0,&60,&30,&1C,&0
 1280 SYMBOL 61,&0,&0,&F8,&0,&F8,&0,&0,&0
 1290 SYMBOL 62,&E0,&30,&18,&C,&18,&30,&E0,&0
 1300 SYMBOL 63,&7C,&64,&C,&18,&10,&0,&10,&0
 1310 SYMBOL 64,&7C,&C6,&DE,&D2,&DE,&C0,&7E,&0
 1320 SYMBOL 65,&18,&6C,&C6,&C6,&FE,&66,&F6,&0
 1330 SYMBOL 66,&FC,&C6,&C6,&FC,&C6,&C6,&FC,&0
 1340 SYMBOL 67,&3C,&66,&C0,&C0,&C0,&66,&3C,&0
 1350 SYMBOL 68,&D8,&EC,&C6,&C6,&C6,&EC,&D8,&0
 1360 SYMBOL 69,&FE,&62,&60,&78,&60,&62,&FE,&0
 1370 SYMBOL 70,&FE,&62,&60,&78,&60,&60,&E0,&0
 1380 SYMBOL 71,&3C,&66,&C0,&CE,&C6,&66,&3C,&0
 1390 SYMBOL 72,&C6,&C6,&C6,&FE,&C6,&C6,&C6,&0
 1400 SYMBOL 73,&7E,&18,&18,&18,&18,&18,&7E,&0
 1410 SYMBOL 74,&FE,&8C,&C,&C,&C,&CC,&78,&0
 1420 SYMBOL 75,&E6,&CC,&D8,&F0,&D8,&CC,&C6,&0
 1430 SYMBOL 76,&E0,&C0,&C0,&C0,&C0,&C2,&FE,&0
 1440 SYMBOL 77,&C6,&EE,&FE,&D6,&C6,&C6,&CC,&0
 1450 SYMBOL 78,&CE,&E6,&F6,&DE,&CE,&C6,&C6,&0
 1460 SYMBOL 79,&38,&6C,&C6,&C6,&C6,&6C,&38,&0
 1470 SYMBOL 80,&DC,&E6,&C6,&C6,&FC,&C0,&C0,&0
 1480 SYMBOL 81,&38,&6C,&C6,&C6,&CA,&64,&3A,&0
 1490 SYMBOL 82,&DC,&E6,&C6,&C6,&FC,&CC,&C6,&0
 1500 SYMBOL 83,&7C,&C6,&C0,&7C,&6,&C6,&7C,&0
 1510 SYMBOL 84,&FE,&B2,&30,&30,&30,&30,&30,&0
 1520 SYMBOL 85,&E6,&66,&C6,&C6,&C6,&C6,&7C,&0
 1530 SYMBOL 86,&E6,&66,&C6,&C6,&CC,&78,&30,&0
 1540 SYMBOL 87,&EC,&66,&C6,&C6,&D6,&D6,&6C,&0
 1550 SYMBOL 88,&EE,&C6,&6C,&38,&6C,&C6,&EE,&0
 1560 SYMBOL 89,&EE,&C6,&2C,&18,&18,&18,&18,&0
 1570 SYMBOL 90,&FE,&8C,&18,&30,&60,&C2,&FE,&0
 1580 SYMBOL 91,&7C,&64,&60,&60,&60,&60,&7C,&0
 1590 SYMBOL 92,&0,&60,&30,&10,&8,&C,&6,&0
 1600 SYMBOL 93,&3E,&6,&6,&6,&6,&26,&3E,&0
 1610 SYMBOL 94,&18,&24,&42,&42,&0,&0,&0,&0
 1620 SYMBOL 95,&0,&0,&0,&0,&0,&0,&EE,&BB
 1630 SYMBOL 96,&3C,&22,&78,&20,&78,&20,&7E,&0
 1640 SYMBOL 97,&0,&0,&74,&DC,&C4,&CC,&74,&0
 1650 SYMBOL 98,&C0,&C0,&DC,&E6,&C6,&E6,&DC,&0
 1660 SYMBOL 99,&0,&0,&78,&CC,&C0,&CC,&78,&0
 1670 SYMBOL 100,&0,&70,&18,&7C,&CC,&CC,&78,&0
 1680 SYMBOL 101,&0,&0,&78,&CC,&FC,&C0,&7C,&0
 1690 SYMBOL 102,&68,&74,&60,&F8,&60,&60,&60,&C0
 1700 SYMBOL 103,&0,&0,&78,&CC,&C0,&CC,&7C,&C
 1710 SYMBOL 104,&C0,&C0,&D8,&EC,&CC,&D8,&DC,&0
 1720 SYMBOL 105,&C,&0,&38,&18,&18,&18,&38,&0
 1730 SYMBOL 106,&6,&0,&1C,&C,&C,&C,&4C,&38
 1740 SYMBOL 107,&C0,&C0,&CC,&D8,&F0,&D8,&CE,&0
 1750 SYMBOL 108,&30,&30,&30,&30,&30,&36,&3E,&0
 1760 SYMBOL 109,&0,&0,&AC,&D6,&D6,&C6,&CC,&0
 1770 SYMBOL 110,&0,&0,&BC,&C6,&C6,&CC,&DE,&0
 1780 SYMBOL 111,&0,&0,&7C,&C6,&C6,&C6,&7C,&0
 1790 SYMBOL 112,&0,&0,&DC,&E6,&C6,&E6,&DC,&C0
 1800 SYMBOL 113,&0,&0,&76,&CE,&C6,&CE,&76,&6
 1810 SYMBOL 114,&0,&0,&DC,&E6,&C6,&FC,&C6,&0
 1820 SYMBOL 115,&0,&0,&3C,&60,&3C,&8E,&7C,&0
 1830 SYMBOL 116,&18,&30,&FC,&30,&30,&32,&1C,&0
 1840 SYMBOL 117,&0,&0,&E6,&66,&C6,&C6,&7A,&0
 1850 SYMBOL 118,&0,&0,&EC,&66,&C6,&EC,&38,&0
 1860 SYMBOL 119,&0,&0,&EC,&C6,&D2,&7C,&28,&0
 1870 SYMBOL 120,&0,&0,&EE,&6C,&38,&6C,&EE,&0
 1880 SYMBOL 121,&0,&0,&EC,&C6,&6C,&18,&30,&E0
 1890 SYMBOL 122,&0,&0,&FE,&9C,&30,&62,&FE,&0
 1900 SYMBOL 123,&C,&30,&30,&60,&30,&30,&C,&0
 1910 SYMBOL 124,&CF,&DB,&DB,&CF,&C3,&DB,&FB,&0
 1920 SYMBOL 125,&60,&18,&18,&C,&18,&18,&60,&0
 1930 SYMBOL 126,&7C,&C6,&BA,&A2,&BA,&C6,&7C,&0
 1940 SYMBOL 127,&FF,&FF,&FF,&FF,&FF,&FF,&FF,&FF
 1950 RETURN
The scanned library catalogues are available as PDF: About the TPUG Library. They’re searchable via web search engines: Google: site:tpug.ca amiga “puzzle maker”. The search is only as good as the OCR in the scan, but is better than nothing.
What you can’t do is search inside the disk images themselves. The files I made below might help with that, especially once search engines get hold of them:
Printing from computers goes through waves of being difficult to being easy, then back to difficult again. This is likely due to the cycles of technology, complexity and user demand flow in and out of sync. I think we’re at peak annoyance right now.
It’s even harder with Raspberry Pis, as when printer drivers support Linux, 90% of them are for x86 or x86_64 computers only (Canon: ಠ_ಠ). ARM doesn’t get a look in. But one technology does actually seem to help: network printers that support IPP — Internet Printing Protocol.
We had an old Brother laser printer that just got slower and crankier and less useful as a printer, so yesterday I got a new Brother DCP-L2550DW to replace it. It says it supports Linux in the spec, but I knew not to be too optimistic with my Raspberry Pis. And indeed, it was seen on the network but no driver was found. I had a sad.
What turned my frown upside down was finding out about Raspbian’s cups-ipp-utils package. For desktop use, install it this way:
(leave off system-config-printer if you’re running from the terminal.)
Update: while you’re here, you might also want to install the print-to-PDF driver too. This allows you to print without wasting paper. Install it (and the IPP driver) with:
In many cases, this might be all you need to do: the network printers should be automatically found and added as devices.
Adding the new printer
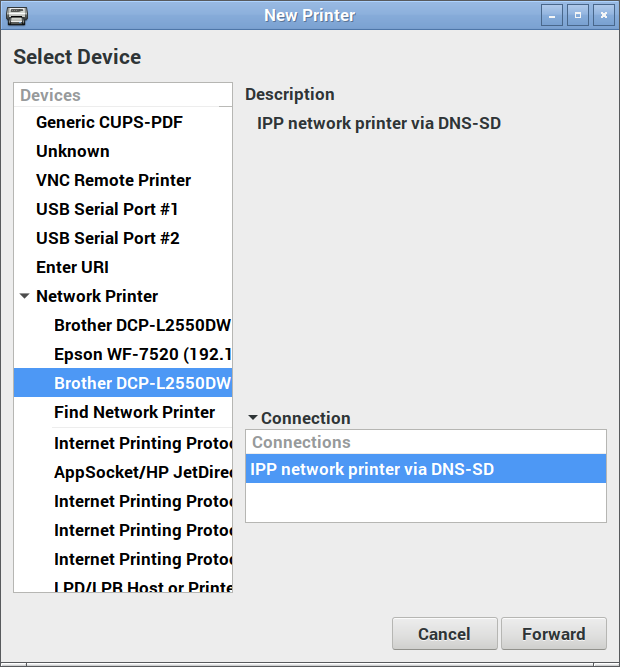
On the desktop, open up Preferences → Print Settings and add a new printer. Yes, it prompts for your user password which you may have forgotten. I’ll wait while you try to remember it …
Now under Network Printers, you should see a device you recognize. Pick the one that says IPP network printer somewhere:
IPP network printer
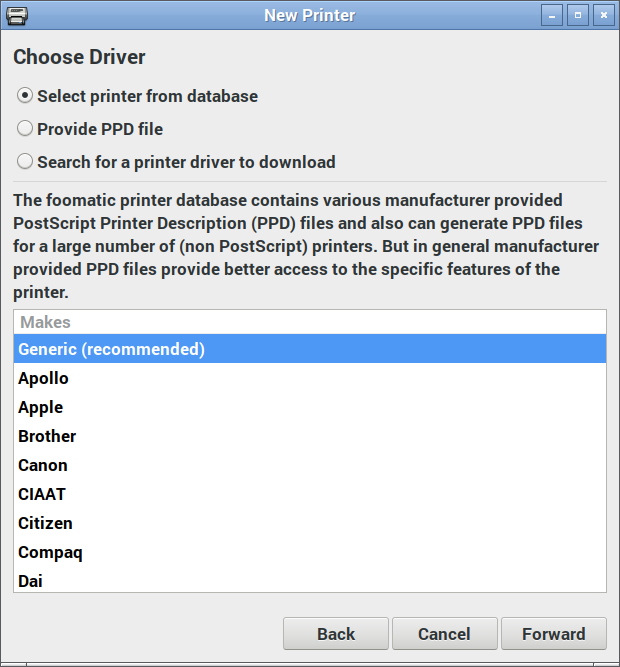
Here’s where the magic happens: you actually want to pick the generic driver for once:
Select Generic (recommended) manufacturer
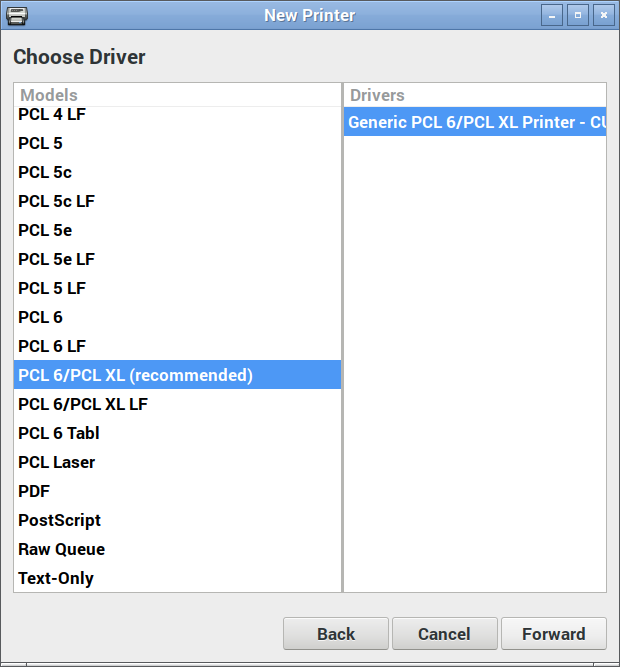
And again, the IPP utilities package will have picked the right driver for you:
Just go with what the driver suggests
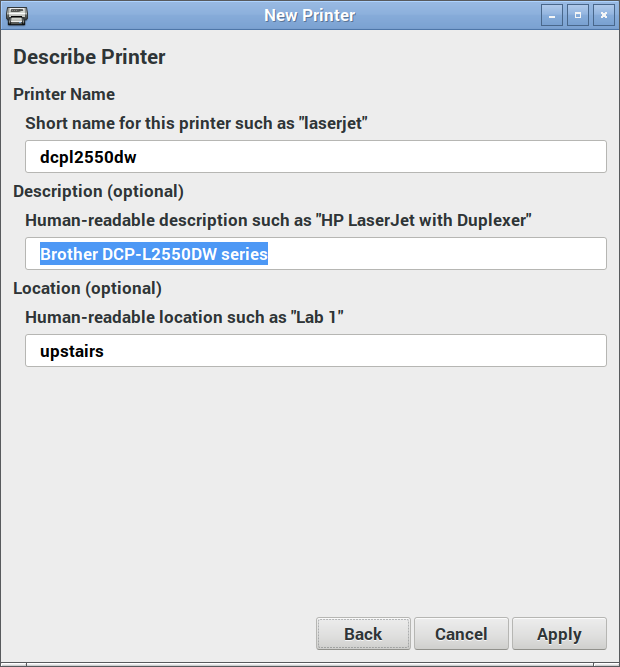
Changing the name and location is optional:
Your new printer’s almost ready to go!
Hit Apply, and you should be printing!
(Hey, printer manufacturers have been known to be evil and make good, working stuff suddenly not work. IPP is supposed to make everything sparkly again, but I can’t guarantee that something wicked won’t come this way.)
Update: After a few months of using the Brother DCP-L2550DW, I don’t recommend you buy it. It’s a perfectly capable printer, but it takes ‘chipped’ toner cartridges that:
stop dead when you hit their page count limit, wasting toner and preventing you from finishing the print job;
can’t easily be refilled by local technicians, so are wasteful of resources.
To get around (1), select Continue instead of Stop in the Toner Out configuration menu.
Update, January 2020: with sales and all needing a printer for work, the DCP-L2550DW will go with me to the office. I now have a MFC-L2750DW at home that scans to network, amongst other things. IPP proved it was magic yet again by the new printer being found and justworked with all my machines as soon as I added it to the network.
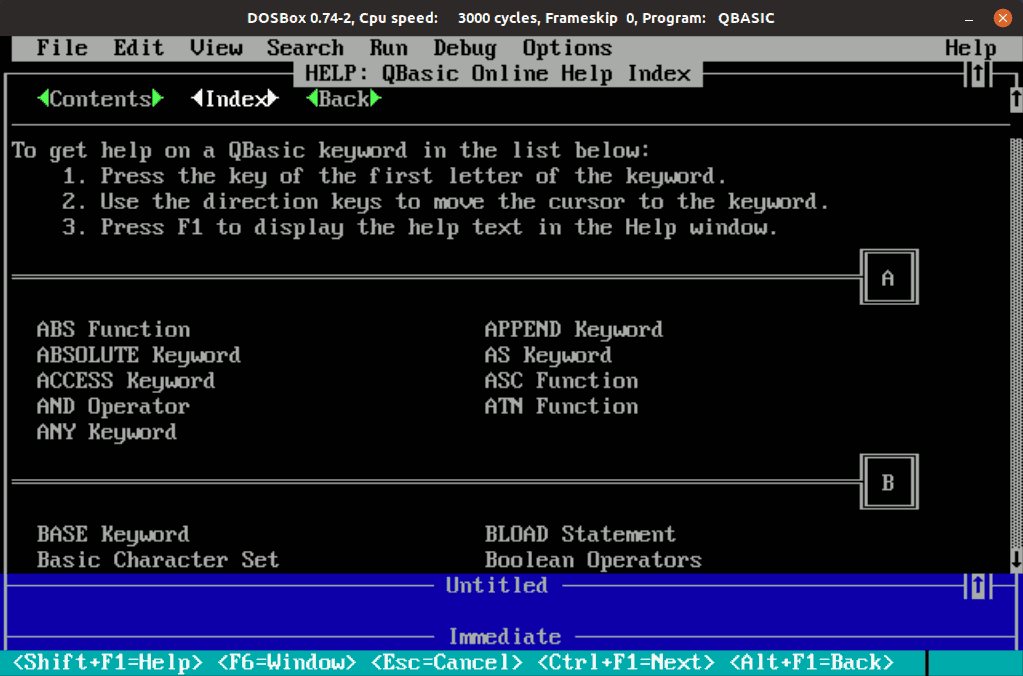
It’s the QuickHelp file from Microsoft’s ancient-but-still-useful QBasic interpreter for MS-DOS. I converted it to HTML, and made some minor cleanups so it would work better on the web.
So if you’ve got a hankering to understand the parameters for MKSMBF$ or know the syntax of PRINT USING, I’ve got your back.
Years back I wrote something about HSV colour cycling for Arduino. Things have moved on: we’re all writing code in MicroPython/CircuitPython now and 8-bit micro-controllers are looking decidedly quaint. Yes, yes; some of you must still write code in PIC assembly language and I’m sure that’s very lovely for you indeed don’t @ me.
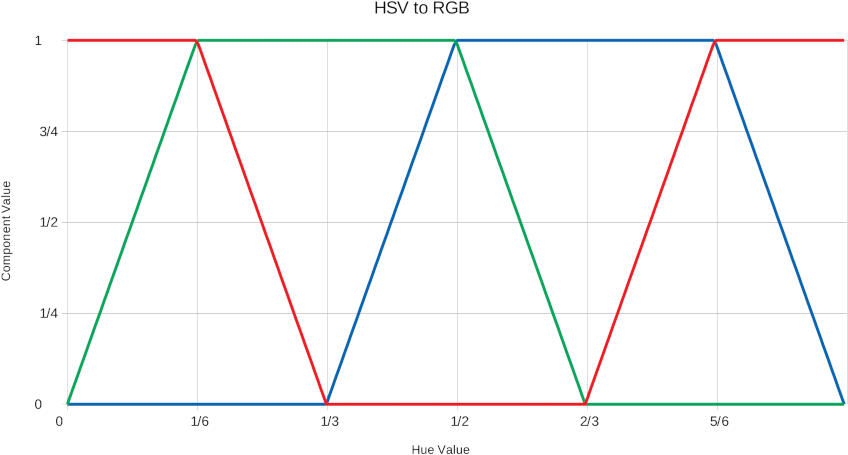
If you look at the output of a typical HSV to RGB algorithm, the components map something like this:
Hue between 0-1, with saturation and value set to 1. Output range 0-1 for each component
These lines remind me so much of sine waves, if very blocky ones. The red trace in particular is just the cosine function, with the input range of 0..2Ï€ and the output range of -1..1 both mapped to 0..1. The green and blue traces are just the red trace shifted horizontally by â…“ and â…” respectively.
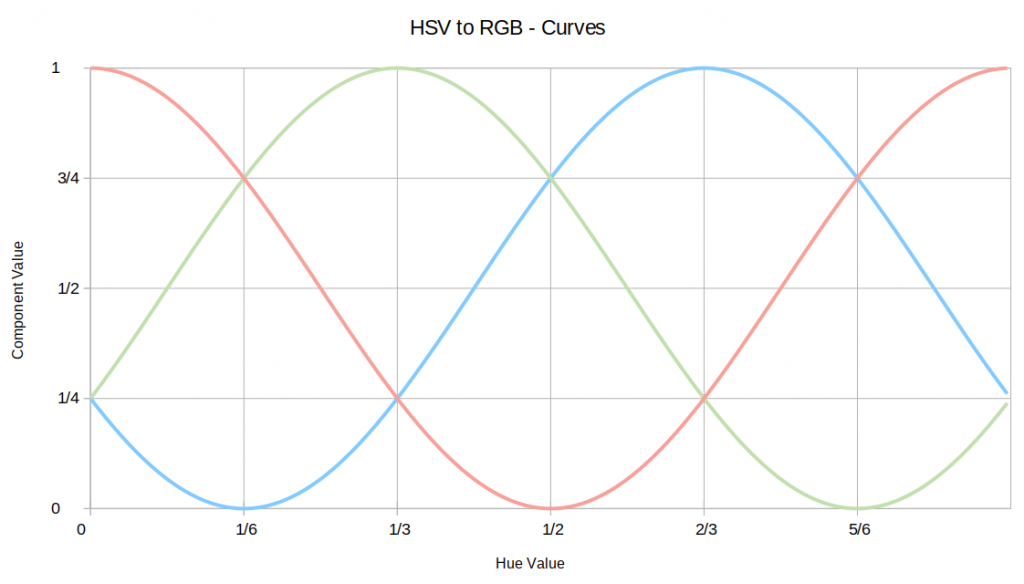
Since we have transcendental functions in MicroPython, we don’t have to fossick about with linear approximations. The common RGB LED function wheel() uses similar linear interpolation as the graph above. Why make do with blocky cogwheels when you can have a smooth colour wheel?
def cos_wheel(pos):
     # Input a value 0 to 255 to get a colour value.
     # scruss (Stewart Russell) - 2019-03 - CC-BY-SA
     from math import cos, pi
     if pos < 0:
         return (0, 0, 0)
     pos %= 256
     pos /= 255.0
     return (int(255 * (1 + cos( pos            * 2 * pi)) / 2),
             int(255 * (1 + cos((pos - 1 / 3.0) * 2 * pi)) / 2),
             int(255 * (1 + cos((pos - 2 / 3.0) * 2 * pi)) / 2))
Though you never quite get a pure red, green or blue, the results are pleasing
Quite elegant, I thought. Yeah, it may be computationally expensive, but check next year when we’ll all be running even faster µcs. Certainly none of the mystery switch statements or nested conditionals you’ll see in other code. Just maths, doing its thing.
First half is cosine wheel, second half (after red flash) is linear
I like using OpenSCAD, but it has some limitations. While you can linear_extrude() 2D paths into 3D shapes, you can’t get a proper tapered/chamfered extrusion of anything but simple shapes that are symmetric about the origin:
// this is symmetrical … linear_extrude(height=20, scale=2)square(10, center=true);
// but shift the same square off the origin and this happens … linear_extrude(height=20, scale=2)translate([20, 20])square(10, center=true);
There are lots of partial attempts at fixing this, many of which end up with ugly results. Some of them even mess up the top surface, which is precisely what I wanted to avoid. My code uses the computationally-intensive minkowski() sum function to replace every vertex of a 2D shape with a many-sided pyramid.
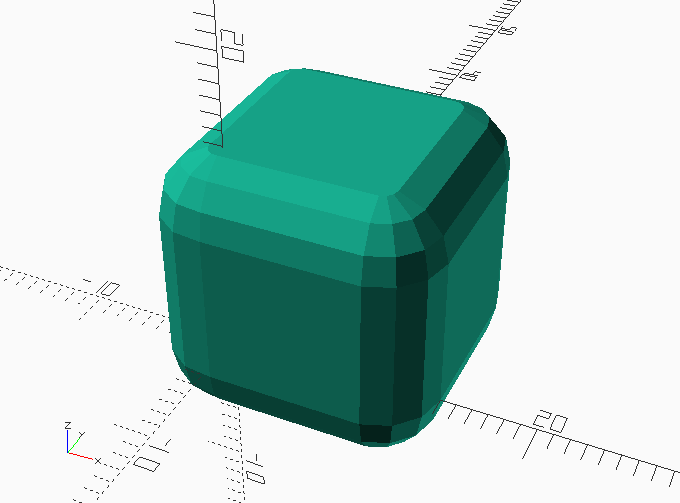
Minkowski sums effectively replace every vertex with another shape, here making a rounded cube from a cube and a sphere:
minkowski() { cube(10); sphere(4); }
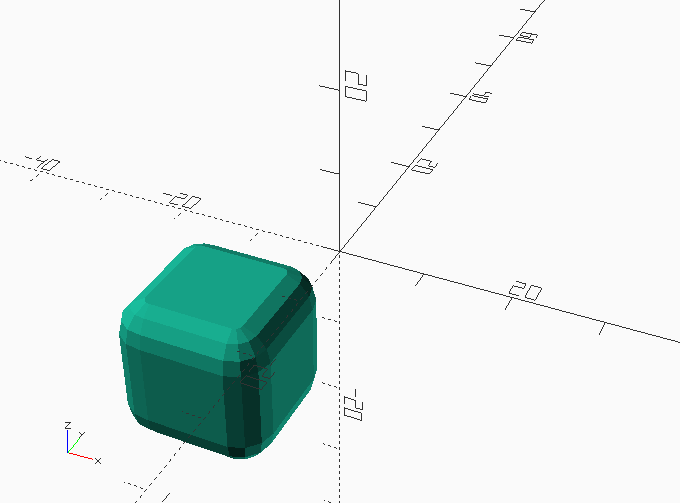
One feature of OpenSCAD’s implementation of the Minkowski sum is that the operator takes into account the second shape’s position relative to the origin. So if I take the same cube and apply the minkowski() operator with the same sphere moved away from the origin, I get:
// the same cube, but shifted by the power of minkowski()! minkowski() { cube(10); translate([-15,-15,-15])sphere(4); }
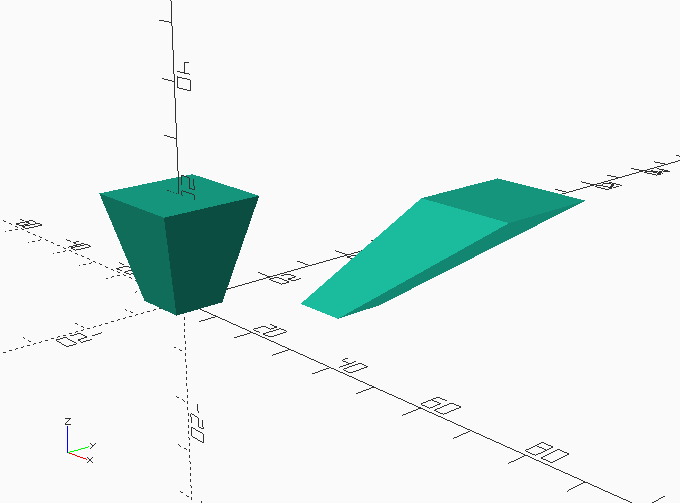
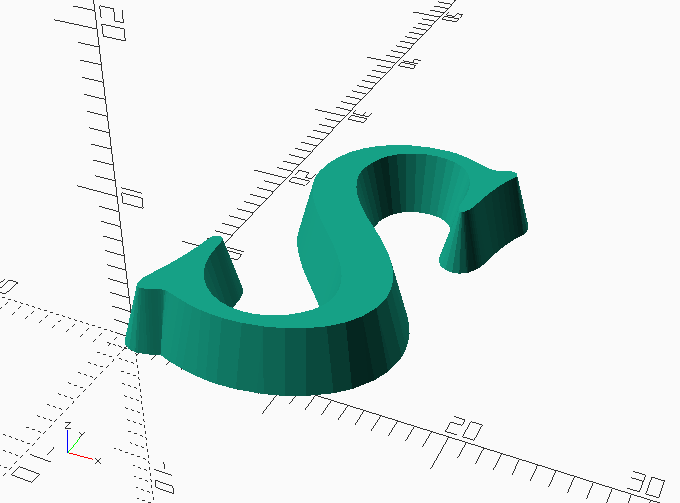
So I can approximate a tapered extrusion by turning a 2d path into a very thin 3d plate (OpenSCAD’s 2D and 3D subsystems can never meet in the same output) and using a pyramid as the second argument to the operator:
// a 30 degree pyramid with its apex at the origin rotate_extrude()polygon([ [0,0] , [4, -8], [0, -8] ]);
You get:
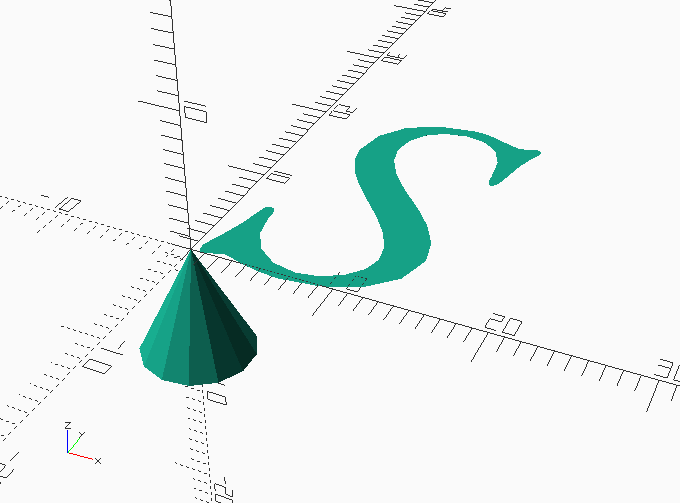
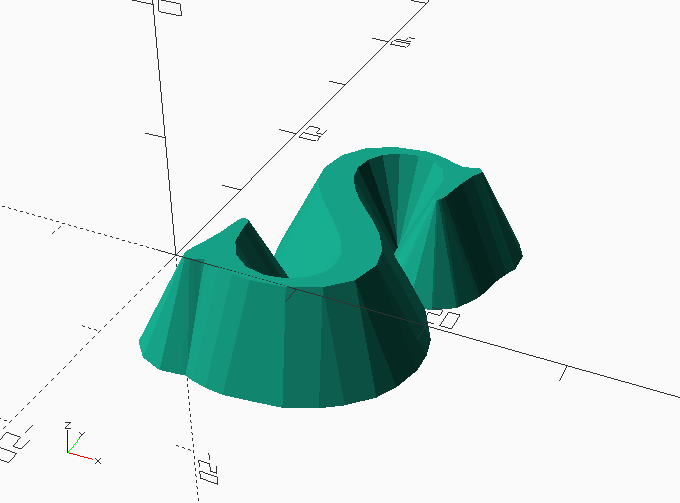
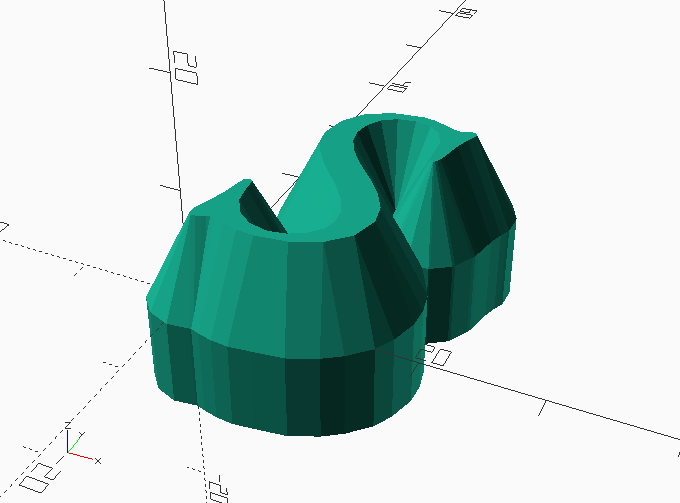
minkowski() { // thin extrusion of 2D path linear_extrude(height=0.001)text(“S”, size=24, font=”EB Garamond:style=12 Italic”); // a 30 degree pyramid with its apex at the origin rotate_extrude()polygon([ [0,0] , [4, -8], [0, -8] ]); }
In reality, you’d probably use a smaller taper angle, but the example is short rather than pretty. If you’re really picky about correctness, the process leaves the thin extrusion as parallel walls at the bottom of the shape, shown grossly exaggerated here for effect:
hugely exaggerated vertical profile
If you’re working in consumer-grade 3D printing and are using the standard 1 unit = 1 mm scale, the residual parallel section would only be 1 µm thick and way below any realistic layer height. Feel free to remove it, but be warned that this process creates so many facets that the difference() required to remove it will be very time-consuming for no visible difference.