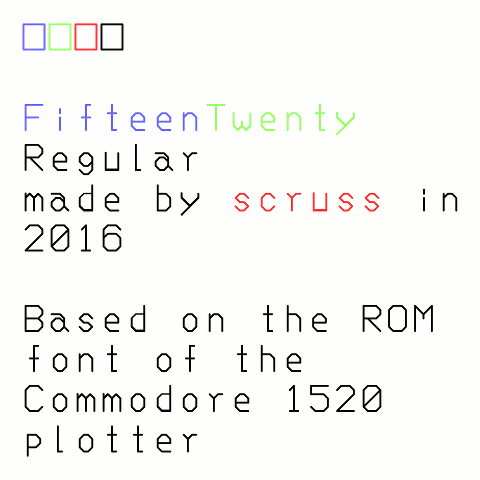
Keypunch029 — for all your punched card font needs …

A fairly accurate rendition of the 5×7 dot matrix font printed at the
top of punched cards by the IBM Type 29 Card Punch (1965).

Local copy: Keypunch029.zip.
Fontlibrary link: Keypunch029

The 029 (as it is sometimes known) generated a bitmap font from an engraved metal plate pressing on a matrix of pins. A picture of this plate from a field engineering manual was used to re-create the pin matrices, and thus an outline font.

029 Code Plate
029 Code Key

Historical Accuracy

The 029 could have many different code plates, but the one used here contained the characters:

<=>¬|_-,;:!?/.'"()@¢$*&#%+0123456789ABCDEFGHIJKLMNOPQRSTUVWXYZ

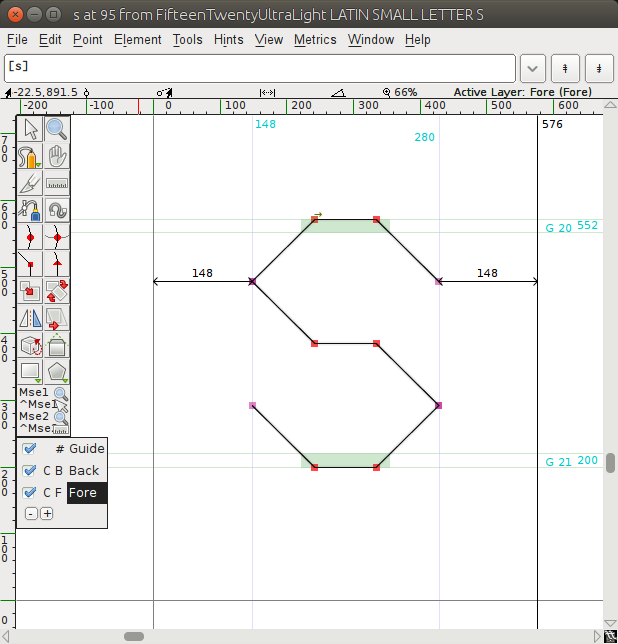
The character glyphs have been sized such that if printed at 12 points, the 029’s character pitch of 0.087″ is accurately reproduced. No attempt to research the pin matrix pitch or pin diameter has been made: the spacing was eyeballed from a couple of punched cards in my collection.

The earlier IBM Type 26 Card Punch (“026”) included a glyph for a square lozenge (Unicode U+2311, ⌑). The 029 code plate did not include this character, but I added it here for completeness.

The character set was extended to include:

  • all of ASCII, with lower case characters repeating the upper case glyphs;
  • sterling currency symbol; and
  • euro currency symbol.

While there may have been official IBM renditions of some of these additional glyphs (with the exception of euro) no attempt has been made to research the original shapes. This font set is intended to help with the visually accurate reproduction of 1960s-era punched cards, mostly coinciding with my interest in the FORTRAN programming language. No attempt has been made to use historical BCD/EBCDIC encodings in these fonts. We have Unicode now.

The 029 card punch could not produce any bold or italic font variants, but FontForge can, so I did.

Things I learned in making these fonts

  1. The 029 card punch printer could be damaged if you tried to print binary cards, as there was no way to disengage the code plate from the punch mechanism.
  2. FontForge really hates to have paths in a glyph just touching. Either keep them more than one unit apart, or overlap them and merge the overlapping paths.
  3. EBCDIC is weird.

Sources

Library Hand – Disjoint


LibHandDis — Based on scans of “Library Hand – Disjoint”, described in Dana’s A Library Primer, with some modifications.

Major changes from scan:

  • As the scan only covered A-Z, a-z, 0-9 and ‘&’, I had to make the rest up.
  • Many of the descenders had to be shortened to fit with modern typography conventions.
  • Kerning is much tighter than Dana’s guidelines suggest.

(idea for this came via MetaFilter, This question of library handwriting is an exceedingly practical one)

Local copy: LibHandDis.zip.

mnicmp: the DECwriter lives again!

I just made and uploaded this to FontLibrary: mnicmp.

This is meant more as an exercise in learning FontForge‘s programming back-end, and definitely showed me that FontForge is incredibly powerful. After the learning comes silliness, so I ended up turning the dots into something like:

I learned you really have to consider a dot-matrix font to be an array of points rather than a glyph, because otherwise you get the dots coming out the wrong sort of oval:

Blue font has been italicized as a whole, while the black dots were done properly

You don’t want to know what it did to the stars …

Local archive: mnicmp.zip

ThreeFourTwoTwo

sampleYup, another highly impractical monospaced font. This one is based on a short-lived 22 segment display made in the early 1980s by Litronix (datasheet).

It’s also on Fontlibrary: ThreeFourTwoTwo.

Local download: ThreeFourTwoTwo .

If you use this font red on a dark background and under-print the ¤ character in a faint colour, you get an approximation of the LED segment mask:

led

TwentyfourSixteen – a 17-segment alpha LCD font

2416-demo

Download: TwentyfourSixteen.zip.

Made in 2016 by Stewart C. Russell – scruss.com

A mono-spaced font family derived from the HP/Siemens/Litronix DL-2416 17-segment alphanumeric 17 segment LED display matrix.

Design size: appx 19 pt

For maximum fidelity, should be displayed/printed red to match the original’s ~640 nm wavelength. This corresponds to RGB #ff2100

Weights

Regular only.

Note that this has a very slight skew (5°) built in.

Coverage

ASCII only, upper case.

Author

Stewart C. Russell – http://scruss.com/blog/

Licence

Dual-licensed CC0/WTFPL (srsly)

All of the segments. I've stashed this glyph at character code U+007f so you can make up new ones.
All of the segments. I’ve stashed this glyph at character code U+007f so you can make up new ones.

also: numbers.zip — just 00-99 as PNG images, after this, made with Pango, like this:

for f in {00..99}
do
 pango-view --no-display --background=black --dpi=112 --align=right --foreground='#ff2100' --font='TwentyfourSixteen Regular 48' --hinting=full --output="$f.png" -t "$f"
done

FifteenTwenty UltraLight: single-stroke OTF for CNC/plotting

Screenshot from 2016-05-08 17-18-31Following on from FifteenTwenty, I made a hairline/single stroke version of the font especially for CNC use. This is a slight misuse of the OpenType format, but if you’re plotting/CNCing/laser cutting, the filled paths of standard fonts don’t work so well. Single-line (or stroke) fonts used to be possible in PostScript — the version of Courier shipped with early Apple LaserWriter printers was composed of strokes, rather than filled paths — but have fallen out of favour. If you have a device with a defined tool width, it’s better to let the tool make the width of the mark/cut. Here’s the hairline font plotted with a 0.7 mm pen to illustrate what I mean:

1520hairlineThis font is almost invisible on screen or on a regular printer, so I don’t recommend installing it unless you have specific CNC/plotting needs. Please note that the font will cause your device to follow the tool path of each letter twice.

Download: FifteenTwenty-master.zip FifteenTwenty-UltraLight.zip (or more options …)

FifteenTwenty: Commodore 1520 plotter font

FifteenTwentyFor the impatient: download FifteenTwenty-master.zip FifteenTwenty-Regular-OTF.zip (or more options …)
Updated: now with all ASCII glyphs!

Update, September 2016: this font was officially squee‘d over by Josh “cortex” Millard on the Metafilter Podcast #120: Hard Out There For A Nerd. I had the great pleasure of meeting Josh at XOXO 2016, too.

The Commodore 1520 was a tiny pen plotter sold for the Commodore 64 home computer. It looked like this:

Commodore 1520 printer plotter (adjusted).jpg
Commodore 1520 printer plotter — by Oguenther (Dr.Guenther). – This file was derived from Cbm1520-2.jpg: , Public Domain, https://commons.wikimedia.org/w/index.php?curid=39145769

I never owned one, but it seems it was more of a curiosity than a useful product.

From a nerdy point of view, however, this device was rather clever in that it packed a whole plotter command language, including a usable font, into 2048 bytes of ROM. Nothing is that small any more.

Thanks to the epic efforts of Jim Brain and others, this ROM is now archived on Project 64 Reloaded. Looking at the code, I was struck by the elegance of the encoding: it packs a full X-Y plot instruction in one byte.

Based on my work with the Hershey font collection, I thought it would be fun to extract the coordinates and make a real OpenType font from these data. I’m sure others would sense the urgency in this task, too.

Since Commodore computers used a subset of ASCII, there’s a barely-usable set of characters in this first release. Notable missing characters include:

U+005C    \    REVERSE SOLIDUS
U+005E    ^    CIRCUMFLEX ACCENT
U+0060    `    GRAVE ACCENT
U+007B    {    LEFT CURLY BRACKET
U+007C    |    VERTICAL LINE
U+007D    }    RIGHT CURLY BRACKET
U+007E    ~    TILDE

I’ll get to those later, perhaps.

Huge thanks to all who helped get the data, and make the bits of software I used to make this outline font.

(Note: although the Project 64 Reloaded contains some extraction code to nominally produce an SVG font, it doesn’t work properly — and SVG fonts are pretty much dead anyway. I didn’t base any of my work on their Ruby code.)

Hershey Writes Again

Update: very preliminary OTF font files are available here: scruss/AVHershey-OTF. These don’t yet even encode all of ASCII, so aren’t yet generally useful.

Major breakthrough: yesterday (Feb 5th), I got the old Hershey fonts outlined properly, and today I have compiled them (sorta) into vector fonts. They’re not yet ready for release, as they have no metadata and are missing some key characters (even for ASCII).

I based the line thicknesses for the fonts as if I were drawing a 16 pt character, and using a plotter with a 0.3 mm (light), 0.7 mm (medium) and 1.0 mm (heavy) pen. You can see in the individual characters from the Hershey Complex font shown below, that the double hairline strokes merge into thicker single strokes. The same effect occurs on a real plotter, too:

S_AVHersheyComplexLightS_AVHersheyComplexMediumS_AVHersheyComplexHeavy

Here are some preliminary bitmap samples:

Complex Heavy
Complex Heavy
Complex Light
Complex Light
Complex Medium
Complex Medium
Simplex Heavy
Simplex Heavy
Simplex Light
Simplex Light
Simplex Medium
Simplex Medium

creating a TrueType font from your handwriting with your scanner, your printer, and FontForge

Hey, this post is super old!
That means that installation and run instructions may not work as well, or even at all. Most of the *Ports Apple software repositories have given way to Homebrew: you may have some success on Mac (untested by me) if you brew install netpbm fontforge potrace. There’s also some font cleanup I’d recommend, like resolving overlaps, adding extrema, and rounding points to integer. One day I may update this post, but for now, I’m leaving it as is.

This looks more than a bit like my handwriting

because it is my handwriting! Sure, the spacing of the punctuation needs major work, and I could have fiddled with the baseline alignment, but it’s legible, which is more than can usually be said of my own chicken-scratch.

This process is a little fiddly, but all the parts are free, and it uses free software. This all runs from the command line. I wrote and tested this on a Mac (with some packages installed from DarwinPorts), but it should run on Linux. It might need Cygwin under Windows; I don’t know.

Software you will need:

  • a working Perl interpreter
  • NetPBM, the free graphics converter toolkit
  • FontForge, the amazing free font editor. (Yes, I said amazing. I didn’t say easy to use …)
  • autotrace or potrace so that FontForge can convert the scanned bitmaps to vectors
  • some kind of bitmap editor.

You will need to download

  • fonttrace.pl – splits up a (very particular) bitmap grid into character cells
  • chargrid.pdf – the font grid template for printing

Procedure:

  1. Print at least the first page of chargrid.pdf. The second page is guidelines that you can place under the page. This doesn’t work very well if you use thick paper.
  2. Draw your characters in the boxes. Keep well within the lines; there’s nothing clever about how fonttrace.pl splits the page up.
  3. Scan the page, making sure the page is as straight as possible and the scanner glass is spotless. You want to scan in greyscale or black and white.
  4. Crop/rotate/skew the page so the very corners of the character grid table are at the edges of the image, like this: I find it helpful at this stage to clean off any specks/macules. I also scale and threshold the image so I get a very dark image at 300-600dpi.
  5. Save the image as a Portable Bitmap (PBM). It has to be 1-bit black and white. You might want to put a new font in a new folder, as the next stage creates lots of files, and might overwrite your old work.
  6. Run fonttrace.pl like this:
    fonttrace.pl infile.pbm | sh
    If you miss out the call to the shell, it will just print out the commands it would have run to create the character tiles.
  7. This should result in a bunch of files called uniNNNN.png in the current folder, like these:
    W
    uni0057.png
    i
    uni0069.png
    s
    uni0073.png
    p
    uni0070.png

    y
    uni0079.png
  8. Fire up FontForge. You’ll want to create a New font. Now File→Import…, and use Image Template as the format. Point it at the first of the image tiles (uni0020.png), and Import.
  9. Select Edit→Select→All, then Element→Autotrace. You’ll see your characters appear in the main window.
  10. And that’s – almost – it. You’ll need to fiddle with (auto)spacing, set up some kerning tables, set the font name (in Element→Font Info … – and you’ll probably want to set the em scale to 1024, as TrueType fonts like powers of two), then File→Generate Fonts. Fontforge will throw you a bunch of warnings and suggestions, and I’d recommend reading the help to find out what they mean.

There are a couple of limitations to the process:

  • Most of the above process could be written into a FontForge script to make things easier
  • Only ASCII characters are supported, to keep the number of scanned pages simple. Sorry. I’d really like to support more. You’re free to build on this.

Lastly, a couple of extra files:

  • CrapHand2.pbm – a sample array drawn by me, gzipped for your inconvenience (and no, I don’t know why WordPress is changing the file extension to ‘pbm_’ either).
  • chargrid.ods – the OpenOffice spreadsheet used to make chargrid.pdf

Have fun! Write nicely!

tiny font victory

Yes, it’s nonsense:

But I made these character glyphs in a semi-automatic bitmap converter for tracing in scanned letters into FontForge. It’s currently only a proof of concept, but I want to expand it up to a full ASCII font, at least.