Instagram filter used: Lo-fi
My previous adventures with my Sinclair ZX Spectrum 48K in Canada were not resounding successes. I couldn’t get the display to work, and tapes wouldn’t load well, so I’d been using Fuse while the hardware sulked in a cupboard.
I’d previously got a proper power supply (9 V DC, ≥ 1.4 A, centre negative) and bypassed the PAL UHF modulator to give composite video. No television, monitor or converter box that I had tried seemed to give a useful display.
Back in May, Walter Miraglia brought a tiny 7″ composite colour monitor to TPUG‘s Retrocomputing Night. He let me try it with the Spectrum, and it worked very well. Walter said it was an extension monitor for a car DVD player.
I dug around, and found that local surplus clearout store Tech Source Canada had the Philips 7″ portable DVD Player PD7016/37 for $60. This gives you two identical DVD players with composite input. I think my other one will be destined for a Raspberry Pi project somewhere.
To get these monitors running, you’ll need:
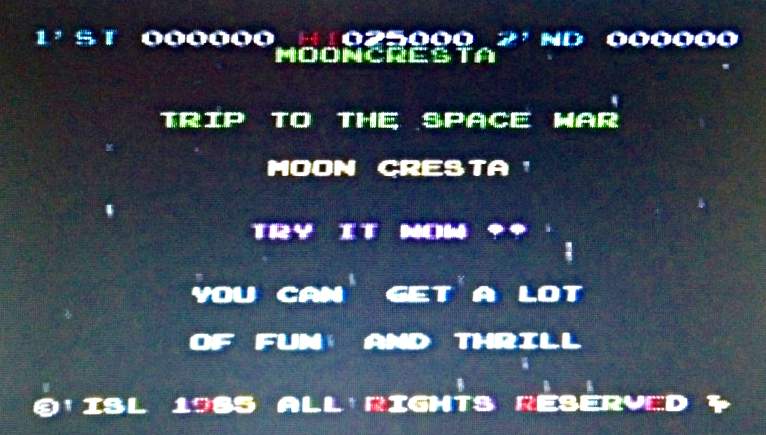
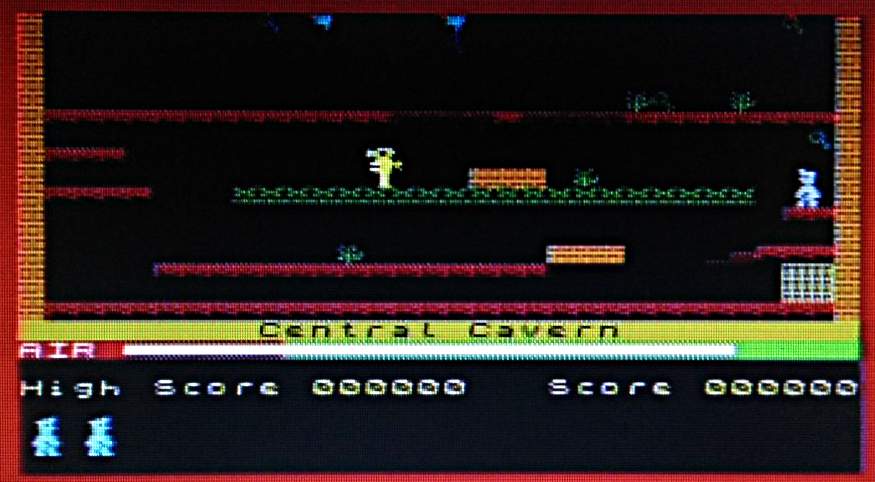
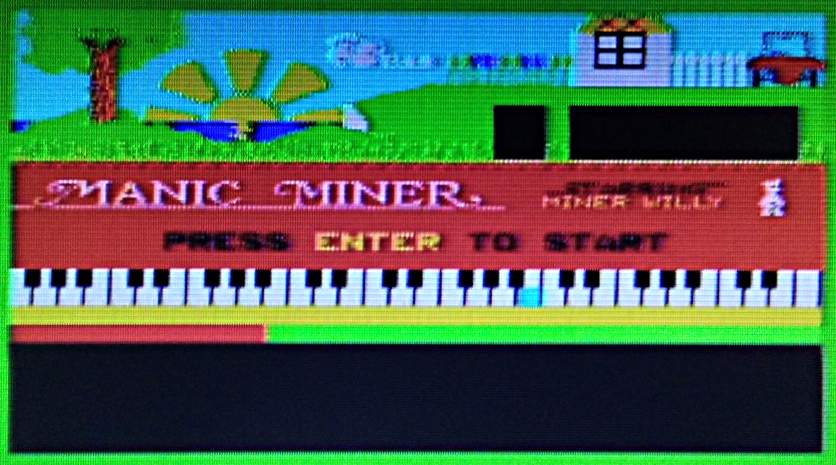
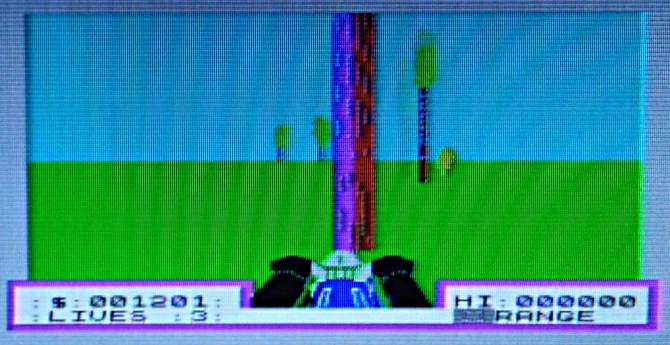
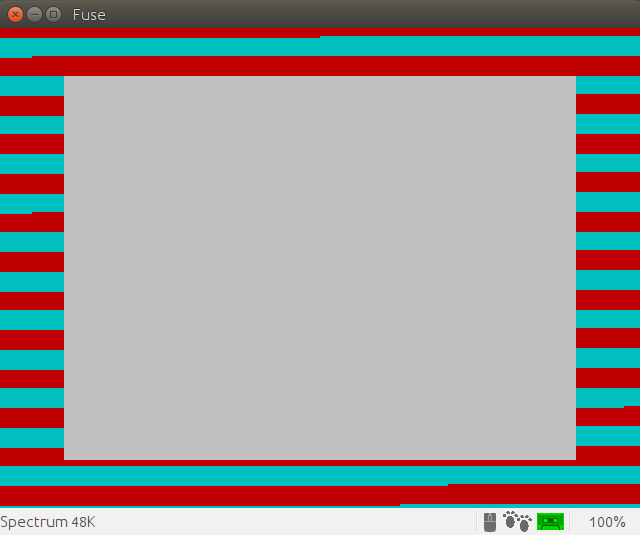
Connect it up , and — success! Well, slightly qualified success. The screens do not have the greatest resolution, so pixels are slightly smeared together. The screens do have a decently fast refresh, and the whole look is just right. With its colour clash and dot crawl, nobody ever expected great video from the Speccy anyway.
Here are some screen shots taken with my phone, and a couple of pixel-sharp screenshots from Fuse to compare:


So I can now definitely view the screens. Huge thanks to Walter for tipping me off to these DVD players.
[Incidentally, the screens are designed for car use, so don’t stand up properly unless you get creative with some supports. I laser-cut these out of 3 mm plywood:

Glue the little sticks on to the flat ends, and they’ll fit into the slots in the back of the monitor. Here are the feet with the sticks fitted:
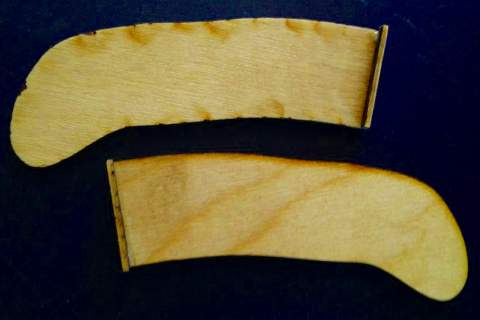
There are better-designed feet than these, but they work, mostly.]
I was still having game loading problems. Try as I might, I couldn’t get anything to load reliably. Retrocomputing Stack Exchange came to the rescue, in the shape of mcleod_ideafix’s very helpful answer. If your audio player is running from batteries and you can use a stereo cable, you can convert the normal mono loading audio into stereo with one channel inverted. This gives you effectively double the volume, and works quite well with my audio player, an old Edirol R-1*.
This audio will not load into an emulator, or work with a mono cable. Some audio players even render it as silence.
Here’s a script to take monophonic loading data and convert it to this faux-differential stereo format using Sox:
#!/bin/bash
# wav2differential.sh - convert mono game tape audio to 2× stereo
# usage:   wav2differential.sh infile.wav
#          (creates  infile-differential.wav)
# scruss - 2016-06-07
# method by ‘mcleod_ideafix’; many thanks / greetz
#   — https://retrocomputing.stackexchange.com/a/774/439

base="${1%.wav}"
sox -q --norm=-3 "$1" -b 16 "${base}-n.wav"
sox -q  "${base}-n.wav" "${base}-ni.wav" vol -1.0
sox -q  --norm=-0.1 -M -c 1 "${base}-n.wav" -c 1 "${base}-ni.wav" -c 2 -b 8 "${base}-differential.wav"
rm -f  "${base}-n.wav" "${base}-ni.wav"
If you want to check your audio levels, sox can also create the 800 Hz header tone used by the Spectrum. Run the output of the command below through the script above, load it onto your audio player and fiddle with the volume until the border flickers steadily:
sox -n -b 8 -r 8000 800hz-header.wav synth 30 square 800
I was also looking for the games to load fairly quickly. Tapes used to take over three minutes to load, and while retrogaming all is about the experience, I haven’t got time for that. Fuse has some utility programs which will convert a .Z80 game snapshot into an audio file that loads in about 1¼ minutes.
To convert the snapshot to a speed-load TZX tape image:
snap2tzx -o game.tzx -s 3 game.z80
To convert that virtual tape image into audio:
tape2wav -r 16000 game.tzx game.wav
You can then run that WAV file through the stereo/differential script I listed above. Have fun!

Laser cut template: coo-coo-rpi_zero-acryl.zip
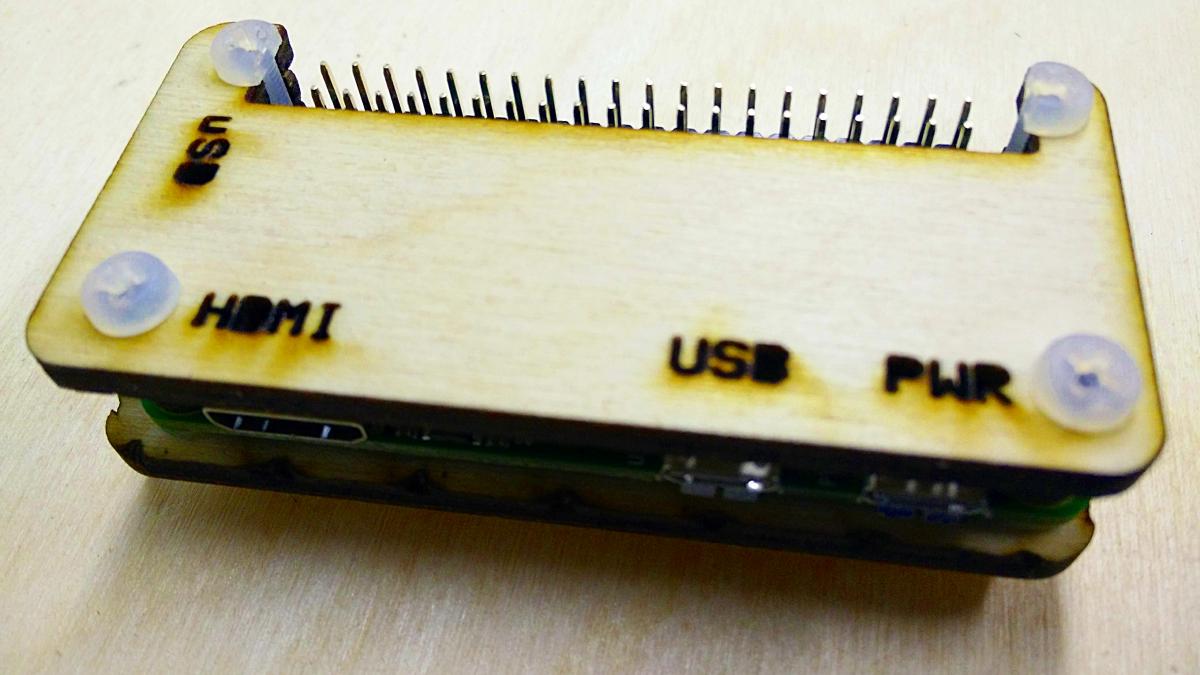
Build notes: The “Coo~Coo†Raspberry Pi Zero Case
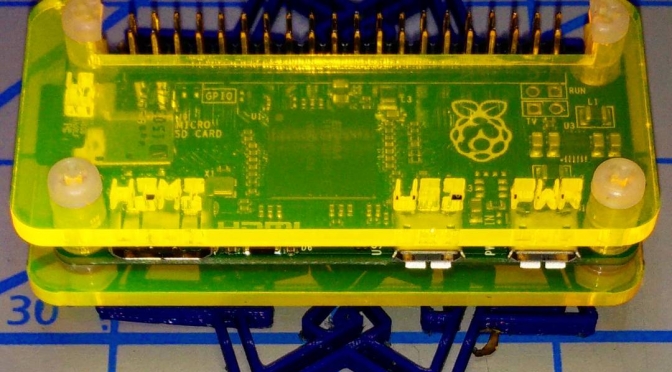
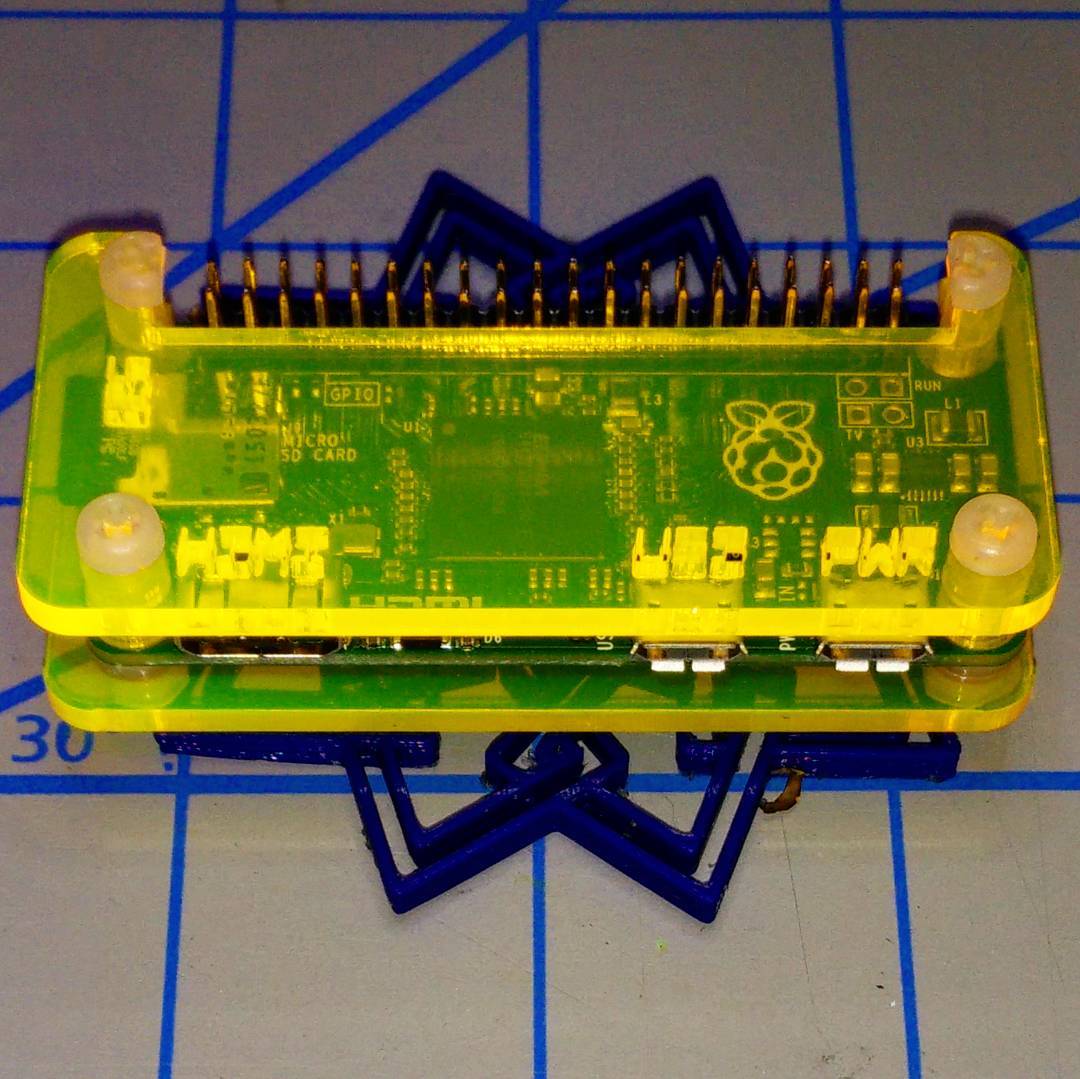
I’d tried making several Raspberry Pi Zero enclosures, but none of them quite worked. My needs are pretty simple, but I do need to be able to fit a full 40 pin strain-relieved (possibly keyed) header into the device while keeping questing fingers and dropped conductors off the circuit board.
So working from a (scaled) version of the Raspberry Pi Zero Mechanical Drawing, I made a case that meets some very basic requirements:
To the extent possible under law, Stewart C. Russell has waived all copyright and related or neighbouring rights to the “Coo~Coo†Raspberry Pi Zero Case. This work is published from: Canada.
Why the odd “Coo~Coo†name? Well, look at the pattern of spacer washers and half-spacer washers:
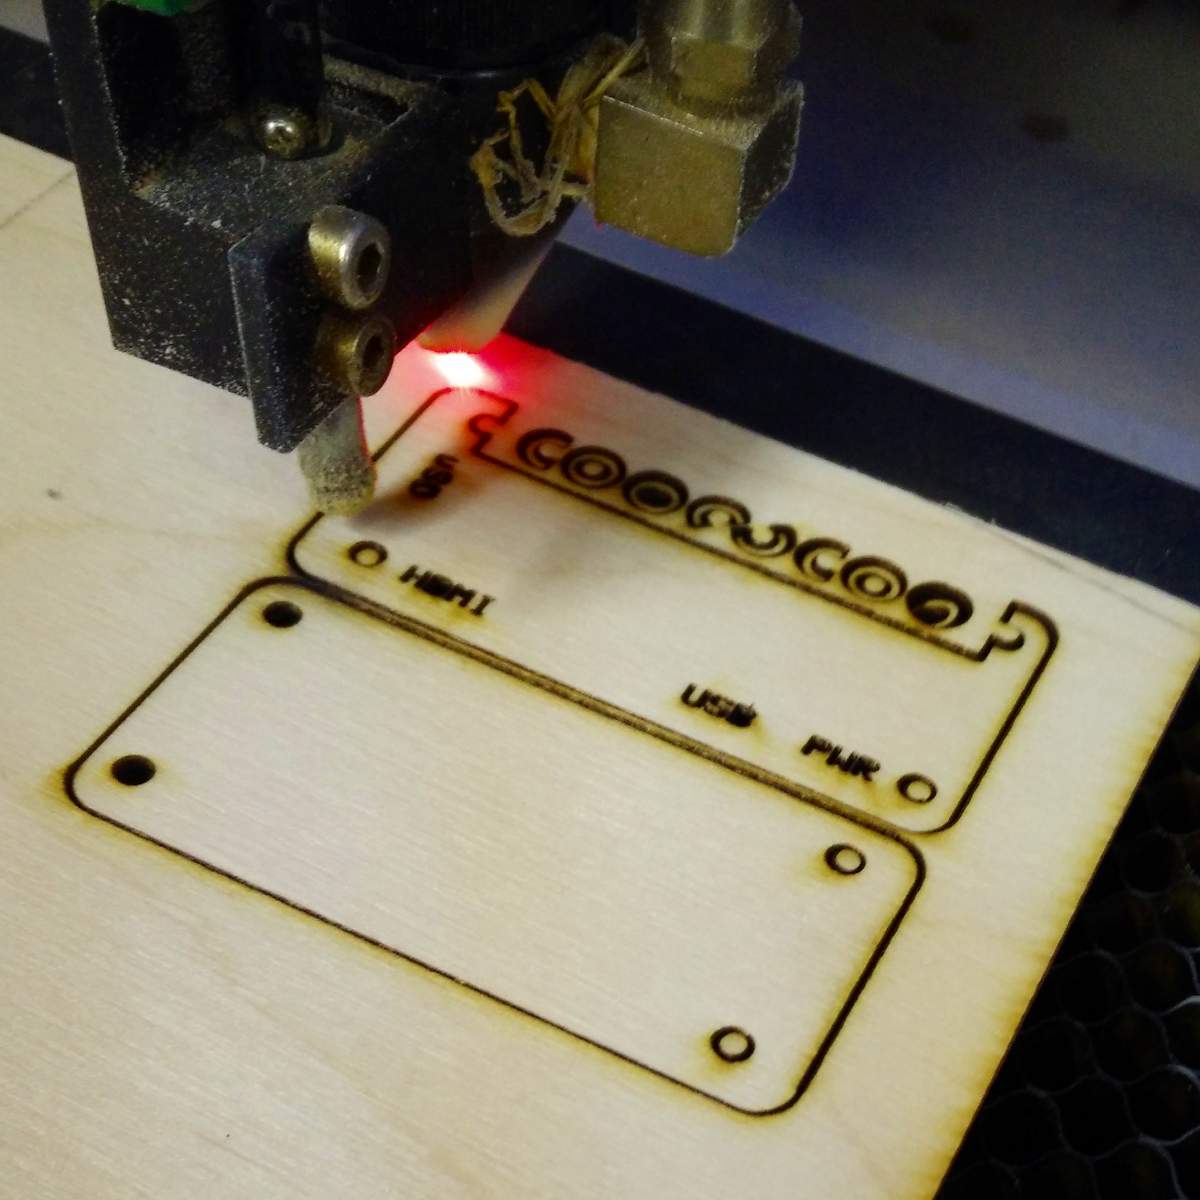
To save material, I arranged these washers inside the GPIO cutout. I realised that I could spell COO~COO. It’s even clearer on the cutting document:

Update: here’s a revised path that cut well with acrylic and probably will work slightly better on plywood, too: coo-coo-rpi_zero-acryl.zip
(If you do use acrylic, let me introduce you to one of the marvels of backing-paper removal: d-limonene. This fruity solvent — present in products like Goo Gone — causes backing paper to slough off with only a few minutes’ soaking. It washes off to a clean shine with water and dish soap/washing up liquid. I have just saved you fingernails from certain damage!)
The cutting path in the PDF could use a little clean up if you want to try this design in acrylic. The base of the design has been flipped so that any laser flare will be hidden inside the case.
You’ll need four M2.5 or M3 nylon screws of 20 mm length, plus 8 washers and 4 nuts. M3 screws of this length are easier to get, but the mounting holes in the Raspberry Pi Zero are only 2¾ mm in diameter. You can thin the M3 screws down slightly by lightly twisting them inside a piece of folded fine sandpaper. You’ll still have to push them through the Raspberry Pi Zero circuit board with a little force, though.
Cutting & Assembly Instructions

The new Raspberry Pi Zero with camera connector should also fit, but I don’t have one to test it.
Pen plotters were pretty expensive and complex pieces of electromechanical equipment. While they often earned their keep in the CAD office, they also had a function that’s almost forgotten: they could be used as input devices, too.
As a kid, we sometimes used to drive past the office of Ferranti-Cetec in Edinburgh. They specialized in digitizers: great big desk or wall mounted devices for capturing points from maps and drawings. Here’s one of their 1973 models:

While the technology and size have changed a bit, these huge bits of engineering kit are the ancestors of today’s track pads and touch screens.
Realizing that their plotters had very precise X-Y indexing and that they had two-way communications to a computer, HP made a drafting sight that fitted in place of a pen on their plotters:
This is a very pleasing piece of kit, all metal, thick plastic and polished optical glass. They show up on eBay occasionally, and aren’t cheap. With a bit of coercion, it fits into my HP plotter like this:
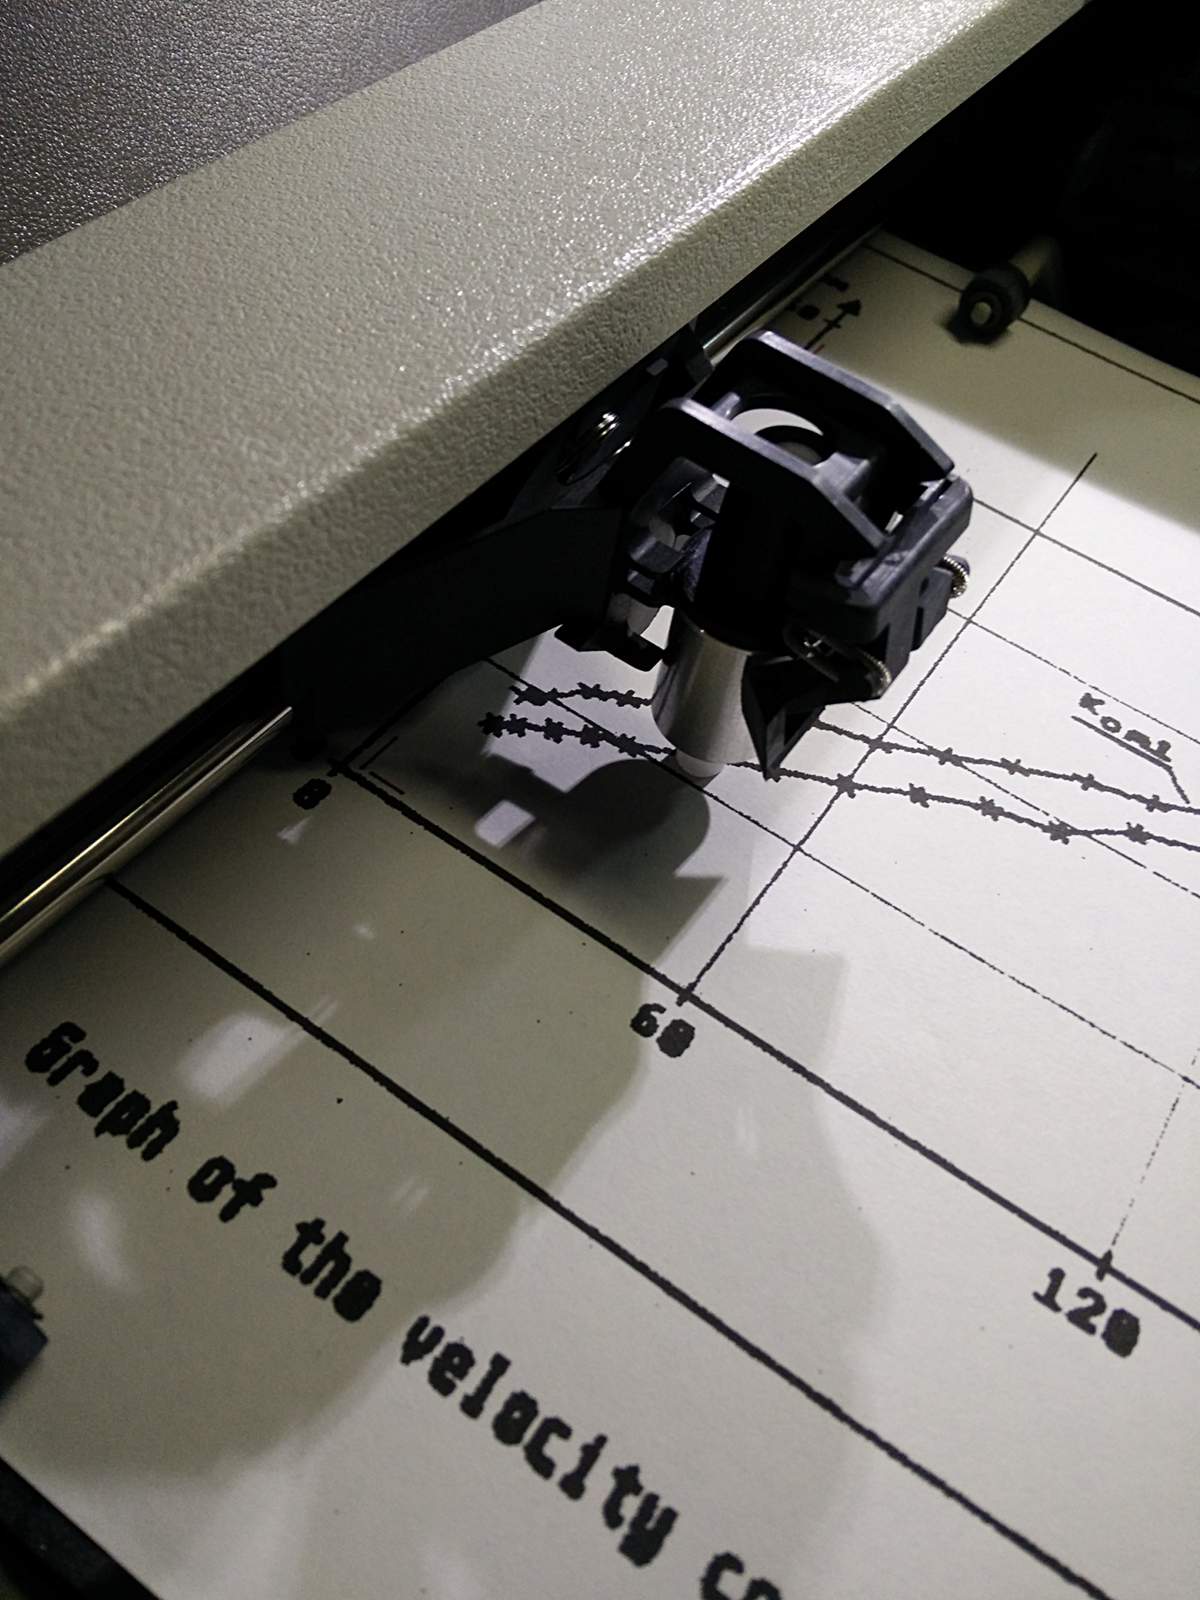
The image is very bright and clear:


If one has a digitizing sight, one needs to find something to digitize post haste. I’m sure everyone can sense the urgency in that. So I found this, a scan from my undergraduate project writeup (centrifugal pump impeller design ftw, or something), which was probably made on an Amiga or Atari ST:

I printed this as large as I could on Letter paper, as it’s the only size my HP7470A plotter can take. Now all it needed was a small matter of programming to get the data from the plotter. Here’s a minimally-useful digitizer for HP and compatible serial plotters. Although I ran it on my little HP grit wheel plotter attached to a Raspberry Pi, I developed it with my larger Roland plotter. The only fancy module it needs is pySerial.
#!/usr/bin/env python
# -*- coding: utf-8 -*-
# a really crap HP-GL point digitizer
#  scruss - 2016

from time import sleep
from string import strip
import serial

ser = serial.Serial(port='/dev/ttyUSB1', baudrate=9600, timeout=0.5)
lbl = ''
points = []
labels = []
k = 0
retval = 0

ser.write('DP;')                # put in digitizing mode
while lbl != 'quit':
    ser.write('OS;')
    ret = strip(ser.read(size=5), chr(13))
    print ('Retval: ', ret)
    if ret != '':
        retval = int(ret)
    if retval & 4:              # bit 2 is set; we have a point!
        print ('Have Point! Retval: ', retval)
        retval = 0
        ser.write('OD;')
        pt = strip(ser.read(size=20), chr(13))
        print ('OD point: ', pt)
        lbl = raw_input('Input label [quit to end]: ')
        points.append(pt)
        labels.append(lbl)
        k = k + 1
        ser.write('DP;')        # put in digitizing mode again
    sleep(1)
ser.close()

f = open('digit.dat', 'w')
for i in range(k):
    f.write(points[i])
    f.write(',')
    f.write(labels[i])
    f.write('\n')
f.close()
In the unlikely event that anyone actually uses this, they’ll need to change the serial port details near the top of the program.
The program works like this:
I didn’t implement any flow control or other buffer management, so it can crash in a variety of hilarious ways. I did manage to get it to work on the lower trace of that graph, and got these data:
9649,2428,1,300,0
357,2428,1,0,0
357,7217,1,0,0.60
733,3112,1,first
826,3167,1,
968,3256,1,
1122,3334,1,
1290,3405,1,
1588,3583,1,
1891,3725,1,
2215,3880,1,
2526,4051,1,
2830,4194,1,
3143,4280,1,
3455,4516,1,
4077,4767,1,
5008,5229,1,
6543,5954,1,
8067,6548,1,
8740,7195,1,
8740,7195,1,last
8740,7195,1,quit
The first two columns are X and Y, in HP-GL units — that’s 1/40 mm, or 1/1016 inches. The third column will always be 1 if you have the sight down. The last columns are the label; if you put commas in them, opening the file as CSV will split the label into columns. I used it to fudge axis points. You’ll also note that the last three lines of data are my valiant attempts to quit the program.
Assuming the axes are not skewed (they are, very slightly, but shhh) some simple linear interpolation gives you the results below:
 12.1    0.086
 15.1    0.093
 19.7    0.104
 24.7    0.114
 30.1    0.122
 39.7    0.145
 49.5    0.162
 60.0    0.182
 70.0    0.203
 79.8    0.221
 89.9    0.232
100.0    0.262
120.1    0.293
150.2    0.351
199.7    0.442
248.9    0.516
270.7    0.597
Good enough for a demo.
(For prettier things to do with plotter digitizing commands, Ed Nisley KE4ZNU has made some rather lovely Superformula patterns)
If you don’t have a plotter, or even if you do and you don’t have hours to waste mucking about with Python, obsolete optics and serial connections, Ankit Rohatgi’s excellent WebPlotDigitizer (or Engauge, as I found out when this article hit HackerNews in 2021) gets numbers out of graphs quickly. It handles all sorts of graphs rather well.
Update, 2025: eek, but WebPlotDigitizer is now login-only and has been infested by AI shite. Run away now, run away fast … or try to find an old mirror online, such as WebPlotDigitizer at utk.edu.
I’m still happily using a Raspberry Pi 2B 3 as a lightweight desktop machine. It’s not my main computer, but it’s pleasantly capable. Set up with a couple of paged desktops (or virtual desktops, as we used to call ’em), I can get a bunch of things done with it.
One feature that really irked me, though, was the way that window switching worked. Or, for greater clarity, didn’t work. Openbox, the standard window manager in Raspbian, didn’t allow you to switch to windows on another desktop with Alt+Tab. As I have a smallish screen, I typically have very few windows per desktop, so I want that ability to move from task to task.
This, however, can be fixed. In your ~/.config/openbox/lxde-pi-rc.xml file, change the keybinding sections for Alt+Tab and Alt-Shift+Tab from:
    <!-- Keybindings for window switching -->
    <keybind key="A-Tab">
      <action name="NextWindow"/>
    </keybind>
    <keybind key="A-S-Tab">
      <action name="PreviousWindow"/>
    </keybind>
to
    <!-- Keybindings for window switching -->
    <keybind key="A-Tab">
      <action name="NextWindow">
        <allDesktops>yes</allDesktops>
      </action>
    </keybind>
    <keybind key="A-S-Tab">
      <action name="PreviousWindow">
        <allDesktops>yes</allDesktops>
      </action>
    </keybind>
Log out, log back in, and Alt+Tab across desktops should Just Work. If you’re not using the default pi user, I suspect you’ll have to edit the ~/.config/openbox/lxde-user-rc.xml file instead.
Credit for this tip: user crunchworksyeay on the CrunchBang Linux Forums.
This has been a Memo To Myselfâ„¢ production.
Hey! This is yet another of my ancient posts about Raspberry Pis that probably contains out-of-date information. In order to run FreeBASIC on a Raspberry Pi, all you need do is:
That’s it! You can access GPIO with FreeBASIC, too: GPIO LED Blink using FreeBASIC and WiringPi
FreeBASIC is a pretty nifty cross-platform BASIC compiler. It uses a Microsoft-like syntax, has an active user and developer base, and is quite fast. Building the latest version on a Raspberry Pi is a bit of a challenge, though.

Part of the problem is that FreeBASIC is mostly written in FreeBASIC, so you need a working compiler to bootstrap the latest version.
Update: you’re probably best just downloading the binary install packages from the FreeBASIC site. I’m having difficulty getting recent (late 2016) source packages to build for reasons that would take too long for most people to care about.
The following steps worked for me:
sudo apt-get install build-essential libncurses5-dev libffi-dev libgl1-mesa-dev libx11-dev libxext-dev libxrender-dev libxrandr-dev libxpm-dev ncurses-doc libxcb-doc libxext-doc libgpm-dev git libcunit1 libcunit1-dev libcunit1-doc
(You don’t really have to include the cunit packages; they’re only needed if you run tests before installation.)
unzip fbc_linux_armv6_rpi_version.zip
cd fbc_linux_armv6_rpi/
chmod +x install.sh
sudo ./install.sh -i
Don’t delete the installation folder just yet.
cd
git clone https://github.com/freebasic/fbc.git
Change directory to the new FreeBASIC source folder (cd fbc), and type make. (or, on a Raspberry Pi 2 or 3, make -j4 to use all the cores …). After a while (in my tests, about 52 minutes on a 512 MB Raspberry Pi, or around 6½ minutes [!] on a Raspberry Pi 2), it should finish. If there’s a bin/fbc file, the compilation worked!
sudo ./install.sh -u
sudo make install
And you’re done! You can delete the fbc_linux_armv6_rpi folder now. If you don’t mind it taking up space, keep the fbc folder to allow you a quick rebuild of the latest version of the compiler with:
cd fbc
git pull
make
sudo make install
Note that this will build a native armv7l compiler on a Raspberry Pi 2, and an armv6l one on a Raspberry Pi. This means you can’t run binaries you built on a Raspberry Pi 2 on a Raspberry Pi (you’ll get an Illegal Instruction error), but you should be able to run ones built on a Raspberry Pi on a Raspberry Pi 2. Binary compatibility is overrated, anyway …
So, the DVD drive on my laptop’s on the fritz. It reads data fine, but ripping CDs with CDDA checks makes it go over the transport error rainbow bridge. So, partly through necessity and partly for lulz, I wondered how well a Raspberry Pi B+ would do on ripping CDs. I’ve got an old IDE DVD-R drive in an external 5¼” USB enclosure (huge!). I set about installing abcde, which is about the leanest way of ripping CDs in a terminal that I know. The standard sudo apt-get install abcde didn’t quite come up with all of the options I’d want to use, so I made the mistake of trying this:
sudo apt-get install --install-suggests abcde
Nooooooooooooooooooooooooooo! This horror suggested I install the following:
  abcde acl akonadi-backend-mysql akonadi-backend-postgresql
  akonadi-backend-sqlite akonadi-server alien antiword apache2 apache2-doc
  apache2-mpm-worker apache2-suexec apache2-utils apache2.2-bin
  apache2.2-common apmd aptdaemon aptdaemon-data at atomicparsley auctex
  autoconf autoconf-archive autoconf-doc autoconf2.13 automake automake1.4
  autopoint autotools-dev autotrace avahi-autoipd avahi-daemon bc bind9-host
  binfmt-support binutils-multiarch bsd-mailx bsh bsh-doc bsh-gcj
  ca-certificates-java catdvi cd-discid cdparanoia cdtool chktex chromium
  chromium-browser chromium-inspector chromium-l10n cjet cl-asdf cl-swank
  clisp clisp-dev clisp-doc cm-super cm-super-minimal colord comerr-dev
  common-lisp-controller cpufrequtils cup cups cups-filters cups-pdf
  cups-pk-helper cups-ppdc darcs db5.1-util dbtoepub dc debhelper
  debiandoc-sgml debiandoc-sgml-doc default-jdk default-jdk-doc default-jre
  default-jre-headless devhelp devhelp-common dh-make dhelp diffstat distmp3
  djtools djview-plugin djview4 djvulibre-bin djvulibre-desktop doc-base
  docbook docbook-defguide docbook-dsssl docbook-dsssl-doc docbook-mathml
  docbook-xml docbook-xsl docbook-xsl-doc-html docbook-xsl-saxon dot2tex
  dvidvi dvipng eject elfutils enscript ethtool exim4 exim4-base exim4-config
  exim4-daemon-light exim4-doc-html eximon4 exiv2 eyed3 fam fancontrol feynmf
  ffmpeg finger firebird-dev firebird2.5-common firebird2.5-common-doc
  firebird2.5-examples firebird2.5-server-common flac fontforge fontforge-doc
  fontforge-extras fonts-arphic-bkai00mp fonts-arphic-bsmi00lp
  fonts-arphic-gbsn00lp fonts-arphic-gkai00mp fonts-beng fonts-beng-extra
  fonts-comfortaa fonts-deva fonts-deva-extra fonts-dustin fonts-freefont-otf
  fonts-gfs-artemisia fonts-gfs-baskerville fonts-gfs-complutum
  fonts-gfs-didot fonts-gfs-neohellenic fonts-gfs-olga fonts-gfs-porson
  fonts-gfs-solomos fonts-gubbi fonts-gujr fonts-gujr-extra fonts-guru
  fonts-guru-extra fonts-hosny-amiri fonts-inconsolata fonts-indic
  fonts-ipaexfont-gothic fonts-ipaexfont-mincho fonts-ipafont-gothic
  fonts-ipafont-mincho fonts-junicode fonts-knda fonts-knda-extra
  fonts-liberation fonts-linuxlibertine fonts-lohit-beng-assamese
  fonts-lohit-beng-bengali fonts-lohit-deva fonts-lohit-gujr fonts-lohit-guru
  fonts-lohit-knda fonts-lohit-mlym fonts-lohit-orya fonts-lohit-taml
  fonts-lohit-telu fonts-mlym fonts-nakula fonts-navilu fonts-oflb-asana-math
  fonts-orya fonts-orya-extra fonts-pagul fonts-sahadeva fonts-samyak-gujr
  fonts-samyak-taml fonts-sil-gentium fonts-sil-gentium-basic fonts-smc
  fonts-stix fonts-taml fonts-telu fonts-telu-extra
  foomatic-db-compressed-ppds foomatic-db-engine foomatic-db-gutenprint
  foomatic-filters fop fop-doc fragmaster freeglut3 freetds-common
  frei0r-plugins gawk gawk-doc gcc-4.6-doc gcc-doc-base gcj-4.7-base
  gcj-4.7-jre-lib gcr gdal-bin geoip-bin geoip-database geotiff-bin gettext
  gettext-doc gfortran gfortran-4.6 gfortran-4.6-doc ghostscript-cups
  ghostscript-x gimp gimp-data gimp-data-extras gimp-gutenprint
  gimp-help-common gimp-help-en gimp-ufraw gir1.2-atk-1.0 gir1.2-freedesktop
  gir1.2-gdkpixbuf-2.0 gir1.2-gst-plugins-base-0.10 gir1.2-gstreamer-0.10
  gir1.2-gtk-3.0 gir1.2-pango-1.0 gir1.2-vte-2.90 gnome-keyring
  gnome-mime-data gnu-standards gnuplot gnuplot-doc gnuplot-nox gnutls26-doc
  gocr grads graphicsmagick graphicsmagick-dbg graphviz graphviz-doc groff
  gstreamer0.10-alsa gstreamer0.10-doc gstreamer0.10-ffmpeg
  gstreamer0.10-gconf gstreamer0.10-plugins-bad gstreamer0.10-plugins-base
  gstreamer0.10-plugins-good gstreamer0.10-plugins-ugly
  gstreamer0.10-pulseaudio gstreamer0.10-x gutenprint-doc gutenprint-locales
  gv hardening-includes hdf4-tools hdparm heirloom-mailx hp2xx hpijs
  hpijs-ppds hplip hplip-cups hplip-data hplip-doc hplip-gui hspell html2ps
  html2text hylafax-client i2c-tools iamerican icedtea-6-jre-cacao
  icedtea-6-jre-jamvm icedtea-6-plugin icedtea-netx icedtea-netx-common
  icedtea-plugin icoutils id3 id3v2 ienglish-common ijsgutenprint imagemagick
  imagemagick-common imagemagick-doc info2www intltool-debian ir-keytable
  ispell jadetex java-wrappers javascript-common jlex kate-data katepart
  kde-runtime kde-runtime-data kdelibs-bin kdelibs5-data kdelibs5-plugins
  kdepim-runtime kdepimlibs-kio-plugins kdoctools ko.tex-extra-hlfont
  krb5-config krb5-doc krb5-multidev krb5-user lacheck latex-beamer
  latex-cjk-all latex-cjk-chinese latex-cjk-chinese-arphic-bkai00mp
  latex-cjk-chinese-arphic-bsmi00lp latex-cjk-chinese-arphic-gbsn00lp
  latex-cjk-chinese-arphic-gkai00mp latex-cjk-common latex-cjk-japanese
  latex-cjk-japanese-wadalab latex-cjk-korean latex-cjk-thai
  latex-fonts-sipa-arundina latex-fonts-thai-tlwg latex-sanskrit latex-xcolor
  latexdiff latexmk liba52-0.7.4 libaio1 libakonadi-kabc4 libakonadi-kcal4
  libakonadi-kde4 libakonadi-kmime4 libakonadiprotocolinternals1 libamd2.2.0
  libao-common libao4 libapache-pom-java libapm1 libappconfig-perl libapr1
  libaprutil1 libaprutil1-dbd-sqlite3 libaprutil1-ldap libapt-pkg-perl
  libarchive-zip-perl libarmadillo3 libart-2.0-2 libasm1 libasound2-plugins
  libatk-wrapper-java libatk-wrapper-java-jni libatk1.0-doc libatkmm-1.6-1
  libattica0 libaudio-scrobbler-perl libauthen-ntlm-perl libauthen-sasl-perl
  libautotrace3 libav-tools libavahi-core7 libavalon-framework-java
  libavalon-framework-java-doc libavdevice53 libavfilter2 libavfilter3
  libavformat53 libavresample1 libbabl-0.1-0 libbackport-util-concurrent-java
  libbackport-util-concurrent-java-doc libbatik-java libbcel-java
  libbcel-java-doc libbind9-80 libbonobo2-0 libbonobo2-bin libbonobo2-common
  libbonoboui2-0 libbonoboui2-common libboost-program-options1.49.0
  libbsf-java libc6-dbg libcairomm-1.0-1 libcanberra-gtk-module
  libcanberra-gtk0 libcanberra-gtk3-0 libcanberra-gtk3-module
  libcanberra-pulse libcanberra0 libcap-dev libcap-ng0 libcap2-bin libcdaudio1
  libcddb2 libcdt4 libcf0 libcgraph5 libclass-accessor-chained-perl
  libclass-accessor-perl libclass-load-perl libclass-singleton-perl
  libclone-perl libclucene0ldbl libcommandline-ruby1.8 libcommons-codec-java
  libcommons-io-java libcommons-io-java-doc libcommons-logging-java
  libcommons-logging-java-doc libcommons-parent-java libconfig-inifiles-perl
  libconvert-binhex-perl libcpufreq0 libcrypt-openssl-bignum-perl
  libcrypt-openssl-rsa-perl libcrypt-ssleay-perl libcupscgi1 libcupsdriver1
  libcupsfilters1 libcupsmime1 libcupsppdc1 libcurl3-dbg libcurl4-gnutls-dev
  libcxxtools-dev libcxxtools8 libdap11 libdapclient3 libdapserver7
  libdata-dump-perl libdata-float-perl libdata-integer-perl
  libdata-optlist-perl libdata-page-perl libdatetime-format-mail-perl
  libdatetime-format-w3cdtf-perl libdatetime-locale-perl libdatetime-perl
  libdatetime-timezone-perl libdb-ruby1.8 libdbd-mysql-perl libdbi-perl
  libdbi1 libdbusmenu-qt2 libdevhelp-3-0 libdigest-hmac-perl libdirac-decoder0
  libdiscid0 libdjvulibre-text libdjvulibre21 libdlrestrictions1 libdns88
  libdom4j-java libdom4j-java-doc libdvbpsi7 libdw1 libebml3 libelf1 libelfg0
  libemail-valid-perl libencode-locale-perl libepsilon0 libescpr1
  libexcalibur-logkit-java libexiv2-12 libexpat1-dev libfam0 libfbclient2
  libfbembed2.5 libffcall1 libffi-dev libfile-listing-perl libfile-remove-perl
  libfile-which-perl libfont-afm-perl libfontforge1 libfop-java libfreexl1
  libftdi1 libgail18 libgavl1 libgcc1-dbg libgcj-bc libgcj-common libgcj13
  libgcj13-awt libgcj13-dbg libgck-1-0 libgconfmm-2.6-1c2 libgcr-3-1
  libgcr-3-common libgcrypt11-dev libgcrypt11-doc libgd-gd2-perl
  libgd-graph-perl libgd-graph3d-perl libgd-text-perl libgdal1 libgdraw4
  libgegl-0.2-0 libgeoip1 libgeos-3.3.3 libgeos-c1 libgeotiff-epsg libgeotiff2
  libgettext-ruby1.8 libgettextpo0 libgfortran3-dbg libgimp2.0 libgl1-mesa-dev
  libglademm-2.4-1c2a libglib2.0-bin libglib2.0-dev libglib2.0-doc
  libglibmm-2.4-1c2a libglu1-mesa-dev libgnome2-0 libgnome2-common
  libgnomecanvas2-0 libgnomecanvas2-common libgnomeui-0 libgnomeui-common
  libgnomevfs2-0 libgnomevfs2-bin libgnomevfs2-common libgnomevfs2-extra
  libgnuinet-java libgnujaf-java libgnujaf-java-doc libgnumail-java
  libgnumail-java-doc libgnutls-dev libgnutls-openssl27 libgnutlsxx27
  libgpg-error-dev libgraph4 libgraphics-magick-perl libgraphicsmagick++3
  libgraphicsmagick3 libgraphite3 libgrib2c0d libgssapi-perl libgssrpc4
  libgstreamer-plugins-bad0.10-0 libgstreamer-plugins-base0.10-dev
  libgstreamer0.10-dev libgtk-3-doc libgtk2.0-doc libgtkimageview0
  libgtkmm-2.4-1c2a libgtkmm-3.0-1 libgusb2 libgutenprint2 libgutenprintui2-1
  libgvc5 libgvpr1 libhdf4-0 libhdf4-0-alt libhdf4-alt-dev libhdf4-doc
  libhdf5-7 libhpmud0 libhtml-form-perl libhtml-format-perl libhtml-lint-perl
  libhtml-parser-perl libhtml-tagset-perl libhtml-template-perl
  libhtml-tree-perl libhttp-cookies-perl libhttp-daemon-perl libhttp-date-perl
  libhttp-message-perl libhttp-negotiate-perl libi2c-dev libib-util libical0
  libice-dev libice-doc libid3-3.8.3c2a libid3-tools libidl0 libidn11-dev
  libieee1284-3 libio-pty-perl libio-socket-inet6-perl libio-socket-ip-perl
  libio-socket-ssl-perl libio-string-perl libio-stringy-perl libiodbc2
  libipc-run-perl libipc-sharedcache-perl libipc-sharelite-perl libisc84
  libisccc80 libisccfg82 libiso9660-8 libjavascriptcoregtk-1.0-0 libjaxen-java
  libjaxme-java libjaxme-java-doc libjaxp1.3-java libjaxp1.3-java-gcj
  libjboss-jmx-java libjdom1-java libjdom1-java-doc libjline-java
  libjline-java-doc libjpeg-progs libjpeg62 libjpeg8-dev libjs-jquery
  libjs-underscore libkabc4 libkadm5clnt-mit8 libkadm5srv-mit8
  libkatepartinterfaces4 libkcal4 libkcalcore4 libkcalutils4 libkcmutils4
  libkdb5-6 libkde3support4 libkdeclarative5 libkdecore5 libkdesu5 libkdeui5
  libkdewebkit5 libkdnssd4 libkemoticons4 libkfile4 libkhtml5 libkidletime4
  libkimap4 libkio5 libkjsapi4 libkjsembed4 libkldap4 libkmediaplayer4
  libkmime4 libkml0 libknewstuff2-4 libknewstuff3-4 libknotifyconfig4
  libkntlm4 libkparts4 libkpathsea6 libkpimutils4 libkprintutils4 libkpty4
  libkrb5-dev libkresources4 libkrosscore4 libktexteditor4 libldap2-dev
  liblensfun-data liblensfun0 liblircclient0 liblist-moreutils-perl
  liblog4j1.2-java liblog4j1.2-java-doc liblqr-1-0 libltdl-dev liblua5.1-0
  liblwp-mediatypes-perl liblwp-protocol-https-perl liblwres80 liblzo2-2
  libmagickcore5 libmagickcore5-extra libmagickwand5 libmail-box-perl
  libmail-dkim-perl libmail-imapclient-perl libmail-sendmail-perl
  libmail-spf-perl libmailtools-perl libmailtransport4 libmath-round-perl
  libmatroska5 libmhash2 libmicroblog4 libmime-tools-perl libmime-types-perl
  libmodule-implementation-perl libmodule-runtime-perl libmpcdec6 libmpeg2-4
  libmtp-common libmtp-runtime libmtp9 libmusicbrainz-discid-perl libmyodbc
  libmysqlclient-dev libmysqlclient16 libmysqlclient18 libneon27-gnutls
  libnepomuk4 libnepomukquery4a libnepomukutils4 libnet-dns-perl
  libnet-domain-tld-perl libnet-http-perl libnet-ident-perl libnet-ip-perl
  libnet-ssleay-perl libnetaddr-ip-perl libnetcdf-dev libnetcdfc++4
  libnetcdfc7 libnetcdff5 libnetpbm10 libnl-route-3-200 libnspr4-0d
  libnss-mdns libnss3-1d libntrack-qt4-1 libntrack0
  libobject-realize-later-perl libodbc1 libodbcinstq4-1 libogdi3.2
  libopencv-core2.3 libopencv-imgproc2.3 libopenraw1 liborbit2 libosp5
  libostyle1c2 libp11-kit-dev libpackage-deprecationmanager-perl
  libpackage-stash-perl libpackage-stash-xs-perl libpam-cap
  libpam-gnome-keyring libpango1.0-doc libpangomm-1.4-1
  libparams-classify-perl libparams-util-perl libparams-validate-perl
  libparse-debianchangelog-perl libparse-recdescent-perl libpathplan4
  libpcre3-dev libpcrecpp0 libperl5.14 libperlio-gzip-perl libphonon4
  libplasma3 libplot2c2 libpod-plainer-perl libpolkit-qt-1-1 libpoppler-glib8
  libpostproc52 libpotrace0 libpq-dev libpq5 libproj0 libpstoedit0c2a
  libptexenc1 libpthread-stubs0 libpthread-stubs0-dev libpulse-mainloop-glib0
  libpython2.6 libqca2 libqca2-plugin-cyrus-sasl libqca2-plugin-gnupg
  libqca2-plugin-ossl libqt3-mt libqt3-mt-mysql libqt3-mt-odbc libqt3-mt-psql
  libqt4-declarative libqt4-declarative-folderlistmodel
  libqt4-declarative-gestures libqt4-declarative-particles
  libqt4-declarative-shaders libqt4-designer libqt4-dev libqt4-dev-bin
  libqt4-help libqt4-opengl libqt4-opengl-dev libqt4-qt3support libqt4-script
  libqt4-scripttools libqt4-sql libqt4-sql-mysql libqt4-sql-psql
  libqt4-sql-sqlite libqt4-test libqt4-xmlpatterns libqtassistantclient4
  libqtwebkit-dev libraptor2-0 librarian0 librasqal3 librdf-storage-mysql
  librdf-storage-postgresql librdf-storage-sqlite librdf0 librecode0
  libregexp-java libresid-builder0c2a librhino-java librhino-java-doc
  libroman-perl librpm3 librpmbuild3 librpmio3 librpmsign1 librrd4
  librrds-perl librtmp-dev libruby1.8 libsane libsane-common libsane-extras
  libsane-extras-common libsane-hpaio libsaxon-java libsaxon-java-doc
  libsaxonb-java libsaxonb-java-doc libscalar-number-perl libsensors4 libserf1
  libservlet2.5-java libsgmls-perl libshp1 libsidplay1 libsidplay2 libsigsegv2
  libslp1 libslv2-9 libsm-dev libsm-doc libsnmp-base libsnmp15 libsocket-perl
  libsocket6-perl libsolid4 libsoprano4 libsp1c2 libspatialite3 libspeexdsp1
  libspiro0 libsqlite0 libsqlite0-dev libsqlite3-dev libssh-4 libssh2-1-dev
  libssl-dev libssl-doc libstreamanalyzer0 libstreams0 libsub-install-perl
  libsub-name-perl libsvn-perl libsvn-ruby1.8 libsvn1
  libsys-hostname-long-perl libsystemd-daemon0 libtar0 libtasn1-3-dev
  libtemplate-perl libtemplate-perl-doc libtemplate-plugin-gd-perl
  libtemplate-plugin-xml-perl libterm-readkey-perl libterm-readline-gnu-perl
  libtext-format-perl libtext-template-perl libthreadweaver4 libtiff-opengl
  libtiff-tools libtiff5 libtntnet-dev libtntnet10 libtool libtool-doc
  libtry-tiny-perl libtwolame0 libudunits2-0 libumfpack5.4.0 libuninameslist0
  libunistring0 libupnp6 libupower-glib1 liburi-perl liburiparser1
  libuser-identity-perl libutempter0 libuuid-perl libva-x11-1 libvcdinfo0
  libvirtodbc0 libvlc5 libvlccore5 libvte-2.90-9 libvte-2.90-common
  libwebkitgtk-1.0-0 libwebkitgtk-1.0-common libwebrtc-audio-processing-0
  libwebservice-musicbrainz-perl libwmf-bin libwmf0.2-7 libwww-perl
  libwww-robotrules-perl libx11-dev libx11-doc libxalan110 libxalan2-java
  libxalan2-java-doc libxau-dev libxcb-composite0 libxcb-doc libxcb-keysyms1
  libxcb-randr0 libxcb-xv0 libxcb1-dev libxdmcp-dev libxdot4 libxerces-c28
  libxerces2-java libxerces2-java-doc libxerces2-java-gcj libxext-dev
  libxext-doc libxml-commons-external-java libxml-commons-resolver1.1-java
  libxml-commons-resolver1.1-java-doc libxml-dom-perl libxml-libxml-perl
  libxml-namespacesupport-perl libxml-parser-perl libxml-perl
  libxml-regexp-perl libxml-rss-perl libxml-sax-base-perl
  libxml-sax-expat-perl libxml-sax-perl libxml-simple-perl libxml2-dev
  libxml2-doc libxml2-utils libxmlgraphics-commons-java libxom-java
  libxom-java-doc libxpp2-java libxpp3-java libxsltc-java libxslthl-java
  libxt-dev libxt-doc libxvmc1 libyajl2 libyaml-tiny-perl libzvbi-common
  libzvbi0 lintian linuxdoc-tools linuxdoc-tools-info linuxdoc-tools-latex
  linuxdoc-tools-text lirc lirc-x lm-sensors lmodern locales-all lsb lsb-core
  lsb-cxx lsb-desktop lsb-graphics lsb-languages lsb-multimedia lsb-printing
  lsb-release lsb-security luatex m4 magicfilter man2html man2html-base
  media-player-info mesa-common-dev mgetty-viewfax mkcue mp3gain mpg321
  mplayer mplayer-doc mscompress mysql-client mysql-client-5.5 mysql-common
  mysql-server-core-5.5 netcdf-bin netcdf-doc netpbm netselect netselect-apt
  normalize-audio ntrack-module-libnl-0 odbc-postgresql odbcinst
  odbcinst1debian2 ogdi-bin oidentd openjade openjdk-6-demo openjdk-6-doc
  openjdk-6-jdk openjdk-6-jre openjdk-6-jre-headless openjdk-6-jre-lib
  openjdk-6-source openprinting-ppds openslp-doc opensp openssl-blacklist
  otf-freefont oxygen-icon-theme paman paprefs patchutils pavucontrol
  pavumeter pax pdf2djvu perl-doc perl-tk perlmagick pfb2t1c2pfb pgf phonon
  phonon-backend-gstreamer phonon-backend-vlc plasma-scriptengine-javascript
  pm-utils po-debconf postgresql postgresql-9.1 postgresql-client
  postgresql-client-9.1 postgresql-client-common postgresql-common
  postgresql-doc-9.1 potrace powermgmt-base preview-latex-style
  printer-driver-all printer-driver-c2050 printer-driver-c2esp
  printer-driver-cjet printer-driver-escpr printer-driver-foo2zjs
  printer-driver-gutenprint printer-driver-hpcups printer-driver-hpijs
  printer-driver-m2300w printer-driver-min12xxw printer-driver-pnm2ppa
  printer-driver-postscript-hp printer-driver-ptouch printer-driver-pxljr
  printer-driver-sag-gdi printer-driver-splix proj-bin proj-data proj-ps-doc
  prosper ps2eps psgml pstoedit pstotext psutils pulseaudio
  pulseaudio-module-gconf pulseaudio-module-x11 pulseaudio-module-zeroconf
  pulseaudio-utils purifyeps python-apt python-apt-common python-apt-dbg
  python-apt-doc python-aptdaemon python-aptdaemon-gtk
  python-aptdaemon.gtk3widgets python-aptdaemon.gtkwidgets python-cairo
  python-chardet python-cups python-cupshelpers python-dbg python-debian
  python-defer python-dev python-distribute-doc python-doc
  python-egenix-mx-base-dbg python-egenix-mx-base-dev python-egenix-mxbeebase
  python-egenix-mxbeebase-doc python-egenix-mxdatetime
  python-egenix-mxdatetime-doc python-egenix-mxproxy python-egenix-mxproxy-doc
  python-egenix-mxqueue python-egenix-mxqueue-doc python-egenix-mxstack
  python-egenix-mxstack-doc python-egenix-mxtexttools
  python-egenix-mxtexttools-doc python-egenix-mxtools
  python-egenix-mxtools-doc python-egenix-mxuid python-egenix-mxuid-doc
  python-egenix-mxurl python-egenix-mxurl-doc python-examples python-eyed3
  python-fontforge python-gconf python-gdal python-gdbm python-gdbm-dbg
  python-gi-dbg python-gi-dev python-glade2 python-gnome2 python-gnome2-doc
  python-gnomekeyring python-gnupginterface python-gobject python-gobject-2
  python-gobject-2-dbg python-gobject-2-dev python-gobject-dbg
  python-gobject-dev python-gst0.10 python-gst0.10-dbg python-gst0.10-dev
  python-gtk2 python-gtk2-doc python-imaging python-imaging-dbg
  python-imaging-doc python-imaging-doc-html python-imaging-doc-pdf
  python-imaging-tk python-imaging-tk-dbg python-kde4 python-libxml2
  python-notify python-pexpect python-pkg-resources python-pycurl
  python-pycurl-dbg python-pyorbit python-pyparsing python-qt4 python-qt4-dbg
  python-qt4-dbus python-renderpm python-renderpm-dbg python-reportlab
  python-reportlab-accel python-reportlab-doc python-setuptools python-sip
  python-sip-dbg python-smbc python-smbus python-software-properties
  python-subversion python-vte python2.6 python2.6-doc python2.6-minimal
  python2.7-dbg python2.7-dev python2.7-doc python2.7-examples python3-gi
  pyzor qt-assistant-compat qt4-designer qt4-dev-tools qt4-doc qt4-doc-html
  qt4-linguist-tools qt4-qmake qt4-qmlviewer radeontool radiance radiance-doc
  radiance-materials raptor2-utils rarian-compat rasqal-utils razor re2c
  read-edid realpath recode redland-utils rhino ri ri1.8 ri1.9.1 rpm
  rpm-common rpm-i18n rpm2cpio rrdtool rtkit ruby ruby-bdb ruby-commandline
  ruby-dev ruby-gettext ruby-locale ruby-open4 ruby-svn ruby-switch
  ruby-text-format ruby1.8 ruby1.8-examples ruby1.9.1-dev sane-utils sensord
  sessioninstaller setcd setserial sgml-data sgmls-doc sgmlspl
  shared-desktop-ontologies sidplay-base slime slpd slv2-jack smistrip
  snmp-mibs-downloader soprano-daemon sp spamassassin spamc spell
  spf-tools-perl sqlite sqlite-doc sqlite3 sqlite3-doc ssl-cert subversion
  subversion-tools svn2cl swaks swath swish++ system-config-printer
  system-config-printer-kde system-config-printer-udev t1utils tcl-tclreadline
  tcl8.4 tcsh tdsodbc tex-common tex-gyre texinfo texinfo-doc-nonfree texlive
  texlive-base texlive-binaries texlive-common texlive-doc-base texlive-doc-en
  texlive-doc-zh texlive-extra-utils texlive-font-utils texlive-fonts-extra
  texlive-fonts-extra-doc texlive-fonts-recommended
  texlive-fonts-recommended-doc texlive-generic-recommended
  texlive-lang-african texlive-lang-all texlive-lang-arabic
  texlive-lang-armenian texlive-lang-cjk texlive-lang-croatian
  texlive-lang-cyrillic texlive-lang-czechslovak texlive-lang-danish
  texlive-lang-dutch texlive-lang-english texlive-lang-finnish
  texlive-lang-french texlive-lang-german texlive-lang-greek
  texlive-lang-hebrew texlive-lang-hungarian texlive-lang-indic
  texlive-lang-italian texlive-lang-latin texlive-lang-latvian
  texlive-lang-lithuanian texlive-lang-mongolian texlive-lang-norwegian
  texlive-lang-other texlive-lang-polish texlive-lang-portuguese
  texlive-lang-spanish texlive-lang-swedish texlive-lang-tibetan
  texlive-lang-vietnamese texlive-latex-base texlive-latex-base-doc
  texlive-latex-extra texlive-latex-extra-doc texlive-latex-recommended
  texlive-latex-recommended-doc texlive-luatex texlive-metapost
  texlive-metapost-doc texlive-pictures texlive-pictures-doc texlive-pstricks
  texlive-pstricks-doc texlive-xetex thailatex time tipa tix tk8.4 tntnet
  tntnet-demos tntnet-doc tntnet-runtime transfig ttf-dejavu ttf-dejavu-extra
  ttf-dustin ttf-indic-fonts ttf-liberation ttf-marvosym ttf-wqy-microhei
  tzdata-java ufraw ufraw-batch unattended-upgrades unixodbc unixodbc-bin
  unixodbc-dev unpaper upower videolan-doc virtuoso-minimal
  virtuoso-opensource-6.1-bin virtuoso-opensource-6.1-common vlc vlc-data
  vlc-nox vlc-plugin-notify vlc-plugin-pulse vorbis-tools vorbisgain
  w3-dtd-mathml w3-recs w3c-dtd-xhtml wamerican weblint-perl wwwconfig-common
  x11proto-core-dev x11proto-input-dev x11proto-kb-dev x11proto-xext-dev xalan
  xapm xaw3dg xfig xfig-doc xfig-libs xfonts-75dpi xhtml2ps xindy xindy-rules
  xorg-sgml-doctools xsane xsane-common xsidplay xsltproc xtrans-dev zip
Eep! That looks like the full TeXLive system, most of QT4, almost every TrueType font ever (plus a font editor), printer drivers, the full Apache webserver setup, MySQL, a couple of web browsers, scanner drivers and OCR programs, a mail server … 2.4 GB of downloads, or over 6 GB installed. And all this for a command line script for ripping CDs.
Eventually, I got by by installing just this:
sudo apt-get install abcde lame eject id3 id3v2 eyed3 normalize-audio vorbisgain mkcue mp3gain libdata-dump-perl flac
Much better. Installed in a couple of minutes. Worked quite well, if not fast — ripped and encoded a 45 minute CD in just under 26 minutes (using lame -V2, which is good enough for me). For setup hints for abcde, abcde: Command Line Music CD Ripping for Linux is a good resource. On a Raspberry Pi, with its single core processor, you probably want to set MAXPROCS=1 in the abcde.conf file, or the encoders will fight for resources and get really slow.
Well, look at this:
$ stty -F /dev/ttyACM0 speed 115200 raw cs8
$ rngtest -t 6 < /dev/ttyACM0
  … much snippage …
rngtest: bits received from input: 312368864
rngtest: FIPS 140-2 successes: 15602
rngtest: FIPS 140-2 failures: 16
rngtest: FIPS 140-2(2001-10-10) Monobit: 2
rngtest: FIPS 140-2(2001-10-10) Poker: 2
rngtest: FIPS 140-2(2001-10-10) Runs: 8
rngtest: FIPS 140-2(2001-10-10) Long run: 4
rngtest: FIPS 140-2(2001-10-10) Continuous run: 0
rngtest: input channel speed: (min=837.317; avg=1168.033; max=1948.060)Kibits/s
rngtest: FIPS tests speed: (min=16.834; avg=27.779; max=77.221)Mibits/s
rngtest: Program run time: 271917796 microseconds
Over a megabit/second of decent quality random data. This is from an Arduino Due, which has an Atmel SAM3X8E ARM Cortex-M3 microcontroller on board. I hadn’t found much use for this board previously, as it fell between a regular 8-bit Arduino and my (many!) Raspberry Pis.
This changed when I found out about Walter Anderson’s Entropy library, which uses µc timer jitter as a source of entropy. Originally designed as a slow but true source of random integers on the Atmel AVR chips, it’s been extended to use the SAM3X8E‘s built-in hardware RNG. Since the Due has a native USB port, you’re not limited to standard baud rates.
Here’s the code, trivially modified from one of Walter’s examples:
// Generate_Random_Bytes_Due - speedy demo of Arduino Due's HWRNG
// based on Generate_Random_Bytes, for Entropy, an Arduino library.
// Copyright 2012 by Walter Anderson
//Â modified - scruss - 2014-08-13
// remember to reconnect to native USB port
#include <Entropy.h>
void setup() {
 SerialUSB.begin(115200);
 while (!SerialUSB) {
   ; // wait for serial port to connect.
 }
 Entropy.initialize();
}
void loop() {
 uint16_t r = Entropy.random();
 SerialUSB.write(lowByte(r));
 SerialUSB.write(highByte(r));
}
It’s a minor pain to have to reconnect the USB cable to the other port on the Arduino Due after programming, but it’s worth it just to see an 84 MHz µc belting out random bytes 37½% faster than an 800 MHz Raspberry Pi …
I don’t recommend this in any way, but cpuminer will run on the Raspberry Pi. It’s pretty easy to build:
sudo apt-get install build-essential libcurl4-openssl-dev automake git

git clone https://github.com/pooler/cpuminer.git

cd cpuminer/

./autogen.sh

./configure CFLAGS="-march=armv6 -mtune=arm1176jzf-s -mfloat-abi=hard -mfpu=vfp -ffast-math -ffast-math -O3"

make

sudo make install
I’m not convinced that the l33t funroll-l00pz CFLAGS are strictly necessary. Yes, you still only get 0.34 khash/s on a stock Raspberry Pi — which means it would take several days to earn 1Ä (or roughly 0.1¢).
I’m trying to find the most futile computer on which to dig Ä. My BeagleBone Black is (somewhat surprisingly) more than 2× as fast, once you replace the very limited Ã…ngström distribution with Debian. I’m really disappointed that I can’t build cpuminer on my Intel Galileo. Its Yocto distribution is extremely small yet confusing. As the board runs burny hot under no load, I wonder how quickly it would glow white-hot under 100% CPU load.
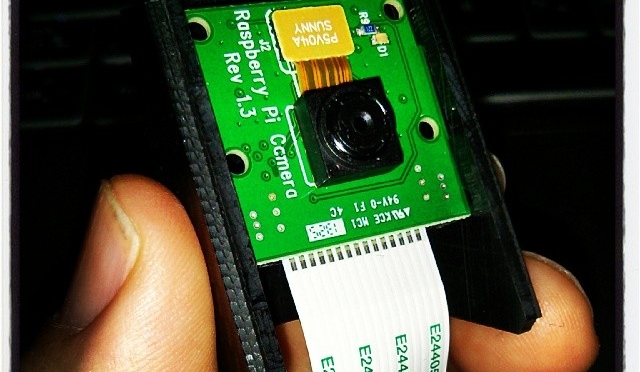
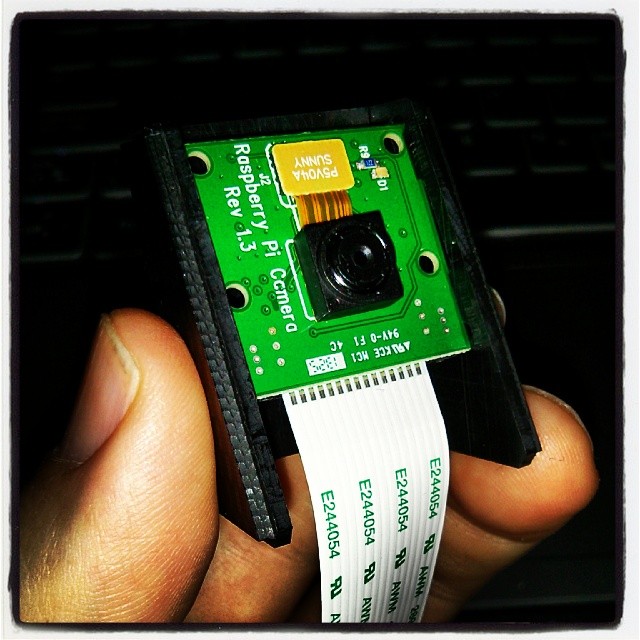
The CamdenBoss Raspberry Pi Camera Enclosure (data sheet, suppliers: RPI CAMERA BOARD – RASPBERRY-PI – ADD-ON BRD, CAMERA MODULE, RASPBERRY PI | Newark element14 Canada, MCM Electronics Carbon Raspberry Pi Camera Case 83-15493 – Micro Center) comes with no instructions. Maybe the lighter coloured ones are easier to work out, but on the faux-carbon one I bought, the little guide slots the board has to slide into are very hard to see.
Given all the warnings about static, I was a little too careful trying to install the camera into the housing. Slip open the camera case, then put the board in at an angle with one side in one slot, then (with a bit more force than I’d like) spring or flex the housing so the other side of the board can click into place. You have to make sure that both sides are fully engaged in the slots before the cover will slide back on.
So here it is, all set up:

Oh, sorry; should’ve warned you about the bright pink case and the awesome/appalling Lisa Frank sticker. The sticker is in no way to cover up where I cut the wrong place for the camera connector, nope nope nope …
Hey! This is very old and there’s an officially supported version out now coming out very soon.
Update for Raspberry Pi 2/Processing 2.2.1/Processing 3.0.5: Raspbian now ships with Java 8, and Processing only likes Java 7. oracle-java7-jdk is still in the repos, so install that, and follow the instructions below. It’s a bit flakey, but when it runs, runs quite fast on the Raspberry Pi 2. You might have more luck running Processing.js or p5.js in the browser.
With Sun Oracle hardfloat Java now available, Processing now runs at a decent clip on the Raspberry Pi. My old instructions are now very obsolete. Here are current, tested instructions for installing it under Raspbian.
[This is a particular solution to installing a Serial/Firmata-enabled Processing 2.1 distribution on a Raspberry Pi. Processing still has issues with other aspects of visual programming (particularly video) that I’m not addressing here.]
A lot of software is installed here, and much of it depends on previous steps. Don’t jump in mid-way and expect it to work.
Always a good plan if you’re doing major upgrades:
sudo apt-get update
sudo apt-get dist-upgrade
sudo apt-get install oracle-java7-jdk
Check if the right version is installed as default: java -version should give
java version "1.7.0_40"
Java(TM) SE Runtime Environment (build 1.7.0_40-b43)
Java HotSpot(TM) Client VM (build 24.0-b56, mixed mode)
If you get anything else, you need to make Sun Oracle’s version the default:
sudo update-alternatives --config java
Go to Download \ Processing.org and get the Linux 32-bit version. It’s big; about 100 MB. I’m going to install it in my home directory, so the base path will be ~/processing-2.1. Extract it:
tar xvzf processing-2.1-linux32.tgz
Now you have to remove the included x86 Java runtime, and replace it with the Raspberry Pi’s armhf one:
rm -rf ~/processing-2.1/java
ln -s /usr/lib/jvm/jdk-7-oracle-armhf ~/processing-2.1/java
You should now have a Processing installation that will run, but there’s some more we need to get serial and Arduino support.
Download jSSC-2.6.0-Release.zip and extract it:
unzip jSSC-2.6.0-Release.zip
Now overwrite the jssc.jar that ships with Processing with the one you just downloaded:
mv jSSC-2.6.0-Release/jssc.jar ~/processing-2.1/modes/java/libraries/serial/library/
(You can remove the jSSC folder now: rm -r jSSC-2.6.0-Release)
You’re almost there! Fire up Processing:
~/processing-2.1/processing
and try Perhaps the World’s Most Boring Processing Sketchâ„¢:
// Example by Tom Igoe

import processing.serial.*;

// The serial port
Serial myPort;

// List all the available serial ports
println(Serial.list());
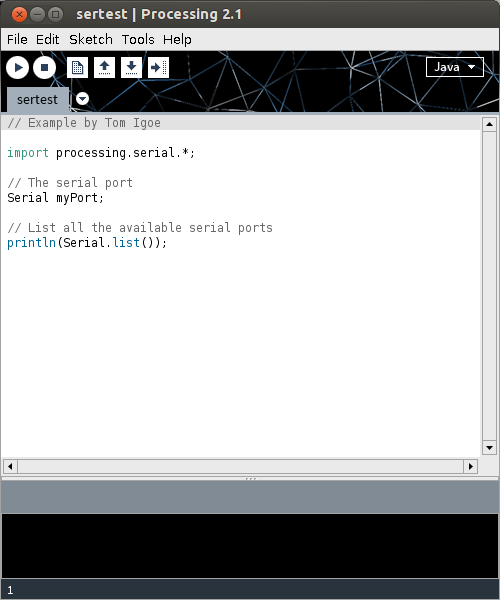 When this runs (it’s a little slow), you should get a single line of output, which should start /dev/tty___:
/dev/ttyACM0
(I have an Arduino Leonardo attached, which usually appears as an ACM device.)
(I’m not going to go into uploading Firmata onto your Arduino here. All I can recommend is that you use the newest version at firmata/arduino, rather than the old code bundled with your Arduino distribution.)
Exit Processing, and download processing-arduino.zip from firmata/processing. Extract it into your Processing sketchbook:
unzip processing-arduino.zip -d ~/sketchbook/libraries/
For tedious reasons, you also have to rename one of the files:
mv ~/sketchbook/libraries/arduino/library/Arduino.jar ~/sketchbook/libraries/arduino/library/arduino.jar
Start up Processing again, and save Most Probably the World’s Second Least Interesting Processing Programâ„¢:
import processing.serial.*;
import cc.arduino.*;
Arduino arduino;
int ledPin = 13;

void setup()
{
  println(Arduino.list());
  arduino = new Arduino(this, Arduino.list()[0], 57600);
  arduino.pinMode(ledPin, Arduino.OUTPUT);
}

void draw()
{
  arduino.digitalWrite(ledPin, Arduino.HIGH);
  delay(1000);
  arduino.digitalWrite(ledPin, Arduino.LOW);
  delay(1000);
}
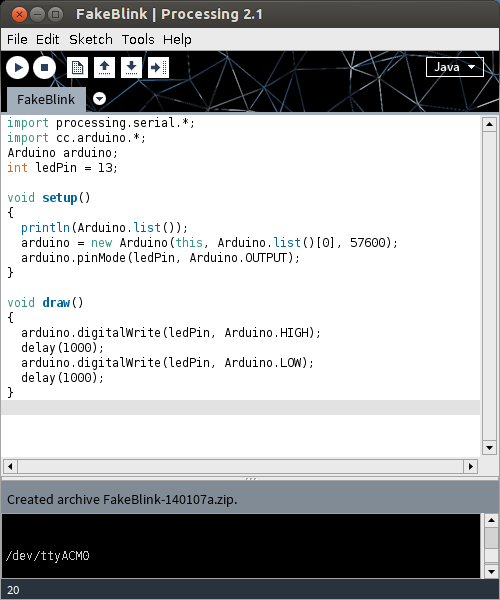
What this sketch does is emulate the µC’s “Hello World†program, Blink. It flashes the board’s LED once per second. Boring? Yes. But if it worked, you have a working Processing 2.1 installation on your Raspberry Pi. Go forth and make more interesting things.
(Props to bitcraftlab/wolfing for the basic outline for installing Processing, and for samaygoenka for the prodding needed to update and test the Processing installation process. If you’re still stuck, the Processing 2.0 Forum and the Raspberry Pi Forum are good places to ask.)
Hey! This post is completely ancient. It doesn’t even use Python 3. Advice given here might be well out of date.
… it complains that the oscilloscope is always making waves.
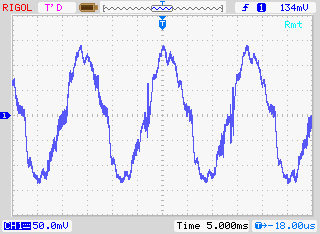
Ahem. Anyway. I have a Rigol DS1102E 100 MHz Digital Oscilloscope. For such a cheap device, it’s remarkable that you can control it using USB Test & Measurement Class commands. I’d been wanting to use a Raspberry Pi as a headless data acquisition box with the oscilloscope for a while, but Raspbian doesn’t ship with the usbtmc kernel module. I thought I was stuck.
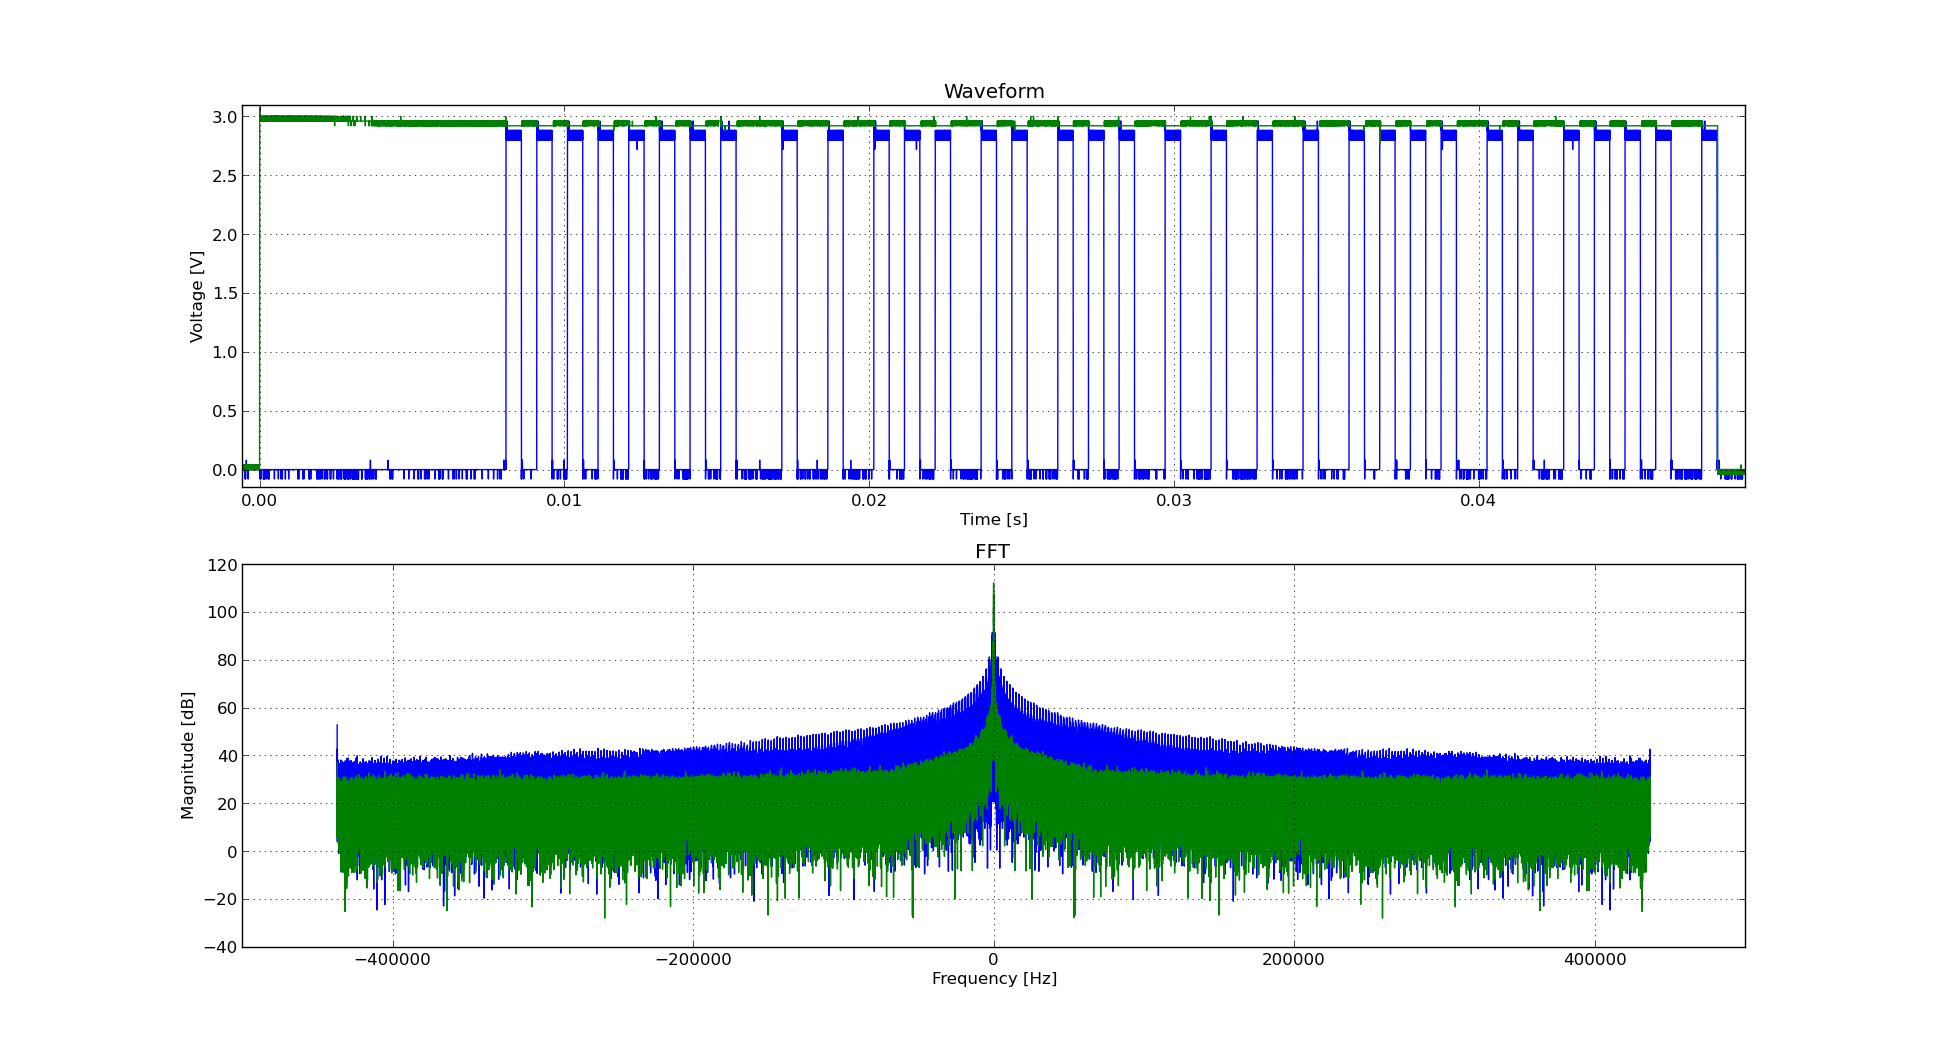
Alex Forencich turned up in the forum with an all-Python solution: Python USBTMC (source: alexforencich / python-usbtmc). I got this working quite nicely today on both the Raspberry Pi and my Ubuntu laptop. Here’s how I installed it:
If you get the status line, congratulations! You now have a fully working usbtmc link. I haven’t had much time to play with this, but I know I can make really nice screenshots to an attached USB drive using the command: instr.write(“:HARDcopy”). Many more commands can be found in the DS1000D/E Programming Guide, available on Rigol‘s site.
I had a couple of problems, though:
I’ve still got to work my way through the Rigol’s data format, but other people have done that before:
I’ll post any updates here, along with the Raspberry Pi forum topic: USB Test & Measurement class (usbtmc) driver?
Incidentally, if you’re working with WFM data dumps from the Rigol ‘scopes (and you should, because they make storing data to USB drives quick), mabl/pyRigolWFM is basically magic. Not merely can it describe and decode those binary files, it can do pretty graphics with no thought required:
 Hat tip for the mention: MP3 Options & Oscilloscope Interfacing For Raspberry Pi @Raspberry_Pi #piday #raspberrypi « adafruit industries blog
Update, 2013-12-20: I’ve successfully managed to run most of Ken’s examples with Alex’s code. The major modification you have to do is use ask_raw instead of ask. Example code shown below:
#!/usr/bin/python
# -*- coding: utf-8 -*-
"""
Download data from a Rigol DS1102E oscilloscope and graph with matplotlib
using Alex Forencich's python-usbtmc pure python driver
https://github.com/alexforencich/python-usbtmc
scruss - 2013-12-20
based on
Download data from a Rigol DS1052E oscilloscope and graph with matplotlib.
By Ken Shirriff, http://righto.com/rigol
which in turn was
Based on http://www.cibomahto.com/2010/04/controlling-a-rigol-oscilloscope-using-linux-and-python/
by Cibo Mahto.
"""
import usbtmc
import time
import numpy
import matplotlib.pyplot as plot
# initialise device
instr = usbtmc.Instrument(0x1ab1, 0x0588) # Rigol DS1102E
# read data
instr.write(":STOP")
instr.write(":WAV:POIN:MODE RAW")
# first ten bytes are header, so skip
rawdata = instr.ask_raw(":WAV:DATA? CHAN1")[10:]
data_size = len(rawdata)
# get metadata
sample_rate = float(instr.ask_raw(':ACQ:SAMP?'))
timescale = float(instr.ask_raw(":TIM:SCAL?"))
timeoffset = float(instr.ask_raw(":TIM:OFFS?"))
voltscale = float(instr.ask_raw(':CHAN1:SCAL?'))
voltoffset = float(instr.ask_raw(":CHAN1:OFFS?"))
# show metadata
print "Data size: ", data_size
print "Sample rate: ", sample_rate
print "Time scale: ", timescale
print "Time offset: ", timeoffset
print "Voltage offset: ", voltoffset
print "Voltage scale: ", voltscale
# convert data from (inverted) bytes to an array of scaled floats
# this magic from Matthew Mets
data = numpy.frombuffer(rawdata, 'B')
data = data * -1 + 255
data = (data - 130.0 - voltoffset/voltscale*25) / 25 * voltscale
# creat array of matching timestamps
time = numpy.linspace(timeoffset - 6 * timescale, timeoffset + 6 * timescale,
num=len(data))
# scale time series and label accordingly
if (time[-1] &lt; 1e-3):
time = time * 1e6
tUnit = "µS"
elif (time[-1] &lt; 1):
time = time * 1e3
tUnit = "mS"
else:
tUnit = "S"
# Plot the data
plot.plot(time, data)
plot.title("Oscilloscope Channel 1")
plot.ylabel("Voltage (V)")
plot.xlabel("Time (" + tUnit + ")")
plot.xlim(time[0], time[-1])
plot.show()
Hi there! This post is beyond ancient, and made sense back when the original Raspberry Pi Linux distributions didn’t have floating point support. With the multi-core Raspberry Pi 3, lame now runs at an acceptable rate. You should probably ignore this post unless you’re deliberately trying to recreate that bubbly old MP3 sound.
One thing the Raspberry Pi is not good at is encoding MP3s at any great speed. At best (using lame) you might get slightly better than 2× real time playback. If you’re using your Raspberry Pi to transcode to another format, that might be slow enough (with other system overhead) to make the output stutter.
While it would be nice to have the GPU as a general media encoder, we’re not there yet. If you must encode mp3s quickly on a Raspberry Pi, there are a couple of options:
Please note that both of these are based on the old ‘8hz’ mp3 encoder, which was a fairly literal interpretation of the original Fraunhofer code. They only start producing okay sounding files at high bitrates.
If you need to decode mp3s quickly, MAD is pretty good: http://www.underbit.com/products/mad. It’s in the repos as ‘madplay’.
With the official announcement of Oracle Java on Raspberry Pi, Java just got usable on the Raspberry Pi. It’s still not super-fast, but I’m seeing ~10× speedup over OpenJDK.
To install it (on Raspbian):
sudo apt-get update && sudo apt-get install oracle-java7-jdk
sudo update-java-alternatives -s jdk-7-oracle-armhf
By way of a baseline, here are SciMark 2.0 results on OpenJDK:
$ java -classpath ./scimark2lib.jar jnt.scimark2.commandline -large SciMark 2.0a Composite Score: 2.4987047508570632 FFT (1048576): 1.5550941987343943 SOR (1000x1000):Â Â 5.32030759023185 Monte Carlo : 0.6005590152716936 Sparse matmult (N=100000, nz=1000000): 2.3584905938878946 LU (1000x1000): 2.6590723561594847 java.vendor: Sun Microsystems Inc. java.version: 1.6.0_27 os.arch: arm os.name: Linux os.version: 3.6.11+
Here’s what the Oracle JDK cranks out (bigger numbers → better):
$ java -classpath ./scimark2lib.jar jnt.scimark2.commandline -large SciMark 2.0a Composite Score: 14.94896390647437 FFT (1048576): 6.953238474333376 SOR (1000x1000):Â Â 33.91437255527547 Monte Carlo : 8.869794361002157 Sparse matmult (N=100000, nz=1000000): 9.81896340073432 LU (1000x1000): 15.188450741026523 java.vendor: Oracle Corporation java.version: 1.7.0_40 os.arch: arm os.name: Linux os.version: 3.6.11+
That’s a tidy increase, and might make Processing and Arduino much easier to work with.
(It’s still not tremendously fast, though. My i7 quad-core has a composite score of nearly 1450 …)
All benchmarks are artificial, but this one had me scratching my head. One hears that the BeagleBone Black is screamingly fast compared to the Raspberry Pi; faster, newer processor, blahdeblah, mcbtyc, etc. I found the opposite is true.
So I buy one at the exceptionally soggy Toronto Mini Maker Faire. Props to the CircuitCo folks, they are easy to set up: just a mini-USB cable provides power and virtual network shell. And BoneScript — an Arduino-like JavaScript library — is very clever indeed. But I need to see if this thing has any grunt, and so I need a benchmark.
After hearing about the business-card raytracer, I thought it would be perfect. I compiled it on both machines with:
g++ -Ofast  card.cpp  -o card
and then ran it with:
time ./card > /dev/null
The results are … surprising:
(In comparison, my i7 quad-core laptop runs it in 8½ seconds.)
I don’t have any explanation why the BBB is so much slower. It’s almost as if the compiler isn’t fully optimizing under Ã…ngström Linux.
$ uname -a
Linux rpi 3.6.11+ #538 PREEMPT Fri Aug 30 20:42:08 BST 2013 armv6l GNU/Linux

$ cat /proc/cpuinfo
Processor    : ARMv6-compatible processor rev 7 (v6l)
BogoMIPS    : 697.95
Features    : swp half thumb fastmult vfp edsp java tls
CPU implementer    : 0x41
CPU architecture: 7
CPU variant    : 0x0
CPU part    : 0xb76
CPU revision    : 7

Hardware    : BCM2708
Revision    : 000f
# uname -a
Linux beaglebone 3.8.13 #1 SMP Tue Jun 18 02:11:09 EDT 2013 armv7l GNU/Linux
# cat /proc/cpuinfo
processor    : 0
model name    : ARMv7 Processor rev 2 (v7l)
BogoMIPS    : 297.40
Features    : swp half thumb fastmult vfp edsp thumbee neon vfpv3 tls
CPU implementer    : 0x41
CPU architecture: 7
CPU variant    : 0x3
CPU part    : 0xc08
CPU revision    : 2

Hardware    : Generic AM33XX (Flattened Device Tree)
Revision    : 0000
Both boards are running at stock speed.
Update: I’ve tried with an external power supply, and checked that the processor was running at full speed. It made no difference. I suspect that Raspbian enables armhf floating point by default, while Ã…ngström needs to be told to use it.
Hey! This is a bit old! Things may have changed and I haven’t necessarily fixed them.
Most computers can’t create true random numbers. They use a formula which makes a very long stream of pseudo-random numbers, but real randomness comes from thermal noise in analogue components. The Raspberry Pi has such a circuit in its SoC, as it helps making the seed data for secure transactions. It was only recently that a driver for this circuit was supplied. To enable it (on Raspbian): I think the module is enabled by default now for the different versions of the SoC.
sudo apt-get install rng-toolsThe /dev/hwrng device should now be available, but can only be read by the root user.
Nico pointed out that you also need to:


Random data look pretty dull. Here are random RGB values made with:
sudo cat /dev/hwrng | rawtoppm -rgb 256 256 | pnmtopng > random$(date +%Y%m%d%H%M%S).png
(you’ll need to install the netpbm toolkit to do this.)
Two short WAV samples of, well, noise:
Yup, sounds like static. It was made with the rndsound.sh script. You’ll need to install sox to run it.
If it sounds like static, and even if it sometimes looks like static, it may not actually be true random noise. An infamous case of a pseudo random number generator being not very random at all was RANDU, which at first glance appeared to produce nearly random results, but close study showed it to be very predictable.
I wrote (what I think to be) a C implementation of RANDU: randu.c. While it produces appropriately random-sounding audio data (randu17.wav), if you output it as an image:
 Those stripes are a giveaway; there should be no order in the output. (Then again, I have no idea if I’ve implemented RANDU correctly.) Testing random data is hard, then — you really need a barrage of tests, and even some of them might fail even for truly random output. Thankfully, when you installed rngtools, it included rngtest, a simple checker for random data:
sudo cat /dev/hwrng | rngtest -c 1000
rngtest 2-unofficial-mt.14
Copyright (c) 2004 by Henrique de Moraes Holschuh
This is free software; see the source for copying conditions. There is NO warranty; not even for MERCHANTABILITY or FITNESS FOR A PARTICULAR PURPOSE.
rngtest: starting FIPS tests…
rngtest: bits received from input: 20000032
rngtest: FIPS 140-2 successes: 1000
rngtest: FIPS 140-2 failures: 0
rngtest: FIPS 140-2(2001-10-10) Monobit: 0
rngtest: FIPS 140-2(2001-10-10) Poker: 0
rngtest: FIPS 140-2(2001-10-10) Runs: 0
rngtest: FIPS 140-2(2001-10-10) Long run: 0
rngtest: FIPS 140-2(2001-10-10) Continuous run: 0
rngtest: input channel speed: (min=67.969; avg=921.967; max=1953125.000)Kibits/s
rngtest: FIPS tests speed: (min=842.881; avg=3208.336; max=6407.890)Kibits/s
rngtest: Program run time: 27658884 microseconds
We were lucky that none of the tests failed for that run; sometimes there are a few failures. RANDU, on the other hand fares very badly:
./randu 17 | rngtest -c 1000
rngtest 2-unofficial-mt.14
Copyright (c) 2004 by Henrique de Moraes Holschuh
This is free software; see the source for copying conditions. There is NO warranty; not even for MERCHANTABILITY or FITNESS FOR A PARTICULAR PURPOSE.
rngtest: starting FIPS tests…
rngtest: bits received from input: 20000032
rngtest: FIPS 140-2 successes: 0
rngtest: FIPS 140-2 failures: 1000
rngtest: FIPS 140-2(2001-10-10) Monobit: 730
rngtest: FIPS 140-2(2001-10-10) Poker: 1000
rngtest: FIPS 140-2(2001-10-10) Runs: 289
rngtest: FIPS 140-2(2001-10-10) Long run: 0
rngtest: FIPS 140-2(2001-10-10) Continuous run: 0
rngtest: input channel speed: (min=45.630; avg=14255.221; max=19073.486)Mibits/s
rngtest: FIPS tests speed: (min=23.694; avg=154.238; max=176.606)Mibits/s
rngtest: Program run time: 141071 microseconds
See? Lots of failures there. It’s hardly random at all. If you really want to get out testing randomness, there are the dieharder tests. They takes ages to run, though.
(Note: newish Intel machines also have a real hardware RNG in the shape of Rdrand.)
I trust you all got the obvious Strictly Ballroom reference in the title?
Years ago, I worked in multilingual dictionary publishing. I was on the computing team, so we had to support the entry and storage of text in many different languages. Computers could display accented and special characters, but we were stuck with 8-bit character sets. This meant that we could only have a little over 200 distinct characters display in the same font at the same time. We’d be pretty much okay doing French & English together, but French & Norwegian started to get a little trying, and Italian & Greek couldn’t really be together at all.
We were very fortunate to be using Sun workstations in the editorial office. These were quite powerful Unix machines, which means that they were a fraction of the speed and capabilities of a Raspberry Pi. Suns had one particularly neat feature:

(source: Compose key, Wikipedia.)
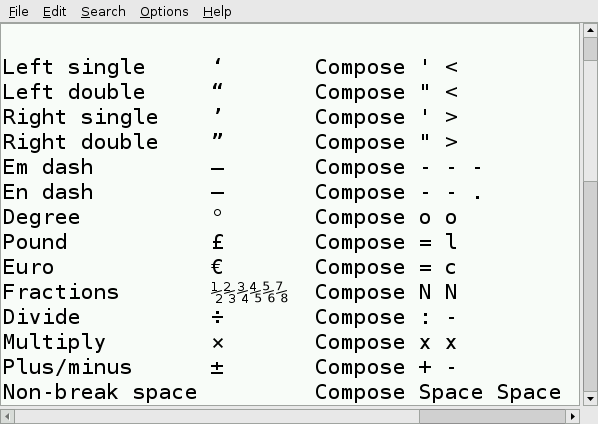
That little key marked “Compose” (to the right of the space bar) acted as a semi-smart typewriter backspace key: if you hit Compose, then the right key combination, an accented character or symbol would appear. Some of the straightforward compose key sequences are:
| Compose + | ||||
| Accent | First key | Second key | Result | Example |
| Acute | ‘ | e | é | café |
| Grave | ` | a | à | déjà |
| Cedilla | , | c | ç | soupçon |
| Circumflex | ^ | o | ô | hôtel |
| Umlaut | “ | u | ü | küche |
| Ring | o | a | å | Håkon |
| Slash | / | L | Ł | Łukasiewicz |
| Tilde | ~ | n | ñ | mañana |
Like every (non-embedded) Linux system I’ve used, the Raspberry Pi running Raspbian can use the compose key method for entering extra characters. I’m annoyed, though, that almost every setup tutorial either says to disable it, or doesn’t explain what it’s for. Let me fix that for you …
Run raspi-config
sudo raspi-config
and go to the configure_keyboard “4 Internationalisation Options” → “I3 Change Keyboard Layout” section. Your keyboard’s probably mostly set up the way you want it, so hit the Tab key and select <Ok> until you get to the Compose key section:
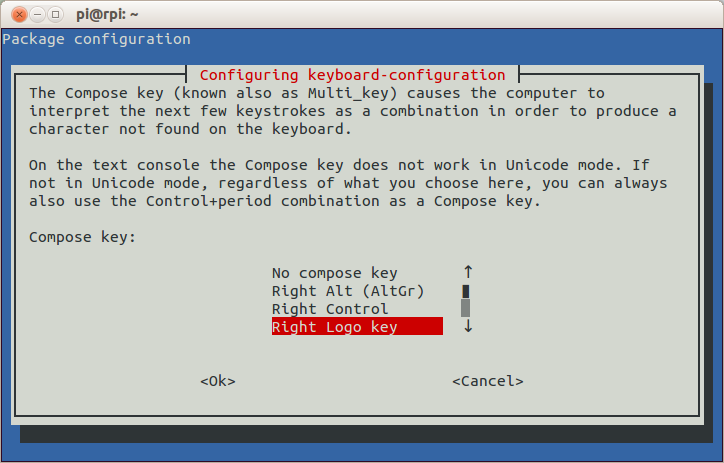
Choose whatever is convenient. The combined keyboard and trackpad I use (a SolidTek KB-3910) with my Raspberry Pi has a couple of “Windows® Logo” keys, and the one on the right works for me. Keep the rest of the keyboard options the same, and exit raspi-config. After the message
Reloading keymap. This may take a short while
[ ok ] Setting preliminary keymap...done.
appears, you now have a working Compose key.
raspi-config hints (‘On the text console the Compose key does not work in Unicode mode …’) that Compose might not work everywhere with every piece of software. I’ve tested it across quite a few pieces of software — both on the text console and under LXDE — and support seems to be almost universal. The only differences I can find are:

To find out which key sequences do what, the Compose key – Wikipedia page is a decent start. I prefer the slightly friendlier Ubuntu references GtkComposeTable and Compose Key, or the almost unreadable but frighteningly comprehensive UTF-8 (Unicode) compose sequence reference (which is essentially mirrored on your Raspberry Pi as the file /usr/share/X11/locale/en_US.UTF-8/Compose). Now go forth and work that Compose key like a boß.
(If you’re on a Mac and feeling a bit left out, you can do something similar with the Option key. Here’s how: Extended Keyboard Accent Codes for the Macintosh. On Windows®? Out of luck, I’m afraid WinCompose!)