NB: this is in the early stages of development, but does work. It’s by no means a plug-and-play solution. You’re going to have to do some coding, and perhaps some soldering. Undaunted? Read on …
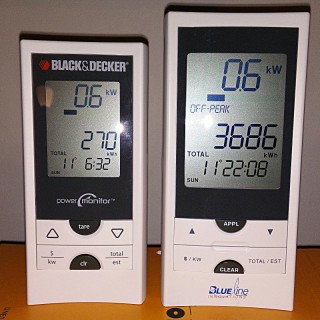
I really like the Blue Line Innovations PowerCost Monitorâ„¢ (aka the Black & Decker Power Monitor EM100B). I bought one long before the OPA started to give them away free to Ontario households as part of their peaksaver PLUS program. It’s a little device that clamps to your hydro meter and sends instantaneous power readings to a display.

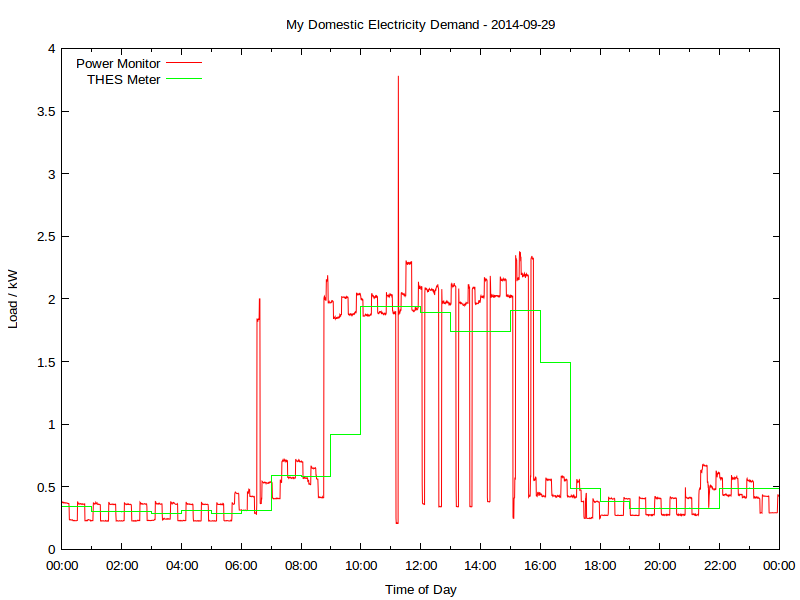
Wouldn’t it be so much better if you could log and analyze these data? So a day’s power consumption might graph to something like this:
 Yup, this is my real electricity consumption, as logged from the PowerCost Monitor. You can see the fridge cycling on and off, and I think the big mid-day spike was either the AC or the dryer; someone was home on that Monday. The rather blocky green line is Toronto Hydro’s hourly smart meter data. It really hasn’t got the resolution to show really detailed power use.
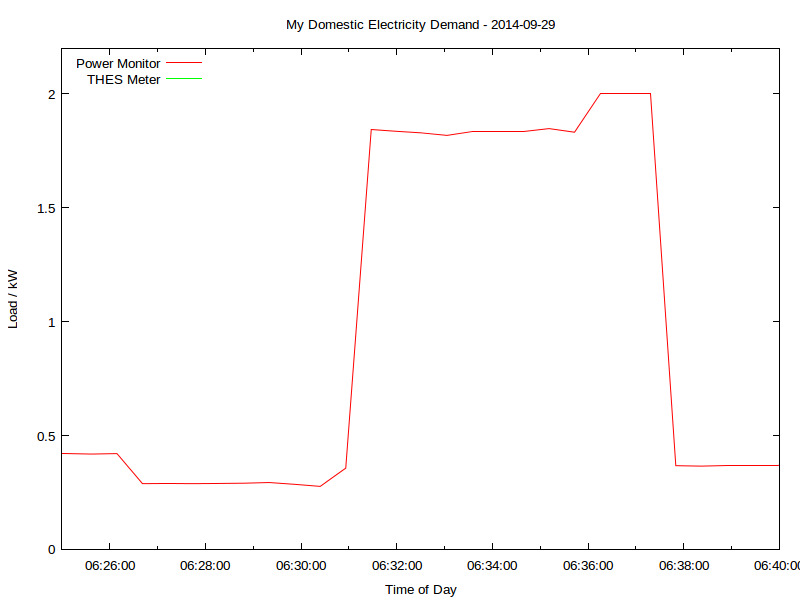
That spike at 06:30; what’s that? Let’s take a look:
 That’s me boiling the kettle. You can see that the time resolution is better than a minute, and the power is to the watt. Mmm, coffee …
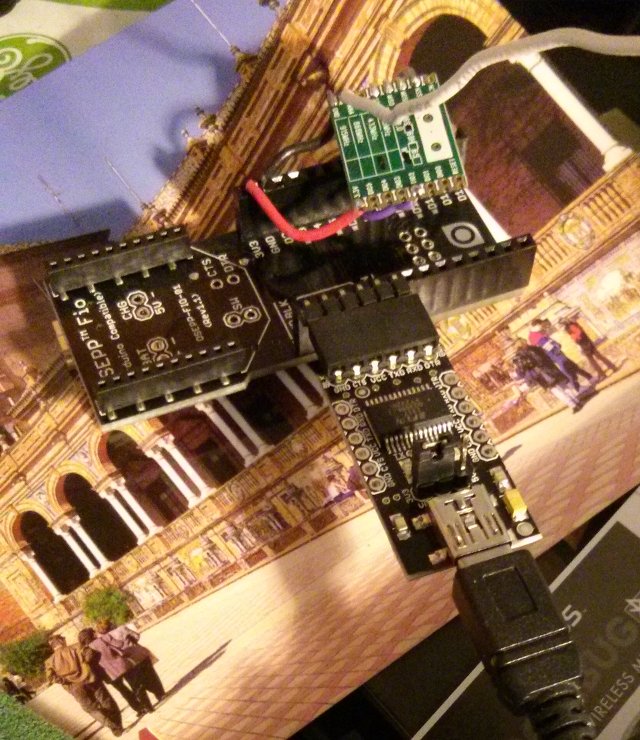
All of this is recorded using a simple Arduino-based solution, originally cooked up by Bryan Mayland. I’ve forked his code and added some instructions: scruss/Powermon433. Here’s the rig I’ve been using to log data over a USB serial link:

That’s a particularly ugly rig, due to the limitations of the 3.3 V receiver board I was using. There are other options that work with more normal Arduino boards up on github.
Here’s a sample of the data I’m logging, including the kettle incident:
| Datetime | Elapsed_s | Energy_Wh | Power_W | Temp_C |
| 2014-09-29T06:27:44 | 23241.7 | 25876 | 289 | 15 |
| 2014-09-29T06:28:16 | 23273.6 | 25876 | 290 | 15 |
| 2014-09-29T06:28:48 | 23305.5 | 25876 | 291 | 15 |
| 2014-09-29T06:29:20 | 23337.4 | 25892 | 294 | 15 |
| 2014-09-29T06:29:52 | 23369.2 | 25892 | 286 | 15 |
| 2014-09-29T06:30:24 | 23401.1 | 25892 | 277 | 15 |
| 2014-09-29T06:30:56 | 23433.0 | 25892 | 357 | 15 |
| 2014-09-29T06:31:28 | 23464.9 | 25892 | 1844 | 15 |
| 2014-09-29T06:32:00 | 23496.8 | 25892 | 1836 | 15 |
| 2014-09-29T06:32:31 | 23528.5 | 25952 | 1829 | 15 |
| 2014-09-29T06:33:03 | 23560.2 | 25952 | 1818 | 15 |
| 2014-09-29T06:33:35 | 23592.1 | 25952 | 1836 | 15 |
| 2014-09-29T06:34:07 | 23624.0 | 25952 | 1836 | 15 |
| 2014-09-29T06:34:39 | 23655.8 | 25952 | 1836 | 15 |
| 2014-09-29T06:35:11 | 23687.7 | 25952 | 1848 | 15 |
| 2014-09-29T06:35:43 | 23719.6 | 26048 | 1832 | 15 |
| 2014-09-29T06:36:15 | 23751.5 | 26048 | 2000 | 15 |
| 2014-09-29T06:36:46 | 23783.4 | 26048 | 2000 | 15 |
| 2014-09-29T06:37:18 | 23815.2 | 26048 | 2000 | 15 |
| 2014-09-29T06:37:50 | 23846.9 | 26048 | 368 | 15 |
You’ll see that I’m recording:
- a system timestamp
- the elapsed logging time, from the Arduino’s clock
- instantaneous meter readings in watt-hours. Note that not every row has an update
- the average power since the last record. The product of this and the time between records adds up to the energy consumption
- the outside temperature in °C. This is not very accurate (in full sun it over-reads vastly) but better than nothing.
Compare that to the smart meter data:
| DateTime | Hour | KwhUsage | Cost | Rate |
| 2014-09-29 05:00:00 | 5 | 0.29 | $0.02 | $0.075 |
| 2014-09-29 06:00:00 | 6 | 0.31 | $0.02 | $0.075 |
| 2014-09-29 07:00:00 | 7 | 0.59 | $0.04 | $0.075 |
Not much data there, is there? Certainly not enough resolution to tell if a kettle has been running.
Even though this interface is homebrew and cheap, it is accurate. Here’s how four days of continuous readings stack up against Toronto Hydro’s meter:
| Â | Power Monitor | ndToronto Hydro Smart Meter | ||||
| Day | First Reading / Wh | Last Reading / Wh | Total Consumption / kWh | No of readings | Daily Total / kWh | No of readings |
| 2014-09-29 | 23896 | 43668 | 19.772 | 2711 | 19.77 | 24 |
| 2014-09-30 | 43668 | 52500 | 8.832 | 2710 | 8.82 | 24 |
| 2014-10-01 | 52500 | 68004 | 15.504 | 2711 | 15.51 | 24 |
| 2014-10-02 | 68004 | 81996 | 13.992 | 2712 | 13.99 | 24 |
The difference looks to me like aliasing; THES’s reporting is much more granular.
I’m going to develop this further to turn it into an easy (or at least, easier) to use logging platform. It’s taken us a few years to get here, but there’s nothing quite like a project finally working!
Just an FYI – no help requested – while I try to figure this out.
I bought the Blue Line (aka BL) Power Monitor around March 1, 2017, but didn’t want to pay $319 or more for the WiFi option for charts. (Toronto Hydro rates are crazy enough, eh! 🙁
After reading your blog, I got an Arduino Uno and an RFM69 receiver to try out the code.
Naturally it didn’t work quite as hoped (story of my life 🙂
After trying your GitHub code, I tried CapnBry’s code, since it had more debugging to turn on for fun and parts are only 11 month’s old.
Both cases showed a rotating “NEW DEVICE ID” in sequences of 3 packets – the last 2 having the same ID each in each 3 packet cycle (but always different than the cycle before.)
When I pressed RESET on the Blue Line sensor, there was a sequence of 4 New Dev ID packets with ID=zero – then the usual rotating ID codes start again
Since I can receive BL data – esp. after RESET, I figure the RFM69 receiver is working OK, so I wonder if BL has changed their sensors to use a rotating Device ID, to sell those expensive WiFi add-ons?
Again, just FYI – no help requested – here is the CapnBry version output, with DUMP_RX defined (after a small source bug fix) just in case you’re interested.
You can see where the 4 RESET zero ID packets show up.
$UCID,Powermon433,Apr 2 2017 19:52:07
RF69 initialized
C7BFB2
NEW DEVICE id=BFC7 Rssi: -90 dBm, Floor: 48
81287B
NEW DEVICE id=2881 Rssi: -92 dBm, Floor: 48
980@11
1000@4
[32001] Missed (floor 48)
CBBF4E
NEW DEVICE id=BFCB Rssi: -92 dBm, Floor: 48
492939
NEW DEVICE id=2949 Rssi: -97 dBm, Floor: 48
492939
NEW DEVICE id=2949 Rssi: -100 dBm, Floor: 48
[64002] Missed (floor 47)
7E6053
NEW DEVICE id=607E Rssi: -96 dBm, Floor: 46
4529C5
NEW DEVICE id=2945 Rssi: -95 dBm, Floor: 46
4529C5
NEW DEVICE id=2945 Rssi: -95 dBm, Floor: 46
[96003] Missed (floor 46)
D3BFB1
NEW DEVICE id=BFD3 Rssi: -93 dBm, Floor: 46
980@3
980@3
63752@12
976@3
49760@19
000000
NEW DEVICE id=0 Rssi: -96 dBm, Floor: 46
000000
NEW DEVICE id=0 Rssi: -95 dBm, Floor: 46
000000
NEW DEVICE id=0 Rssi: -97 dBm, Floor: 46
000000
NEW DEVICE id=0 Rssi: -95 dBm, Floor: 46
[128004] Missed (floor 46)
7E6053
NEW DEVICE id=607E Rssi: -95 dBm, Floor: 46
552992
NEW DEVICE id=2955 Rssi: -94 dBm, Floor: 46
552992
NEW DEVICE id=2955 Rssi: -96 dBm, Floor: 46
[160005] Missed (floor 46)
DBBF19
NEW DEVICE id=BFDB Rssi: -90 dBm, Floor: 46
252930
NEW DEVICE id=2925 Rssi: -99 dBm, Floor: 46
252930
NEW DEVICE id=2925 Rssi: -96 dBm, Floor: 46
3280@8
360@5
[192006] Missed (floor 46)
19272@8
DBBF19
NEW DEVICE id=BFDB Rssi: -90 dBm, Floor: 46
E92826
NEW DEVICE id=28E9 Rssi: -90 dBm, Floor: 46
E92826
NEW DEVICE id=28E9 Rssi: -90 dBm, Floor: 46
Cheers
Steve
Ugh! That would be deeply unfortunate if they changed something, but it would be a lot of rework for them. It could just be that there are four stations within range. Pick one and see if it tracks usage. An electric oven turned on for ~1 minute is the best tester I know of.
BL’s internet gadgets are expensive, but I have real respect for the outdoor sensor design. My first one just died after surviving 4 Toronto winters. You can’t just whip this sort of thing up with a 3D printer and expect it to last ±30° temperature swings
Ack!
It turns out that there is a bug in the Arduino code if the device ID = 0x0000, since every frame ends up having a valid CRC and gets treated as an ID frame.
(Naturally, my out-of-box device ID was 0x0000. 🙁
The easy workaround is to hold reset on the sensor for 10-ish seconds to force it to assume a new device ID and proceed from there.
Also, FYI, the Adafruit Feather M0 433 looks like a perfect platform for this Arduino code, since it is small and has an RFM69HCW receiver built-in.
Just a few pin changes, I hope … maybe (TBD.)