Simple ADC with the Raspberry Pi

Raspberry Pi wearing an MCP3008

Hey! This is a really old article. You should really be using gpiozero these days.

I hadn’t realised it, but the The Quite Rubbish Clock did something that a lot of people seem to have trouble with on the Raspberry Pi: communicating using hardware SPI. Perhaps it’s because everything is moving so fast with Raspberry Pi development, tutorials go out of date really quickly. Thankfully, hardware SPI is much easier to understand than the older way of emulation through bit-banging.

SPI is a synchronous serial protocol, so it needs a clock line as well as a data in and data out line. In addition, it has a Chip Enable (CE, or Chip Select, CS) line that is used to choose which SPI device to talk to. The Raspberry Pi has two CE lines (pins 24 and 26) so can talk to two SPI devices at once. It supports a maximum clock rate of 32 MHz, though in practice you’ll be limited to the rate your device supports.

The device I’m testing here is an MCP3008 10-bit Analogue-to-Digital Converter (ADC). These are simple to use, cheap and quite fast converters with 8 input channels. If you hook them up to a 3.3 V supply they will convert a DC voltage varying from 0-3.3 V to a digital reading of 0-1023 (= 210 – 1). Not quite up there in quality for hi-fi audio or precision sensing, but good enough to read from most simple analogue sensors.

The sensor I’m reading is the astonishingly dull LM35DZ temperature sensor. All the cool kids seem to be using TMP36s (as they can read temperatures below freezing without a negative supply voltage). One day I’ll show them all and use a LM135 direct Kelvin sensor, but not yet.

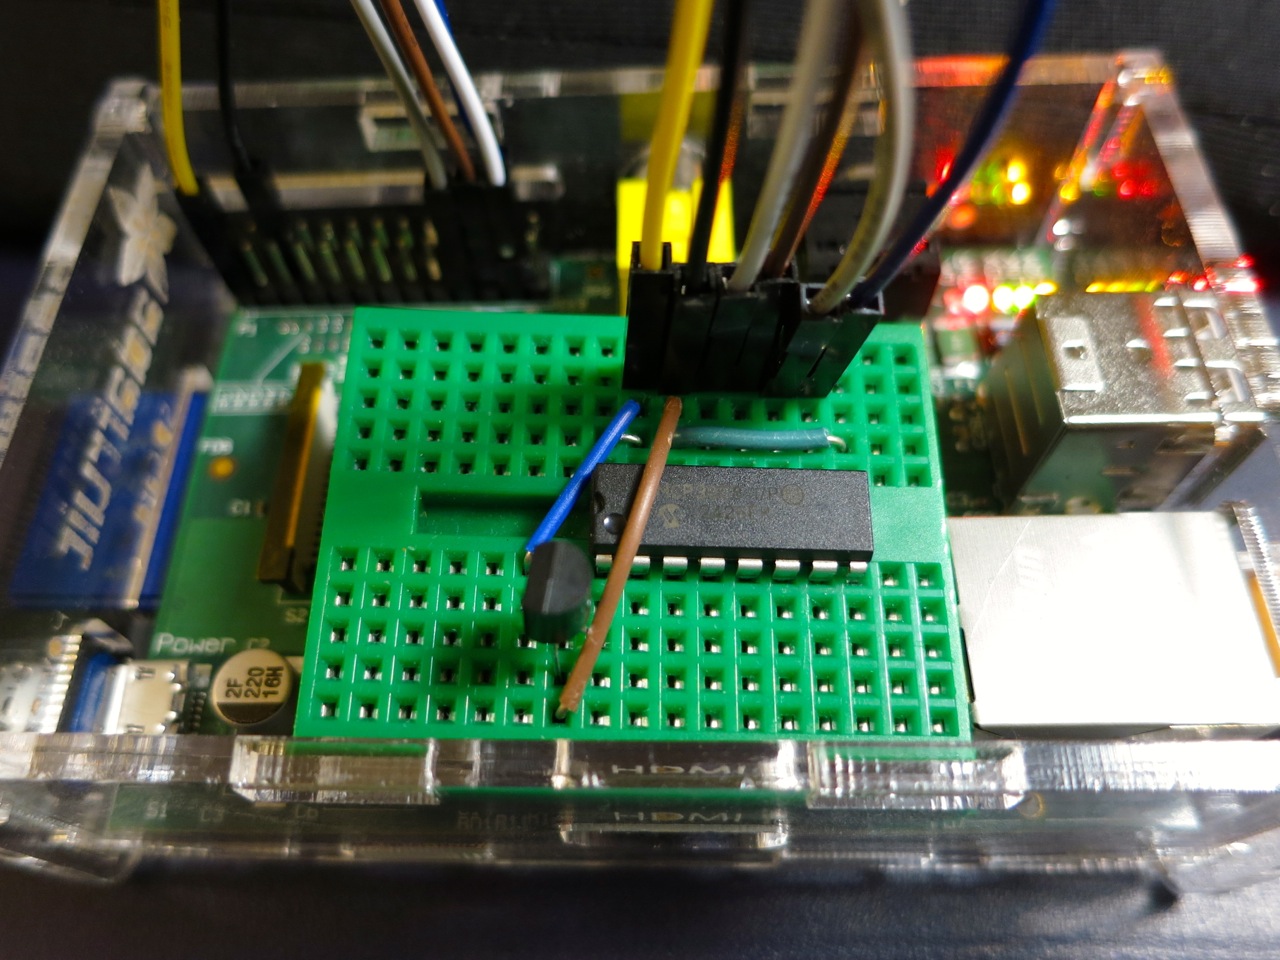
To run this code, install the SPI libraries as before. Now wire up the MCP3008 to the Raspberry Pi like so:

 MCP 3008 Pin          Pi GPIO Pin #    Pi Pin Name
==============        ===============  =============
 16  VDD                 1              3.3 V
 15  VREF                1              3.3 V
 14  AGND                6              GND
 13  CLK                23              GPIO11 SPI0_SCLK
 12  DOUT               21              GPIO09 SPI0_MISO
 11  DIN                19              GPIO10 SPI0_MOSI
 10  CS                 24              GPIO08 CE0
  9  DGND                6              GND

The wiring for the LM35 is very simple:

 LM35 Pin        MCP3008 Pin
==========      =============
 Vs              16 VDD
 Vout             1 CH0
 GND              9 DGND

The code I’m using is a straight lift of Jeremy Blythe’s Raspberry Pi hardware SPI analog inputs using the MCP3008. The clever bit in Jeremy’s code is the readadc() function which reads the relevant length of bits (by writing the same number of bits; SPI’s weird that way) from the SPI bus and converting it to a single 10-bit value.

#!/usr/bin/python
# -*- coding: utf-8 -*-
# mcp3008_lm35.py - read an LM35 on CH0 of an MCP3008 on a Raspberry Pi
# mostly nicked from
#  http://jeremyblythe.blogspot.ca/2012/09/raspberry-pi-hardware-spi-analog-inputs.html

import spidev
import time

spi = spidev.SpiDev()
spi.open(0, 0)

def readadc(adcnum):
# read SPI data from MCP3008 chip, 8 possible adc's (0 thru 7)
    if adcnum > 7 or adcnum < 0:
        return -1
    r = spi.xfer2([1, 8 + adcnum << 4, 0])
    adcout = ((r[1] & 3) << 8) + r[2]
    return adcout

while True:
    value = readadc(0)
    volts = (value * 3.3) / 1024
    temperature = volts / (10.0 / 1000)
    print ("%4d/1023 => %5.3f V => %4.1f °C" % (value, volts,
            temperature))
    time.sleep(0.5)

The slightly awkward code temperature = volts / (10.0 / 1000) is just a simpler way of acknowledging that the LM35DZ puts out 10 mV (= 10/1000, or 0.01) per °C. Well-behaved sensors generally have a linear relationship between what they indicate and what they measure.

If you run the code:

sudo ./mcp3008_lm35.py

you should get something like:

  91/1023 => 0.293 V => 29.3 °C
  93/1023 => 0.300 V => 30.0 °C
  94/1023 => 0.303 V => 30.3 °C
  95/1023 => 0.306 V => 30.6 °C
  96/1023 => 0.309 V => 30.9 °C
  97/1023 => 0.313 V => 31.3 °C
  97/1023 => 0.313 V => 31.3 °C
  98/1023 => 0.316 V => 31.6 °C
  99/1023 => 0.319 V => 31.9 °C
  99/1023 => 0.319 V => 31.9 °C
 100/1023 => 0.322 V => 32.2 °C
 100/1023 => 0.322 V => 32.2 °C
 100/1023 => 0.322 V => 32.2 °C
 101/1023 => 0.325 V => 32.5 °C
 101/1023 => 0.325 V => 32.5 °C
 102/1023 => 0.329 V => 32.9 °C
 102/1023 => 0.329 V => 32.9 °C
 103/1023 => 0.332 V => 33.2 °C

Note that the sensor had been sitting over the Raspberry Pi’s CPU for a while; I don’t keep my house at 29 °C. I made the temperature go up by holding the LM35.

So, you’ve just (fairly cheaply) given your Raspberry Pi 8 analogue input channels, so it can behave much more like a real microcontroller now. I remember from my datalogging days that analogue inputs can be pretty finicky and almost always return a value even if it’s an incorrect one. Check the chip’s datasheet to see if you’re doing it right, and if in doubt, meter it!

26 comments

  1. Thanks Man. Very good tutorial.
    Another question: how far can I go with time.sleep, that is, what’s the minimum time interval that I can sample from MCP3008.
    I tried some low values like 26 ns (like a sound card at 44100 Hz), but the maximum I take was 6us. Do you know what is the limitation(MCP3008, Raspberry Pi, or software?)
    Thanks in advance

  2. Python will be the limitation here, João. If you want to sample audio, a cheap USB sound module would be the way to go.

  3. Whenever I input any voltage into the MCP3008 it gives me the max value 1023. Do you know why this might happen?

  4. Thank you so much for this tutorial! If I may, I’d like to ask for any other pointers regarding the MCP3008 ADC data processing. I currently have that and is working fine in terms of its intended purpose (converting analog to digital). However, my main question lies within the sampling rate. I know I can sample up to 200ksps, but if I am calling the readadc(0) function in a while loop that lasts 1 second, should I actually get 200k ints? Which part of the code will dictate the sampling rate? How to modify it and, what is ultimately my goal, how to use FFT to use the data to see how many frequencies is the digital signal made up of.

    Thanks in advance for your help.

  5. Hi Brian — I’d be amazed if you could get 200,000 Python loops per second even without trying to read a GPIO port each time.

  6. Precisely… I was wondering how the sampling worked if Python doesn’t seem to be able to keep up. I don’t necessarily need 200k samples per second but I was wondering how to go about getting as many as possible. Any pointers?

  7. Hi!
    I need
    GPIO 18, GPIO 23, GPIO 24, GPIO 25, GPIO 08, GPIO 07
    for a 4-bit-dot-matrix lcd display.
    In your example you are using
    GPIO 11, GPIO 09, GPIO 10, GPIO 08
    for the MCP3008.
    For my ds18b20 (temperature sensor) I use
    GPIO 04.
    Problem: GPIO 08 is already used by the display.
    Can I configure the GPIO pins so that I am able to
    use this three devices at the same time?
    Thanks in advance

  8. Hi,
    Thank you for the great introduction.

    Any ideas how I can read DIFF signals in?
    I thought of adapting this line:

    r = spi.xfer2([1, 8 + adcnum << 4, 0])

    to

    r = spi.xfer2([0, 8 + adcnum << 4, 0])

    Would take take all my channels (if adcnum runs from 0..7) from Single to Differential?
    Does line 18 need adjustment?

    Goal: ch0 and ch1 for DIFF input, on ch2 SGL (2 different sensors)

    Cheers
    LS

  9. Okay, that anemometer closes a switch once every revolution, Zaid. You’ll need a circuit like this:
    http://openenergymonitor.org/emon/sites/default/files/pocircuit.png
    except with one line coming from 3.3V instead of 5V. Then you need a way of counting the pulses; the faster the pulses come in, the higher the wind speed.

    You’ll want to throw out pulses that are too close together. Physical switches often bounce, which cause extra counts to register.

  10. Great tutorial. How can I make this work with google sheets?

    Thanks !

  11. Sorry, Francisco — never tried feeding data to Google Sheets. Google can never stop changing their APIs, so it’s not stable enough for me to look at.

  12. Hi! I am having the same problem in achieving a higher sampling frequency.I would like to ask whether there is any way that i can improve the sampling frequency of reading inputs since i need to use all input pins which will further decrease my sampling frequency. I tried using spidev to get the pi with the max frequency which is 32Mhz but still result in reading an input of frequency sampling of 15kHz, if the MCP3008.

    Thanks in advance!

  13. You might be hitting hardware limitations on both the 3008 and the Raspberry Pi. Raspbian isn’t a realtime OS, so I/O rates will always be below the hardware specs.

  14. Hi,
    thanks for this nice tutorial.
    For my current application I need to read out two ADCs simultaneously, so I got two MCP3008, one connected to CE0 the other to CE1. Using the spi.open(0,x) command I can address either of them. But how can I read out both of them?
    Checking out the xfer-protocol, it seems there is no address included. Does that mean I have to open and close the spi-connection after reading out either MCP in order to switch to the other one? That seems rather stupid for a bus protocol but I couldn’t come with a working solution yet.
    Any suggestions on how to do that?

  15. Hi Ian – yes, you’ll have to close the first, then open the second. So you won’t be reading simultaneously. I was going to suggest using an ADC with more channels, but the fancier ones are mostly surface mount.

  16. Is there any way of uploading this analog temperature sensor data on a website… any website, like on Google sheets etc. It’ll be great if you can provide a tutorial link! Thnx!

  17. Yes, there are many ways of uploading sensor data. But that’s not what this article’s about.

  18. Need help!
    I have ADS1115 ADC instead of MCP3008, i have to use LM35 temperature sensor for my project. Can anyone help me with the circuit diagram? what changes i should make in above code.

  19. Since the MCP3008 is an SPI device and the ADS1115 is I²C, there would be no common code you could use from here.

Leave a comment

Your email address will not be published. Required fields are marked *