
Instagram filter used: Normal
Photo taken at: Kennedy Commons
 Markus Hoffmann has been very helpful with getting X11-Basic running on the Raspberry Pi. Remember how I said that the simple Mandelbrot Set test took nearly 1¼ hours to run using the interpreter? How about 2′ 6″ when compiled? That’s a speedup of 35 times! What you need to do is:
xbc -virtualm -o mandel-simple mandel-simple.bas
The “-virtualm” bit is the secret key to speed. Without it, the compiled code is a bit faster than interpreted.
If you’re running from the source code posted to SourceForge yesterday, you might want to replace xb2csol.h with this new xb2csol.h. It’s supposed to help with the compiled code. Just make clean; make; sudo make install to replace the code.
Update: Markus Hoffmann uploaded a new version of X11Basic-1.20.tar.gz to SourceForge that addresses most of these problems. I’ve edited the article to remove the obsolete bits.
More than 20 years ago, I really liked GFA-Basic. It ran blindingly fast on the Atari ST, and when it didn’t crash on the Amiga, it ran blindingly fast there too. I even wrote a review of it for comp.sys.amiga.programmer, which you can read to this day in all its textual glory. One of the e-mail addresses in that article still works, too.
I still sometimes think in BASIC, and there is much wringing of hands (not by me, really) that there isn’t a good interpreter for Raspbian on the Raspberry Pi. So when I found X11-Basic — a cross-platform GFA-Basic-like system — I had to take a look.
While I have managed to get X11-Basic demos to run, I have to say it’s not running super well. I’ll show you how to install X11-Basic 1.20 and get it (mostly) running, but it’s a bit rough on the ARM. Incidentally, these instructions also work on Ubuntu 12.mumble LTS on x86.
First, you need to install some (okay, a lot of) packages:
sudo apt-get install libreadline-dev tcsh libncurses5-dev xutils-dev libc6-dev libsdl1.2-dev libtool
Now download and extract the package:
tar xvzf X11Basic-1.20.tar.gz
cd X11Basic-1.20
For X11Basic-1.20, you have to issue an extra command before the standard ‘./configure ; make ; make install‘ sequence:
sudo mkdir -p /usr/local/share/man/man1
./configure
make
sudo make install
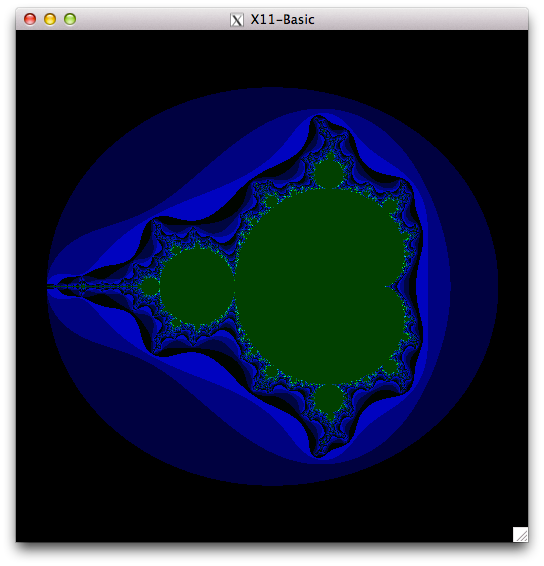
This is enough to make a working xbasic interpreter. I made some screenshots of some of the graphics demos —

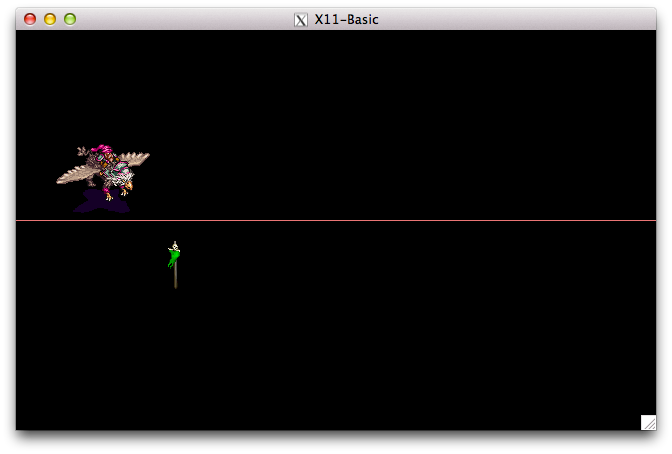

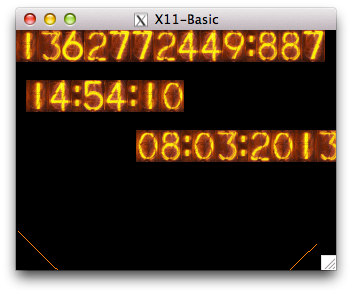
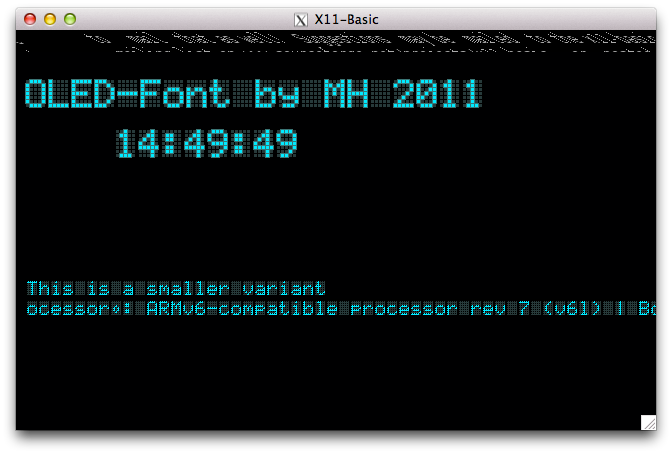 As you can see, there’s some screen corruption, but most demos just worked. Incidentally, the Mandelbrot one took almost 1¼ hours to run. Took me right back, that did (or it would have, if I hadn’t been outside bombing about in the slush on my bicycle while it churned away).
In order to see just how fast the interpreter is, I ran the formerly fearsome Personal Computer World Benchmark #8 under X11-Basic. PCW#8 used to bring 8-bit home computers to their knees, typically taking more than a minute to run. Here’s the code, indented a bit and with a timing wrapper added:
	LET start=TIMER
	LET K=0
L30:
	LET K=K+1
	LET A=K^2
	LET B=LN(K)
	LET C=SIN(K)
	IF K<1000
		GOTO L30
	ENDIF
	PRINT TIMER-start
	QUIT
(yeah, GFA-style BASIC isn’t too pretty …)
It takes about ¼s to run. The old BBC B was supposed to take about 50s. By comparison, X11-Basic on a manky old dual-core Atom took 0.04s.
The native compiler xbc seems to work. To make a standalone binary of the above code, you do:
xbc -o PCWBenchmark PCWBenchmark.xbas
The compiled binary runs roughly twice as fast as the interpreted code. Not blazing fast, but a useful increase.
Unfortunately, the bytecode compiler xbbc doesn’t actually do anything on the Raspberry Pi yet. So here I leave it up to you to play with X11-Basic, and see what it can and can’t do.


Instagram filter used: Lo-fi
Photo taken at: Kennedy Station – South Parking Lot


Instagram filter used: X-Pro II
Photo taken at: Toronto Pearson International Airport (YYZ)
Newark really need to get a handle on their packaging.
I’d ordered a bluetooth adapter for my multimeter. It needs a little doohickey to attach to my meter, which Newark sent out by separate cover. This is how it turned up:
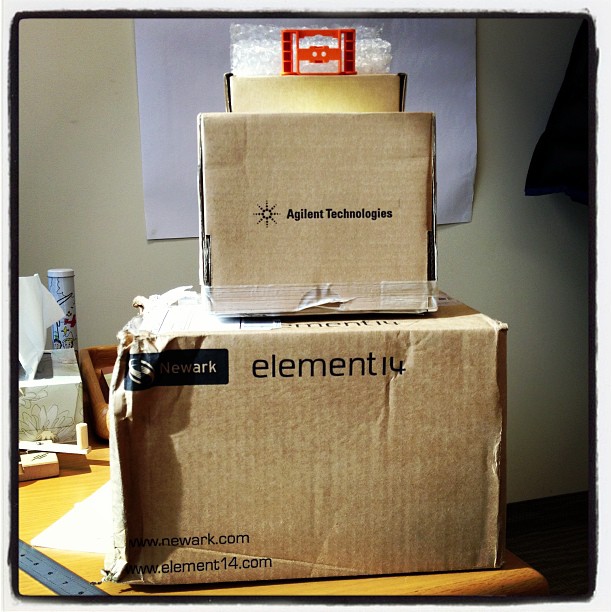
See the little orange thing on top? That’s the part. It’s 70×40×15 mm, and made in Malaysia. It was packed bubble-wrapped in a sturdy little cardboard box (163×73×43 mm, or 12× the volume of the part). That box was then packed in a very solid box (originally shipped from Penang to Gaffney, SC) measuring 200×200×170 mm; that’s 162× the part’s volume. Finally, that box was inside a third box of 330×245×220 mm, or 424× little doohickeys.
Thing is, the little doohickey is a tough injection moulded polymer part. It could probably be dropped in a padded envelope and survive any mail journey.
We’re going to die out for sure.
Here are the complete 1988-vintage Sun manuals “Using NROFF and TROFF†and “Formatting Documents†scanned just for you. I’d scanned these in 2000, and they’d sat on a forgotten archive volume since then.
Update: there are better versions on the Internet Archive: Using NROFF and TROFF and Formatting Documents, all as part of the Sun Microsystems, Inc. manual collection.
(if you need to get your troff on, go to Ralph’s troff.org.)
If I said that computers got slower with age, you’d look at me as if I were deranged. But REF say effectively that about wind turbines.
My former (nutso) argument goes like this: your 30 year old Commodore 64 is so much slower than the multi-core beastie you’re reading this post on, so computers get slower as they age, amirite …? I can’t actually keep this nonsense up much longer (computers have always been as fast as the market and technology could support), but the Renewable Energy Foundation manage for about 50 pages of statistical gorp in their paper, “Analysis of Wind Farm Performance in UK and Denmark“. And oh boy does the dittosphere like to report on it, like here, here, here, here, and here.
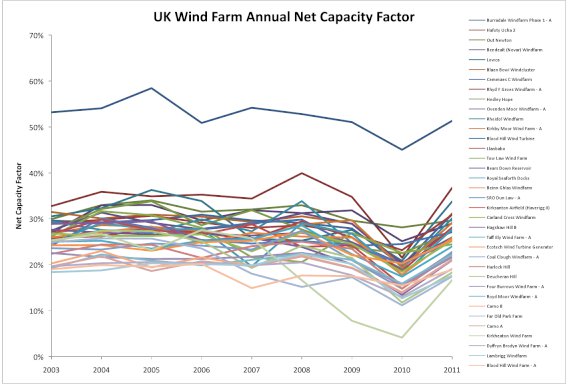
In short, the key graph in the report is this:
 If you believe it, it shows a steady decline in wind farm output with age. But thankfully, the good chaps at REF supply all of their data (and also have a bunch of other wind farm stats lying around in easily scrapeable formats; cheers, m’dears!), so I could take a look at their claims. So I made a subset: uk_annual_ncf [ODF], which has:
First off, and most blatantly, there’s no correction for annual wind patterns in the REF report. Blustery Januaries are merrily correlated against balmy Augusts, so there’s a lot of noise in the data. Using only annual data for those sites with 9 full years of data aligned everything quite nicely:
 No real trends evident there, except that the wind appeared to have sucked mightily in 2010. So how about if I graph the same data, but plot it by project age at mid-year:
 And there it is: a trend pulled from where there was none. It’s not very well correlated, but you could say that it shows a decline in NCF of about 0.6% per year. I wonder where it came from?
There’s one site that gives REF’s game away: Blood Hill, in Norfolk. It’s had 10× 225 kW Vestas V27s on 30m towers running since 1992, but it’s also got a single megawatt-class Enercon turbine on a 65 m tower which was installed in 2000. Here’s how the annual capacity factor looks for both sites:
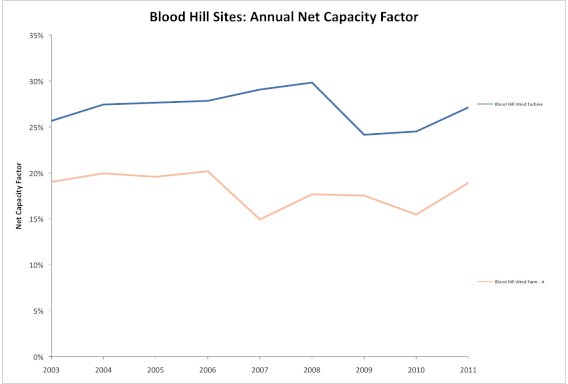 Apart from a slight maintenance wibble in 2007-2008 on the older turbines, the capacity factors track each other quite well. Remember, these turbines are nearly 20 years old at the end of the graph; according to REF, they’d be bumping along at about a third of their original capacity. So let’s graph them by age:
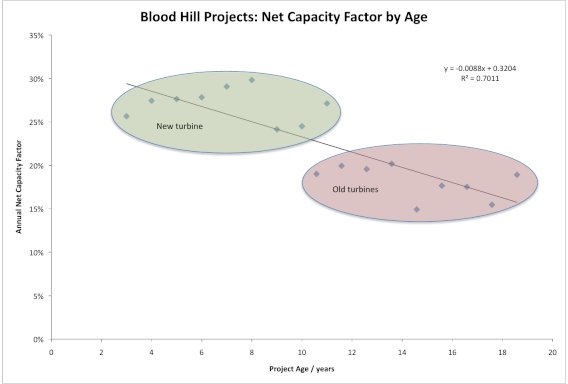 Aha! Here is the secret key (as a certain spider might say). If you compare new, tall turbines against old, small ones you get this false correlation. To show you how much wind turbines have grown, here are the average sizes for each installation year in the data set:
| Year | Avg Height / m |
Avg Diameter / m |
Avg Power / kW |
Installed Capacity in year / MW |
| 1991 | 32.0 | 34.0 | 400.0 | 4.0 |
| 1992 | 30.3 | 31.7 | 343.2 | 25.1 |
| 1993 | 31.8 | 35.2 | 428.0 | 35.1 |
| 1994 | 31.7 | 37.0 | 466.7 | 15.4 |
| 1995 | 35.0 | 44.0 | 600.0 | 15.6 |
| 1996 | 31.8 | 40.7 | 573.6 | 60.8 |
| 1997 | 32.3 | 41.3 | 527.7 | 34.3 |
| 1998 | 33.2 | 33.3 | 363.2 | 6.9 |
| 1999 | 40.6 | 45.5 | 647.1 | 18.1 |
| 2000 | 39.7 | 45.5 | 672.4 | 49.8 |
| 2001 | 40.9 | 51.6 | 963.9 | 31.8 |
| 2002 | 43.4 | 55.6 | 1023.1 | 26.6 |
| 2003 | 58.3 | 58.0 | 1166.7 | 3.5 |
| 2004 | 51.4 | 64.9 | 1593.5 | 146.6 |
| 2005 | 54.4 | 64.9 | 1525.7 | 346.3 |
| 2006 | 60.9 | 74.2 | 1919.5 | 418.5 |
| 2007 | 63.5 | 68.8 | 1753.4 | 206.9 |
| 2008 | 66.7 | 78.0 | 2104.4 | 662.9 |
| 2009 | 60.6 | 71.0 | 1804.4 | 268.9 |
| 2010 | 69.6 | 79.4 | 1987.8 | 163.0 |
It’s clear from the table that the height, diameter, and rated power of the turbines installed in the UK have all gone up. Turbines really have got bigger over the years; just look at this old promo slide from Vestas:
 Wind turbines grew immensely; maybe not quite by Moore’s Law, but exceedingly fast for mechanical machinery. So to even compare old turbines to new is exactly like comparing your old Commodore 64 to a current computer: that’s to say, not even wrong.
This is how wind turbine hub height grows by installation year for the sites it can be reliably extracted from the REF data:
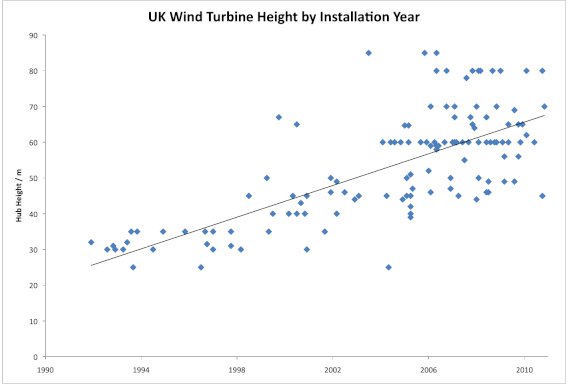 or if you want to look at it the way REF does, by age:
 (I fully expect someone to come out with a report that says “Wind Turbines Get Smaller As They Get Older” … oh wait, REF already did.)
To compound this effect, wind speeds increase with height from the ground. So taller, newer turbines are able to harvest much more energy than shorter, older ones. What’s more, the larger a wind turbine’s rotor, the more swept area it has, so it will have even more energy available to supply to the grid. In a later post, I’ll run a simulation where, with no degradation from a wind turbine’s output, you can fake a decline just by building taller turbines every year.
In short, we can take two things from the anti-wind REF’s report:
The sad thing is that REF peddle this deliberately misleading crap, and some of the public believes them. The spectacularly sad thing is that I had to waste my time sleuthing my way through it all.
It is a truth universally acknowledged, that an engineer in possession of a solid-state flammable gas detector, will shortly make a fart detector with it. I’m sorry, but call it childishness, simple-minded curiosity, or the results of a diet high in polysaccharides, but this is something I have to get out of my system. (It’s okay; I’ll waft the door.)
This all started when our carbon monoxide detector decided it was past its best, and started to emit an ear-splitting shriek. Thinking there might be some cool parts inside, I took it apart. Inside, in amongst the other stuff, I found this:
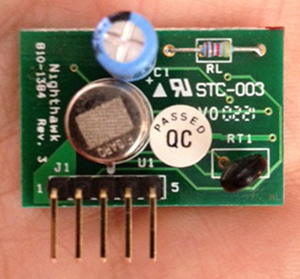 Thankfully, David Cook of Robot Room had once had the same idea as me (well, minus the puerile bits), and he documented the sensor board very well: Explosive Gas Detector Board. Here are the four pins that you really need to get the thing going:
 Pin # (from left)    Function
===================  ==========
       1              Vcc
       2              /Enable
       3              /Gas
       5              Gnd
Pins 2 and 3 are active low signals. To be typographically correct, I’d write them as Enable and Gas, but that’s hard to do in fixed-pitch ASCII. I can understand why the Gas signal should be active low (think about it; if the Figaro TGS 2611 sensor fails or shorts, it will likely fail to an alarm state, so you’ll still be alive to curse the bloody noise that woke you at 03h00), but the Enable being active low? Dunno.
I was hoping to have presented a little sketch for the Digispark that would have typed something unhelpful every time that gas was detected, but it was not to be. It seems that Macs and Digispark keyboard emulation is a thing of great wobbliness, so I had to resort to an Arduino and a serial connection.
Here’s the code:
/*
 gas_detector - uses board scavenged from CO detector

 scruss - 2013-02-18 (unfortunately)
 */

int gas     = 2;               // /Gas line on pin 2
int val     = 0;
int lastval = 0;

void setup() {
  pinMode(gas, INPUT);
  Serial.begin(115200);
}

void loop() {
  val = digitalRead(gas);
  if (val != lastval) {
    if (val == LOW) {          // LOW means gas detected
      Serial.println("gas");
      Serial.println();
      delay(1000);             // wait 1s for air to clear
    }
  }
  lastval = val;
}
Before you ask, I tested the circuit by briefly hitting the button on a gas lighter. Honest.
I’ll keep working on the Digispark; it’s such a nifty little device, and this is such a worthy project …
Because I can never find them when I need them, here — badly scanned for the Whole Internet — are the NordicWare Microwave Rice Cooker instructions [PDF].
For me, brown basmati needs nearer 30 minutes than 20, but your l/100 km may vary.
Re Skip’s suggestion below, the abbreviated instructions are here: Rice Cooker | Microwave | Nordic Ware. (PDF print link for the perfectly paranoid.)
Boodler is rather fun. It generates ambient music based on user-defined or downloaded ‘soundscapes’. If you’ve got a modern (HTML5/Opus-capable) browser, you can hear a streaming demo here: http://repeater.xiph.org:8000/clock.opus. It’s using the FM3 Buddha Machine samples in this demo, but it can run lots more: a tree full of crows, a thunderstorm, dripping water, …
It’s pretty easy to run on a Raspberry Pi running a recent version of Raspbian. The only technical glitch I had was that there’s something deeply confused about ALSA sound handling on the Raspberry Pi. I’m sure it’ll get fixed soon, but for now, you have to use PulseAudio. (If you want to read about my ALSA woes, go here.)
The installation prerequisites are simple:
sudo apt-get install pulseaudio pulseaudio-utils libpulse-dev python-dev
Now download and configure Boodler:
wget http://boodler.org/dl/Boodler-2.0.4.tar.gz
tar xvzf Boodler-2.0.4.tar.gz
cd Boodler-2.0.4
python setup.py build
It takes a while to do this, but make sure it does something useful when it’s building the various sound drivers. You don’t want it to say:
skipping 'boodle.cboodle_pulse' extension
If it says that, you haven’t installed Pulseaudio. Go back and check your apt-get line.
Once it’s built, now install it:
sudo python setup.py install
Now test it:
boodler --hardware --output pulse --testsound
Not merely should you get some pleasant tones from your Raspberry Pi’s audio, but you sound get some informative and non-threatening terminal output. Mine looks like:
Boodler: PulseAudio sound driver.
 PulseAudio library: 2.0.0.
 Sample rate is 44100 fps.
 Samples are 16-bit little-endian.
 Buffer size is 32768.
 21:37:46 (root) Running "Boodler test sound"
If that works, let’s get those crows a-cawin’. Download the soundscapes you need:
boodle-mgr install http://boodler.org/lib/org.boodler.old.crow.1.0.boop
boodle-mgr install http://boodler.org/lib/com.eblong.zarf.crows.1.0.boop
and run it:
boodler --output pulse com.eblong.zarf.crows/ParliamentOfCrows
Crows everywhere!
I really like the Buddha Machine samples. It’s quite big (> 80 MB), so this next set will take a while to download:
boodle-mgr install  http://boodler.org/lib/com.azulebanana.buddhamachine.1.5.1.boop
boodle-mgr install http://boodler.org/lib/com.azulebanana.buddhaagent.1.5.1.boop
It’s worth the wait:
boodler --output pulse com.azulebanana.buddhaagent/ChangingLoops
Boodler has tons of options, prebuilt packages, and instructions to build your own: Boodler Documentation.
One thing I’ve tried to get working, but failed, is streaming from Boodler via icecast. Sure, I can install and run it, it’s just that the results are, um, undesirable. If you want to have a play, here’s how to install icecast:
sudo apt-get install icecast2 ices2 libshout3-dev
Icecast will configure itself, and ask for a couple of passwords. You’ll have to rebuild and reinstall Boodler for it to catch the new configuration. You can then try streaming:
boodler --output shout --define shout-password=mypassword --define shout-mount='/boodler-buddha.ogg' com.azulebanana.buddhaagent/ChangingLoops
If you open a web browser at this address http://raspberrypi:8000/ you should see a config page listing your boodler-buddha.ogg stream. Click on the M3U link next to it, and your streaming music player should start making a joyful noise …
… except in my case, something went very wrong, and it started to produce industrial ultra-glitch nightmare noise: boodler-streaming_test-fail. I’m sure it’s fixable with some tweaking, but I’m not there yet.