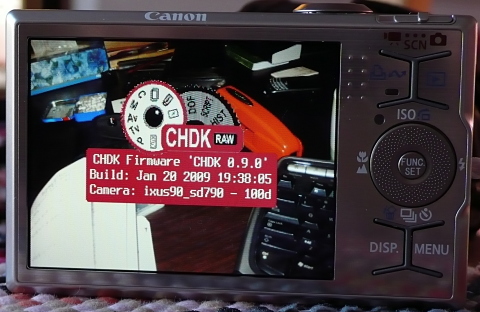
a very quick guide to using a remote release with CHDK

CHDK allows your Canon P&S to do nifty things. One of them is to rig up a USB Remote Cable. Someone on Metafilter asked how to set this up, so here’s what worked with me and my PowerShot SD790is (Ixus 90).

!!! Warning: this requires you to apply unauthorized voltages to your camera. If in doubt, don’t. Check the CHDK camera-specific page for notes on voltages. Don’t hold me responsible if you let the magic smoke out of your camera !!!

You’ll need to install CHDK first. What you download and how you install it depends on your camera model and the memory card your using. This might help.

The good news is that CHDK comes with the remote script built in, so you don’t need to download anything else. You will need a suitable remote trigger, or a cannibalized USB Mini-B cable.

First, call up the CHDK menu. On my camera, that’s the Direct Print button (looks like this: ), which puts CHDK in Alt mode. Hit Menu in Alt mode, and you should see this menu:
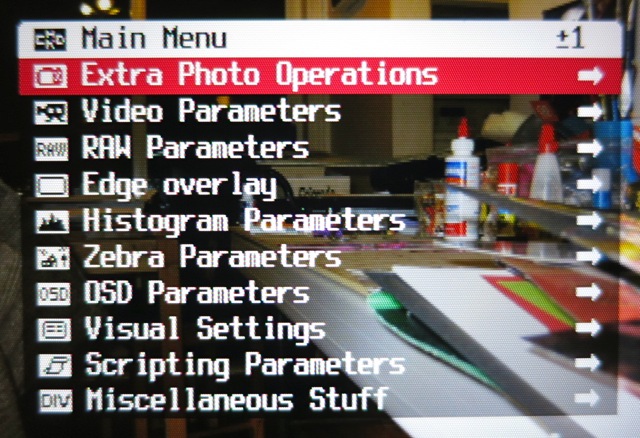
Scroll down to Miscellaneous Stuff and select it:
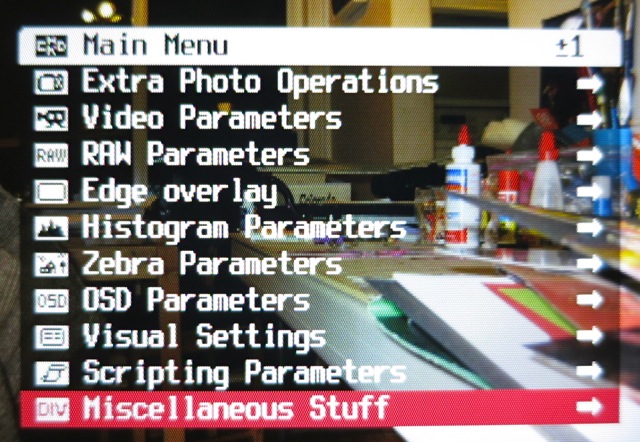
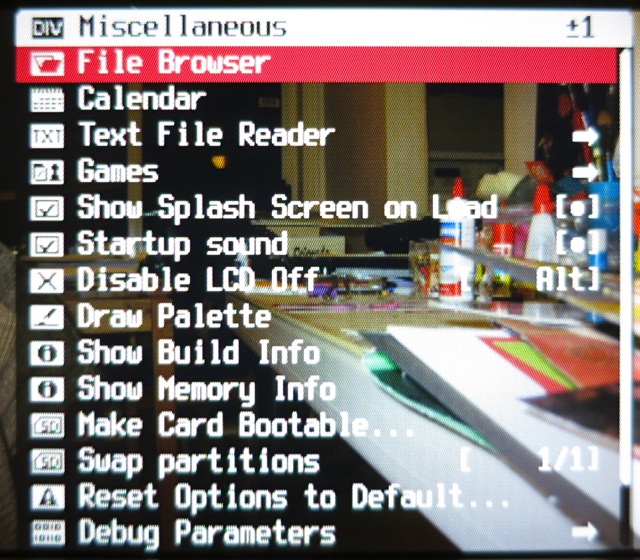
Scroll all the way down to Remote Parameters (or, more quickly, scroll up, and the menu wraps round):
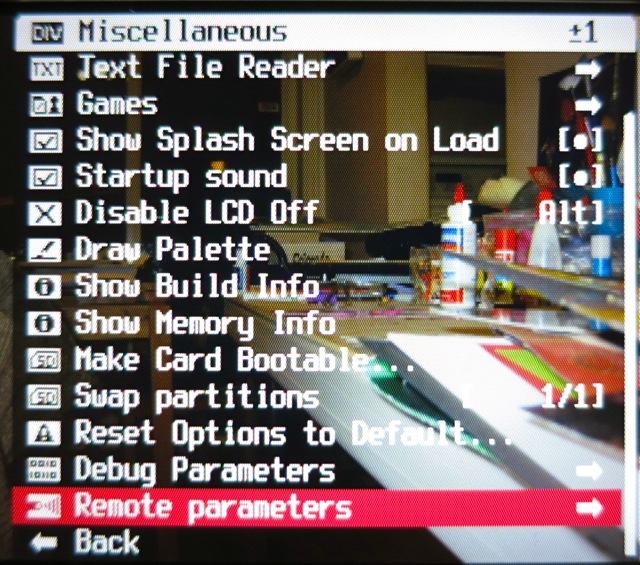
Now Enable Remote:

Go back to the main menu, and scroll down to Scripting Parameters:
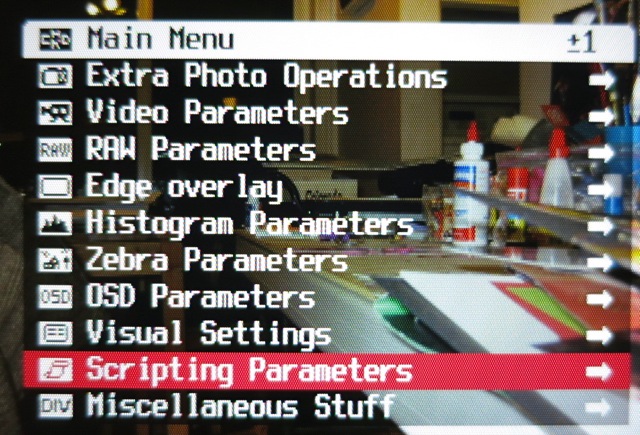
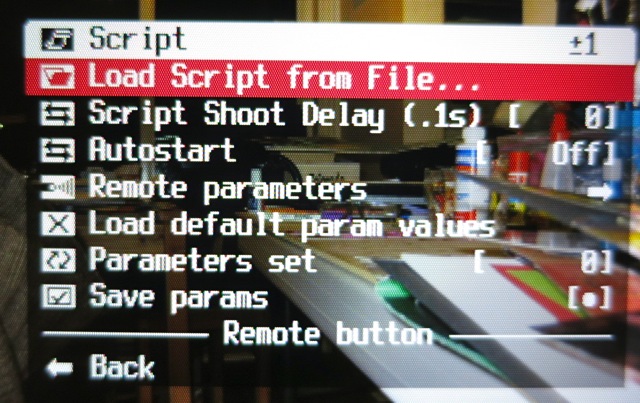
Select Load Script from File …:
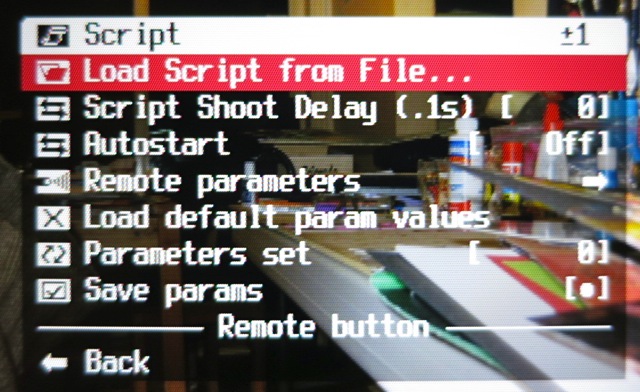
Enter the EXAM folder:
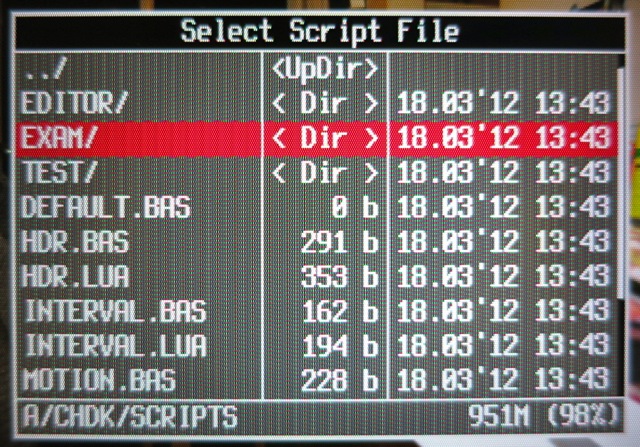
Select REMOTE.BAS:
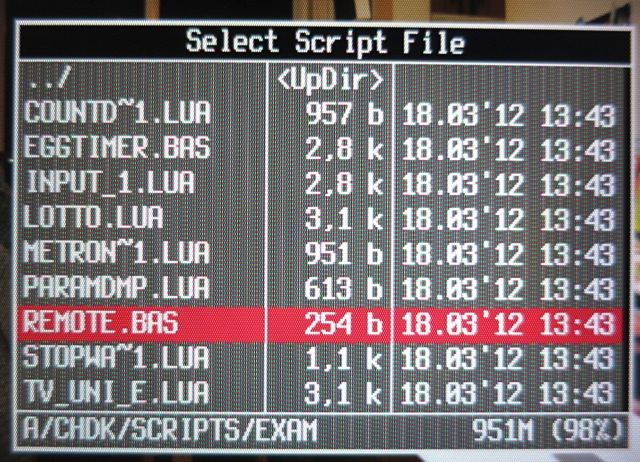
Now you’ll be taken back to the Script menu, and the bottom of the menu shows that you’ve enabled the Remote button script:
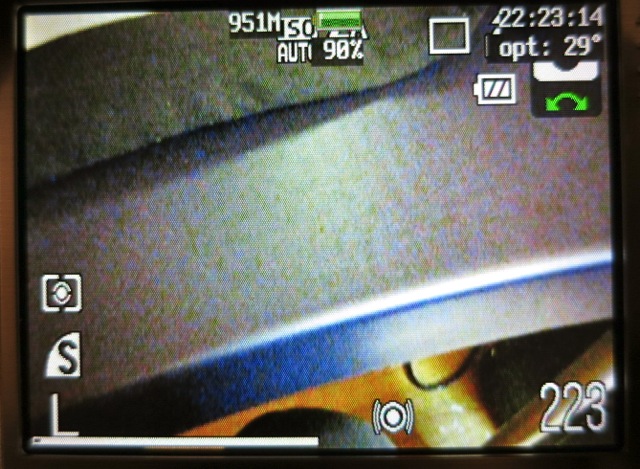
Exit the menu, and hit the shutter button to extend the lens. You’ll get a normal display, a bit like this:
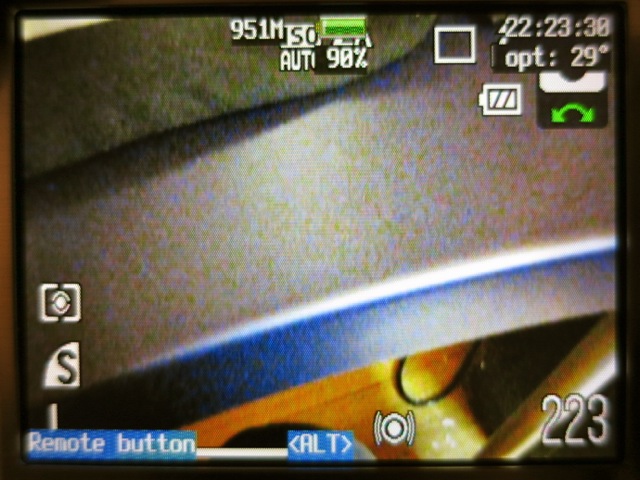
To allow the remote script to run, hit Direct Print/Alt, and the bottom of the display will show that the remote script is running:
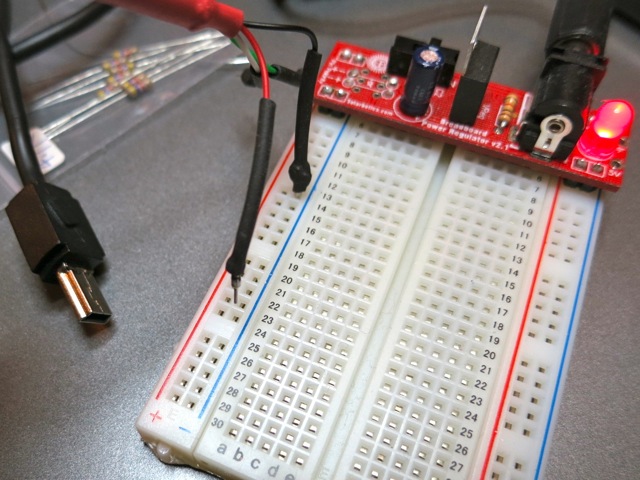
Now you’ll need to rig up a trigger. I cannibalized an old USB Mini-B cable, and connected the black wire to ground, and the red wire – momentarily – to +5V. You will likely come up with something much more elegant.
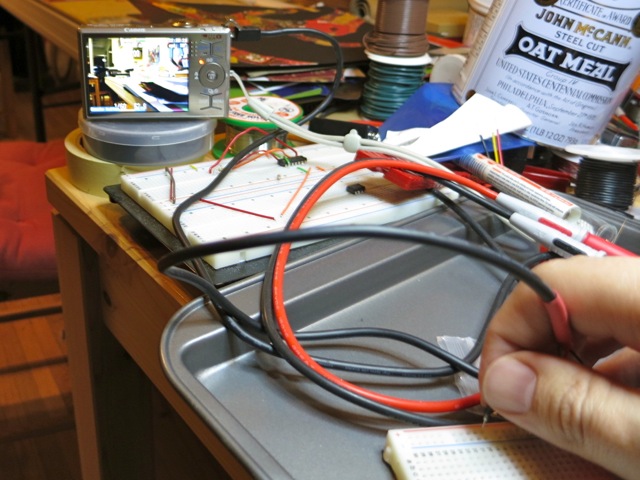
And here’s me triggering a shot (you can see the amber focus/flash LED lit) by touching the red wire to +5V:
That’s all there is to very basic remote work in CHDK. Note that USB Remote V2 is in development, which allows finer control and many more options.

lookit them li’l doozers scoot!

We have a lot of tiny snails in the aquarium. The loaches are supposed to eat them, but the tank was snail-free for a long time, and I suspect the loaches have forgotten that these little nodules are tasty.

The snails don’t seem to move much; so little, in fact, that I was convinced that they just basked in the filter’s outflow, and let food come to them. To test this hypothesis, I set up a tripod, my trusty Canon PowerShot loaded with CHDK, and used an intervalometer to take an image every ten seconds for a total of a hundred images. Here’s the result, speeded up 100x:

Plain link (MPG): snails.

Those little dudes really do bop about, if you consider things from their timescale.

How I made this: I renamed the jpeg files 001.jpg … 100.jpg, then ran the command:

ffmpeg -f image2 -i %03d.jpg -r 10 -s vga -b 1200k snails.mp4

Canada Day softball

On Canada Day, I rigged up my bicycle with a camera set to take a picture every 20 seconds, and a GPS to track my location. I had no control over when the camera would fire as I rode round the neighbourhood. Out of the 150+ photos it took, this one from Jack Goodlad park came out quite well:
The rest of the pictures are here: My Neighbourhood, Canada Day 2010 « Numpty’s Progress

embedded Old Man Luedecke

Old Man Luedecke plays The Rear Guard in Toronto a couple of nights ago:

So if that didn’t work, here’s the YouTube video:

I took this with my little PowerShot SD790 balanced on a sugar bowl. Cropped and recoded in Avidemux2, it’s not bad. To get the embedded video above, I used ffmpeg2theora (thanks, Daring Fireball!).

Whatever you do, don’t – on your first try of recording live video – try using a setting you’ve never investigated. For the second set, I used CHDK‘s default video. It looks like an attack of mosaic tiles. Oh well.

implicit markup: easy to read, hard to parse

I don’t usually ponder about other people’s blog postings, but Jeff Atwood’s Responsible Open Source Code Parenting reminded me of some of the old wars that the used to be when I was a markup head. Jeff writes about his frustration that John Gruber’s Markdown text-to-html filter:

  1. hasn’t been updated for some time
  2. doesn’t quite do exactly what Jeff’s users at Stack Overflow want
  3. appears to have any changes in its behaviour from v1.0.1 strenuously vetoed by Gruber himself.

Markdown is nice in that you can write screeds of text, and it does almost exactly what you’d expect. The markup doesn’t get in the way, usually. The difficulty arises when implicit markup (indented lines for quoted text, bulleted lists, highlights) has to give way to explicit (cross-references, code samples). Explicit markup is ugly, but sometimes, you’ve got to do it. Complex intent requires complex modes of communication, and sometimes plain text just hasn’t the bandwidth. [As an aside, there was a hilarious lengthy recurring episode on John Mark Ockerbloom‘s late bookpeople mailing list where a user (mercilessly skewered here)  insisted that they could write a general Gutenberg plain-text converter that would re-create typeset quality in an e-book reader with no explicit markup, and that XML was completely unnecessary and ill-conceived. The un-markup language, called zen markup language (said user had an aversion to the shift key) lives on only in a single website: the home of z.m.l. As for XML, its executive assistant had no comment on the matter.] Looking at Markdown, it looks like Gruber’s moved on from it. He made a 1.0.1 which did what he wanted. The code’s there to change if anyone needs it. I understand his frustration at people wanting to make changes and still call it Markdown; I’d be annoyed if I had text which I thought was in one format suddenly not be accepted, or do something unexpected. Seriously, that’s almost as bad as ‘deprecated‘. [At least Gruber didn’t go on a deletion rampage, like (admittedly smaller-time) erstwhile CHDK stalwart Barney Fife did when he was slighted in a forum. Looks like almost everything he contributed to CHDK has been removed, including some very useful control scripts and explanations.] Personally, when I need to make text to web conversions, I still use txt2html and a bunch of shell and Perl glue to feed to tidy. It’s on its third maintainer, doesn’t do much, but does it simply. And I’m pretty simple that way.

Update: see also On my increasing exasperation with Markdown.

perhaps a slightly easier way to make SD cards bootable for CHDK under OS X

Now that CHDK has a working beta in the source tree for my Canon PowerShot SD790is, I actually have to prepare SD cards for it. The Bootable SD card – OS X instructions seem a bit contrived, so I took a look at the linux instructions, and modified them accordingly. These instructions should work for FAT16-formatted SD cards of 2GB capacity and under. It will not work for SDHC cards, which are generally formatted to FAT32.

This is all command-line only for here on in. It seems to work. Please note that you will be modifying raw file systems with root permissions here; there is no safety net. If you b0rk your main hard drive, don’t say I didn’t warn you.

Firstly, you’re going to have to find out where the SD card in mounted. Do this with:
df
I got:

Filesystem    512-blocks      Used Available Capacity  Mounted on
/dev/disk0s2   487463200 318749896 168201304    66%    /
devfs                222       222         0   100%    /dev
map -hosts             0         0         0   100%    /net
map auto_home          0         0         0   100%    /home
/dev/disk2s1     3969280      3328   3965952     1%    /Volumes/CANON_DC

There are three important concepts to note when looking at the mounted card:

  1. The mount point (or volume) – in this case /Volumes/CANON_DC. This is the location that you see in Finder when moving files around.
  2. The filesystem – here /dev/disk2s1. This is the partition on the disk, arranged according to a certain formatting scheme like MS-DOS FAT16.
  3. The disk device – which for me is /dev/disk2. This is the disk device itself, and it may contain several filesystems.

Your locations for these three could well be different, so please substitute your values.

You’ll need to unmount the device, as writing to a raw filesystem while the OS thinks it has control often results in hilariously unexpected results. I used the OS X-specific command

diskutil unmount /Volumes/CANON_DC

You should get a message like Volume CANON_DC on disk2s1 unmounted. Now you need to write the boot instruction:

echo -n BOOTDISK | sudo dd bs=1 count=8 seek=64 of=/dev/disk2s1

This will prompt you for your password.

If you need to, you can remount the filesystems on the card with

diskutil mountDisk /dev/disk2

(Note that we used the disk name here, not the filesystem. If there were several partitions on the disk, this command would mount all of them that it could. It’s also kinda handy for remounting USB devices that you’ve accidentally ejected from Finder.)

Update: Knowing a difficulty getting the firmware update method of getting CHDK to work on a Mac? Running a Leopard or newer machine? Then you need to learn all about Apple’s quarantine attribute and how to remove it with xattr: FAQ/Mac – Still having trouble?.