This web page has been produced to help owners of secondhand Weston Master V meters who do not have a manual. It must not be used to add value to the sale of such a secondhand meter.
All images on this page link to higher resolution files. Use your browser's "back" facility to return to this page.
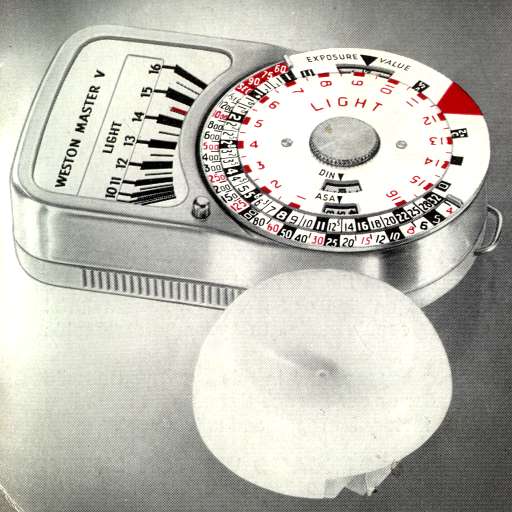
Your Weston Exposure Meter is an entirely British product and is made by the recognised leaders in fine instrument construction.
It is warranted against faulty workmanship and defective materials for a period of one year from date of purchase. Handle your meter with the care and respect to which a fine mechanism is entitled and it will give you faithful service, adding considerably to your photographic pleasure.
An accident may happen, and in this event you should consult your dealer or our Service Department regarding its return to this factory for repair and adjustment.
SANGAMO WESTON LIMITED
ENFIELD . MIDDLESEX . ENGLAND
The Master V film speed dial suits both ASA and DIN specifications and is designed for film speeds up to 16000 ASA and 43 DIN.
For reflected light readings the instrument alone is used. For exposure determination by the incident light method the Invercone attachment should be fitted as described on page 7.
Reflected light and incident light methods each have their uses but it should be noted that the latter is particularly recommended for colour reversal work.
Equipment Errors Photographic equipment is sometimes subject to small errors, e.g. in shutter times and f/stops. Sometimes these errors cancel each other but it is possible for them to be additive, resulting in consistent under or overexposure. These errors can be compensated for by adjusting the film speed (ASA or DIN rating), lowering it if results are consistently under exposed and raising it if over exposed.

The illustrations on this page show the method of operating the baffle over the photoelectric cell. When the baffle is closed, the high light scale (10-16) moves into position. The baffle should be kept closed when the light reads 10 or higher. If the light reading is less than 10, the baffle should be opened bringing the low light scale (0-10) into use.

| Opening the baffle |  |
| Releasing catch to close baffle | 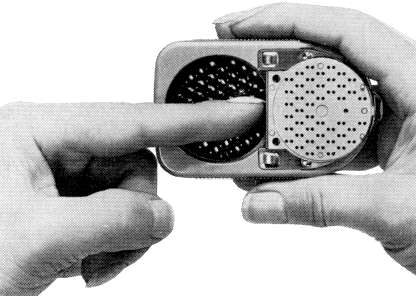 |
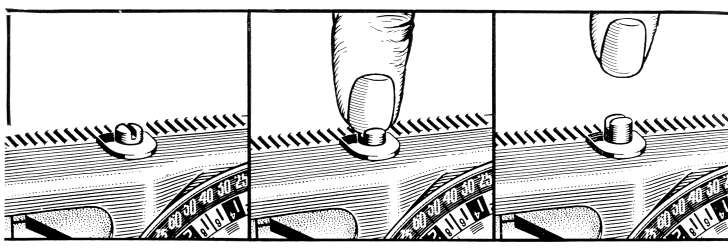
Depressing the lock button enables a reading to be taken; releasing it holds the pointer in place. When the meter is not to be used for a long period leave pointer unlocked by depressing the button and giving it a quarter turn.
 |
||
| Pointer free, lock ineffective | Button turned to locked position | Pointer locked, depress to take reading |
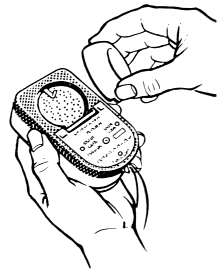
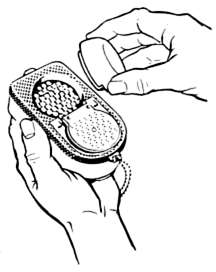
When using the Weston Master V to take incident light readings the Invercone is fitted to the meter in the manner shown here. Insert the leaf spring first when fitting the Invercone and remove it last when taking the Invercone from the meter.
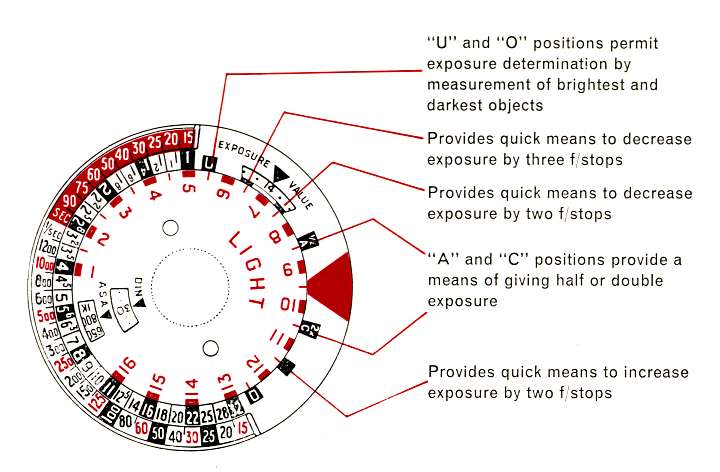
HIGH LIGHT SCALE
Simply slip the Invercone into place over the closed baffle as shown.
LOW LIGHT SCALE
If the meter reading with the baffle closed and the Invercone in position is less than 10 on the Light Scale, remove the Invercone, open the baffle as shown and replace the Invercone.
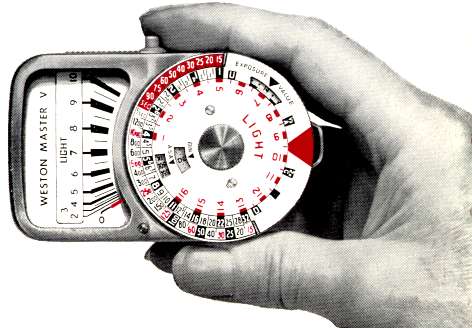
For reflected light readings hold the meter as shown here, being careful not to obstruct the photo-electric cell with your fingers or the neck cord.
For outdoor general scenes, when the reading is taken from the camera position, tilt the meter sufficiently downwards to avoid measuring sky areas which would inflate the reading and cause under exposure.
This method may lead to under exposure if used for back lighted scenes particularly where specular reflection is present such as occurs from wet surfaces. This also applies when exceptionally bright light sources or unusually large white areas are contained within the meter's 'viewing' field. Conversely over exposure may result if the meter is directed to include unduly large dark areas.

For incident light readings use either of the alternative ways of holding the meter shown here; use the index finger to operate the pointer lock.
Point the Invercone along or parallel with the camera axis towards the camera position from the subject position. Take one reading from the position of brightest scene lighting-side, back and front lighting are then all taken into account.
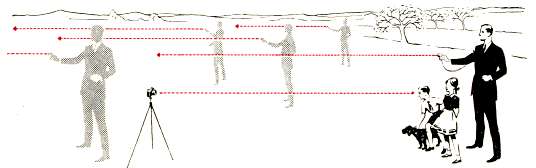
SUBSTITUTE READINGS In some outdoor work it is impracticable to reach the subject. In this case a reading may be taken at any location where the lighting conditions are the same as at the subject. At all times the meter with Invercone must be pointed in the same direction as for a reading taken at the subject position.
In the diagram the best position from which to take a reading is shown by the solid figure. Ghosted figures show alternative positions from which a reading can be made, provided that the illumination at each of them is the same as at the subject.
Your Master V Invercone may be cleaned with a cloth damped in a detergent solution. Use a soft cloth to wipe dry.
Do NOT immerse in water.
The incident light method will provide correct exposure determination under all conditions where it is possible to take the reading from the subject position or in a situation where the incident light condition is the same as the subject, see page 11.
For the reflected light method it will simplify the classification of scenes to remember that the exposure meter without the Invercone measures the average brightness of the scene. Thus for normal exposures the arrow position on the Calculator Dial is used and this is true of about eighty per cent of all scenes. However, for those scenes requiring less or more than the normal exposure the "A" or "C" positions may be employed.
The following recommendations apply primarily when monochrome negative film is being used. For Colour Photography see page 16.
Flat scenes lacking in contrast, such as distant views and landscapes on dull days, generally require less than normal exposure and more than normal development for best reproduction. Set the "A" position on the Calculator Dial opposite the light value measured for such scenes, thus halving the exposure.
The contrasty scene, such as a sunlit street with large dark shadows, for best reproduction requires more than normal exposure and less than normal development. Set the "C" position on the Calculator Dial opposite the light value for these scenes, thus doubling the exposure.
The Brightness Range Method consists of measuring the reflected light from the lightest and darkest objects of the scene and thereby centring the exposure between the two extremes.
In any scene, various objects reflect different amounts of light. To produce a good photograph, all objects should be correctly exposed and thus the extremes of brightness should be measured.
Take a close-up reading of the darkest object in the scene (for example, a dark hedge) and note the light value. Then make a close-up reading of the brightest object (for example, a white wall) again noting the light reading.
Set the arrow on the Calculator Dial midway between the darkest and brightest object light values, i.e. the arrow should be the same number of divisions or blocks from the darkest light value as it is from the brightest.
You can then read off a suitable combination of f/stop and shutter time for the scene or, alternatively, the exposure value.
Most monochrome negative emulsions can record a long range of deep shadows and bright highlights in a single negative. A knowledge of the limits of this range can prevent unnecessary loss of detail in extreme shadows or highlights when long range subjects are encountered. See "The 'U' and 'O' Positions" on page 8 and page 14.
The "U" and "O" positions on the Calculator Dial show the recommended limits of subject brightness, the ratio of these being 128 : 1. For a given setting of the dial, all objects whose light values fall on or between these two limits will be correctly exposed. Any object having a light value below the "U" position will be under exposed and any object with a light value above the "O" position may be difficult to reproduce.
By setting the "U" position opposite the darkest object light value, the indicated exposure will be just sufficient correctly to reproduce that part of the scene.
Where the overall brightness is of a low order, such as in a dark hall or cave, it might be impossible to obtain a reading from anything but a very bright object. If the "O" position is set opposite this bright object light value, the indicated exposure will avoid over exposing the highlights.
Where the brightness range of the scene exceeds a ratio of 128 : 1 use of the "U" position may involve some sacrifice of detail in the extreme highlights. Conversely, use of the "O" position will cause loss of shadow detail.
In a scene such as that shown here, the brightness range greatly exceeds the film range, i.e. patches of sunlight may give a light reading of 14 and the deep shadows a reading of 4 (this represents a range of approximately 1000 : 1, since from each number to the next on the Light Scale is a change of 2 : 1). The average film range is thus not wide enough to give printable details in both the highlights and shadows, although a good average exposure can be obtained by using your meter as already described. According to the effect you require, however, you can choose to expose for details in the shadows by using the "U" position or, alternatively, for detail in the highlights by using the "O" position. See paragraph headed "The 'U' and 'O' Positions" on preceding page. The foregoing is particularly true of short range, slow film. Many films, however, have a range greater than 128 : 1 and when using such material, use of the "U" position is often preferable.
Use of the incident light method is recommended for all colour photography.
The beginner should avoid extreme lighting conditions and allow the colour to provide the contrast. For outdoor shots, if possible expose when the sun is reasonably high (i.e. above about 30° from the horizon) as the colour of the light is normally most suitable during this period. Watch the reflection values of the surroundings, i.e. a white dress can be turned pink by light reflected from a red object. Outdoors avoid shadows and subjects in shadow, as these are illuminated by skylight which is more blue than sunlight, for which the film is balanced. An ideal scene is one having low contrast and even illumination.
When the scene contains large areas of a light tone, the reflected light method will result in an inflated reading and consequent under exposure. In such cases a reading could be taken of an average portion of the scene, avoiding the areas of light tone, but it is preferable to use the incident light method.
The range of scene brightness which can be recorded on colour film is far more restricted than that of monochrome material. For colour photography the ratio between the lightest and darkest parts of the scene should in general not exceed about 32 : 1, i.e. a difference of 5 in the reading on the light scale.
For best colour rendering it will generally be found that the light value range of extreme colours will lie between the mark positioned one whole stop above the "C" position and the mark positioned one whole stop below the "A". Objects whose light values lie outside this range may suffer in colour rendering. Effective pictures in colour are obtained from colour contrast rather than from highlights and shadows as in monochrome photography. The Brightness Range Method described on page 13 may be used.
First take a close-up reading of the darkest colour in the scene. Then take a closeup reading of the brightest colour. Set the arrow position on the Calculator Dial midway between these light values and make your camera setting.
The above method locates the exposure in the middle of the film range and is suitable for the average subject in flat lighting. If the darker colours are of principal interest, a longer exposure may be preferable. Conversely, if the brighter colours are of interest then a shorter exposure may be necessary.
It must be appreciated that varying the exposure to suit one end of the colour range may affect true rendering at the other. A useful suggestion is to use the "C" position when exposing for the darker colours and the "A" position for the brighter colours.
Correct exposure will, of course, give the best results, but if in doubt remember that when using reversal film slight under exposure gives better colour rendering than over exposure. With negative/positive colour processes, however, the opposite is the case and slight over exposure is preferable to under exposure. In both forms of colour photography, it is normally desirable to avoid shadows and extreme contrast in lighting until plenty of experience has been gained. Some fine contre-jour effects are attainable, however, to which end the use of the Invercone (see page 11) is especially recommended.
A cine camera is essentially the same as a still camera except that it exposes a series of pictures at a fixed shutter time setting
For cine work the incident light method is recommended but the Brightness Range Method could be used.
The standard number of frames exposed by the average amateur cine camera is 16 per second at a shutter setting of 1/30th of a second. For other frames per second than 16, the shutter times are proportional. Use the settings shown in the following table:
| 8 | frames per second | 1/15th |
| 16 | frames per second | 1/30th |
| 24 | frames per second | 1/50th |
| 32 | frames per second | 1/60th |
| 48 | frames per second | 1/100th |
| 64 | frames per second | 1/125th |
Some cameras may have a different shutter time at 16 frames per second, such as 1/40th or 1/50th and the f/stop for these should be read off against this shutter setting on the Calculator Dial. If the shutter time on your camera is unknown, ascertain it from the camera manufacturer.
High Altitudes Films are sensitive to ultra-violet radiation, of which there is a considerable amount present at high altitudes. To eliminate the effect of this, it is always good practice to use a haze or ultra-violet filter. No exposure correction is necessary so use the meter in the normal manner
Snow, Beach and Water Scenes Use the Invercone or take reflected light readings of the brightest and darkest objects and set the Arrow midway between, or take a reading from the palm of your hand and use the "C" position on the Calculator Dial. The best rendering of snow texture results when the snow is back or cross lighted.
Copy Work When copying pages of a book or photographs in black and white or colour use the Invercone.
Alternatively divide the nominal film speed by 4, set the resulting value in the Film Speed Window, and take a reflected light reading from a white card placed over the subject. in either case set the Normal Arrow to the light reading obtained and select the camera settings in the usual manner.
Television Adjust the television screen for high contrast. Place the camera on a tripod, set the shutter at 1/25 second and focus on the lines across the screen. Dim the room lights. Take a close-up average reflected light reading holding the meter about six inches from the screen. Set the Normal Arrow at this reading and select the camera settings in the usual manner.
Sunsets and Silhouettes Aim the meter directly at the subject and set the Normal Arrow at the reading.
Aerial Pictures To prevent the sky from inflating the reading, aim the meter down towards the ground. As a general guide, below 1,000 feet use the meter reading indicated; from 1,000 to 2,000 feet set the Arrow on the Calculator Dial one space higher than the meter reading, thereby reducing the exposure by 1/3 f/stop; from 2,000 to 4,000 feet, set the Arrow two spaces higher than the meter reading (an exposure reduction of 2/3 f/stop). Above 4,000 feet, set the "A" mark instead of the Arrow to the meter reading (an exposure reduction of one f/stop). If no other filter is in use, a skylight filter, haze filter or ultraviolet filter should be used, in which case no exposure correction is required.
Printing note from back cover: D.W. 16M. 5.63