Using the IBM Wheelwriter 10 Series II Typewriter as a printer

I can’t believe I’m having to write this article again. Back in 2004, I picked up an identical model of typewriter on Freecycle, also complete with the parallel printer option board. The one I had back then had an incredible selection of printwheels. And I gave it all away! Aaargh! Why?

Last month, I ventured out to a Value Village in more affluent part of town. On the shelf for $21 was a familiar boxy shape, another Wheelwriter 10 Series II Typewriter model 6783. This one also has the printer option board, but it only has one printwheel, Prestige Elite. It powered on enough at the test rack enough for me to see it mostly worked, so I bought it.

Once I got it home, though, I could see it needed some work. The platen was covered in ink and correction fluid splatters. Worse, the carriage would jam in random places. It was full of dust and paperclips. But the printwheel did make crisp marks on paper, so it was worth looking at a repair.

Thanks to Phoenix Typewriter’s repair video “IBM Wheelwriter Typewriter Repair Fix Carriage Carrier Sticks Margins Reset Makes Noise”, I got it going again. I’m not sure how much life I’ve got left in the film ribbon, but for now it’s doing great.

Note that there are lots of electronics projects — such as tofergregg/IBM-Wheelwriter-Hack: Turning an IBM Wheelwriter into a unique printer — that use an Arduino or similar to drive the printer. This is not that (or those). Here I’m using the Printer Option board plus a USB to Parallel cable. There’s almost nothing out there about how these work.

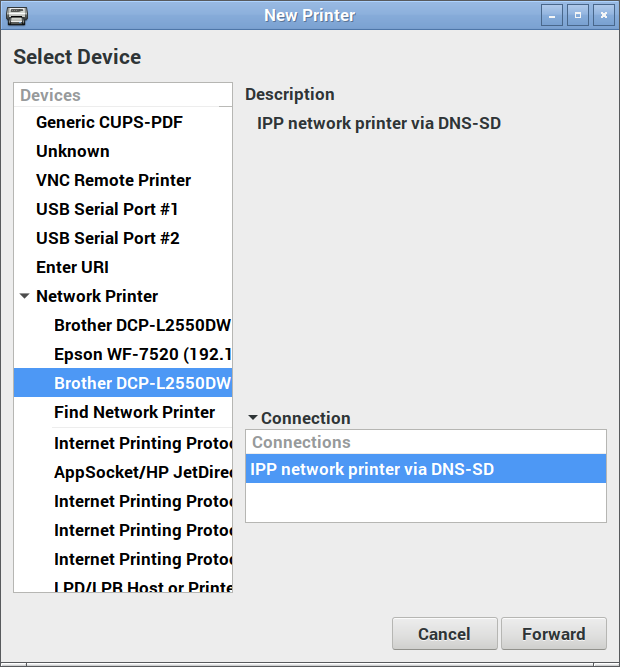
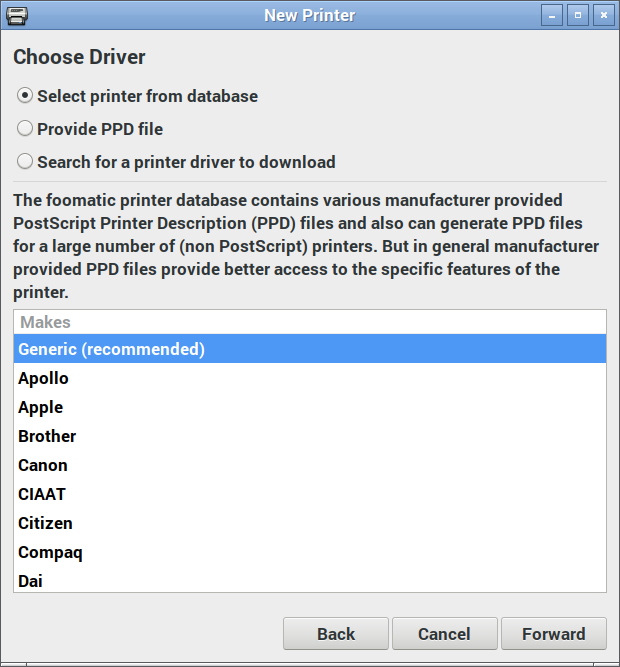
Connecting the printer

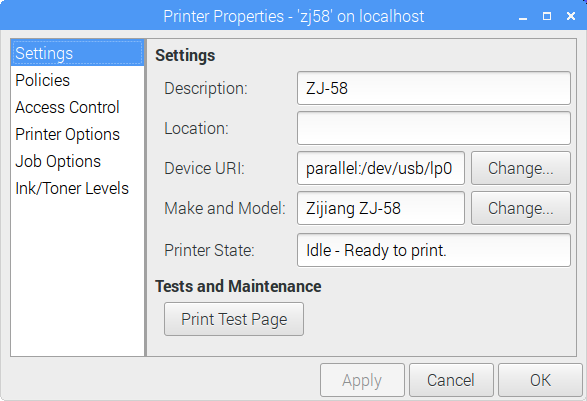
You’ll need a USB to Parallel adapter, something like this: StarTech 10 ft USB to Parallel Printer Adapter – M/M. You need the kind with the big Centronics connector, not the 25-pin D-type. My one (old) has a chunky plastic case that won’t fit into the port on the Wheelwriter unless you remove part of the cable housing. On my Linux box, the port device is /dev/usb/lp0. You might want to add yourself to the lp group so you can send data to the printer without using sudo:

sudo adduser user lp

The Wheelwriter needs to be switched into printer mode manually by pressing the Code + Printer Enable keys.

Printer Codes

As far as I can tell, the Wheelwriter understands a subset of IBM ProPrinter codes. Like most simple printers, most control codes start with an Esc character (ASCII 27). Lines need to end with both a Carriage Return (ASCII 13) and newline (ASCII 10). Sending only CRs allows overprinting, while sending only newlines gives stair-step output.

The codes I’ve found to work so far are:

  • Emphasized printingEsc E
  • Cancel emphasized printingEsc F
    (double strike printing [Esc G, Esc H] might also work, but I haven’t tried them)
  • Continuous underscoreEsc – 1
  • Cancel continuous underscoreEsc – 0
    (technically, these are Escn, where n = ASCII 1 or 0, not character “1” or “0”. But the characters seem to work, too)
  • 7/72″ inch line spacingEsc 1
  • Set text line spacing to n / 72″ unitsEsc A n
    (this one really matters: if you send “6” (ASCII 66) instead of 6, you’ll get 66/72 = 11/12″ [= 28.3 mm] line spacing instead of the 1/12″ [= 2.1 mm] you expected)
  • Start text line spacingEsc 2

Text functions such as italics and extended text aren’t possible with a daisywheel printer. You can attempt dot-matrix graphics using full stops and micro spacing, but I don’t want to know you if you’d try.

Sending codes from the command line

echo is about the simplest way of doing it. Some systems provide an echo built-in that doesn’t support the -e (interpret special characters) and -n (don’t send newline) options. You may have to call /usr/bin/echo instead.

To print emphasized:

echo -en 'well \eEhello\eF there!\r\n' > /dev/usb/lp0

which prints

well hello there!

To print underlined:

echo -en 'well \e-1hello\e-0 there!\r\n' > /dev/usb/lp0

which types

well hello there!

To set the line spacing to a (very cramped) 1/12″ [= 2.1 mm] and print a horizontal line of dots and a vertical line of dots, both equally spaced (if you’re using Prestige Elite):

echo -en '\eA\x05\e2\r\n..........\r\n.\r\n.\r\n.\r\n.\r\n.\r\n.\r\n.\r\n.\r\n.\r\n\r\n' > /dev/usb/lp0

Character set issues

IBM daisywheels typically can’t represent the whole ASCII character set. Here’s what an attempt to print codes 33 to 126 in Prestige Elite looks like:

tabulation of printable ASCII characters on orange background. Some characters are clearly missing

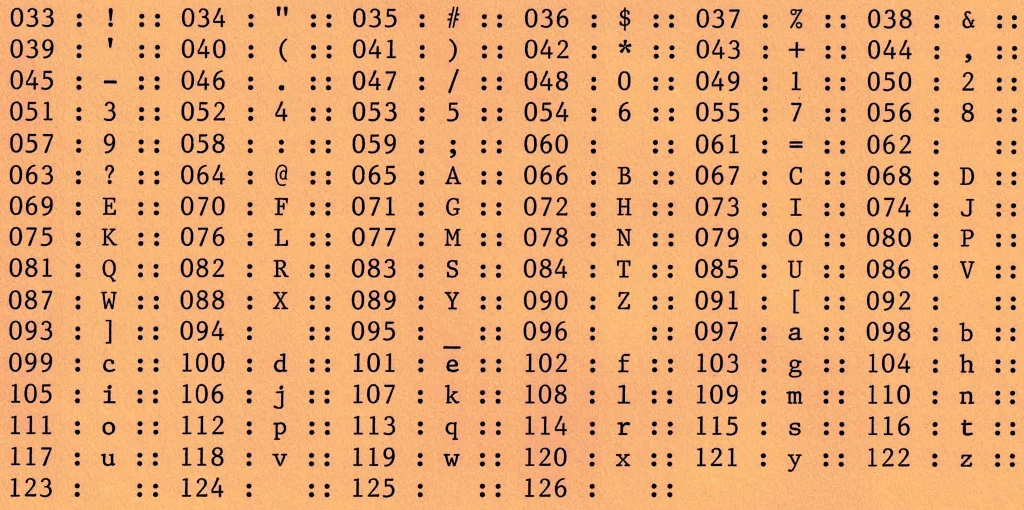
The following characters are missing:

< > \ ^ ` { | } ~

So printing your HTML or Python is right out. FORTRAN, as ever, is safe.

Prestige Elite is a 12 character per inch font (“12 pitch”, or even “Elite” in typewriter parlance) that’s mostly been overshadowed by Courier (typically 10 characters per inch) in computer usage. This is a shame, as it’s a much prettier font.

Related, yet misc.

There’s very little out there about printing with IBM daisywheels. This is a dump of the stuff I’ve found that may help other people:

  • Wheelwriter 10 Series II Typewriter 6783 Operator’s Guide (Internet Archive; nothing about the printer option)
  • IBM didn’t make too many daisywheel printers. Two models were the 5216 Wheelprinter and 5223 Wheelprinter E, possibly intended for larger IBM machines. The 5216 Wheelprinter looks like it may use similar character codes. Here’s a (Printer Definition File?? An IBM thing, I think) for that printer that might help the interested: ibm5216_pdf
  • The IBM 6901 “Personal Typing System” included a daisywheel printer (Correcting Wheelwriter Printer 6902) that looks almost identical to a Wheelwriter 10 Series II with the keyboard lopped off. But I can find nothing about it.
  • Word Perfect 5 may have had a driver for this typewriter/printer, but that doesn’t help me with the control codes.

A new old calendar

simulated dot-matrix printer on ruled paper layout of an ASCII-art Snoopy in WW1 Air Ace regalia yelling "Curse you Red Baron!" at his imaginary nemesis, and a 2022 calendar laid out on the facing page
not seen the likes of this since ’78, I’ll be bound

It’s unlikely anyone wanted a faux-lineprinter ASCII art calendar for 2022, but you’re getting one anyway. You can print this yourself:

If you want to make your own, here’s a script: snoopycal.sh

Credits:

  • Original “WW1 Fighter Pilot” Snoopy ASCII art from “SNOOPY.BA” for the DEC PDP-8, written by Mr Kay R. Fisher of DEC some time before July 1973. It’s referred to in the first printing of the “101 Basic Computer Games” book, which was published in 1973.
  • ncal, banner: their respective authors
  • pstext an ascii to PS filter by Dan Judd, usenet comp.lang.postscript, December 1989. I had to really mess around with the output of this program to use a custom font and add the music ruling, but it produces cleaner PostScript than the giant messes that enscript and a2ps have become
  • Font: mnicmp, by me. Based on the DecWriter II font.
  • iffy scripting, scribbly lines: also me.

Possibly Painless Network Printing from your Raspberry Pi

Printing from computers goes through waves of being difficult to being easy, then back to difficult again. This is likely due to the cycles of technology, complexity and user demand flow in and out of sync. I think we’re at peak annoyance right now.

It’s even harder with Raspberry Pis, as when printer drivers support Linux, 90% of them are for x86 or x86_64 computers only (Canon: ಠ_ಠ). ARM doesn’t get a look in. But one technology does actually seem to help: network printers that support IPP — Internet Printing Protocol.

We had an old Brother laser printer that just got slower and crankier and less useful as a printer, so yesterday I got a new Brother DCP-L2550DW to replace it. It says it supports Linux in the spec, but I knew not to be too optimistic with my Raspberry Pis. And indeed, it was seen on the network but no driver was found. I had a sad.

What turned my frown upside down was finding out about Raspbian’s cups-ipp-utils package. For desktop use, install it this way:

sudo apt install cups cups-ipp-utils system-config-printer

(leave off system-config-printer if you’re running from the terminal.)

Update: while you’re here, you might also want to install the print-to-PDF driver too. This allows you to print without wasting paper. Install it (and the IPP driver) with:

sudo apt install cups cups-ipp-utils system-config-printer printer-driver-cups-pdf

In many cases, this might be all you need to do: the network printers should be automatically found and added as devices.

Adding the new printer

On the desktop, open up Preferences → Print Settings and add a new printer. Yes, it prompts for your user password which you may have forgotten. I’ll wait while you try to remember it …

Now under Network Printers, you should see a device you recognize. Pick the one that says IPP network printer somewhere:

IPP network printer

Here’s where the magic happens: you actually want to pick the generic driver for once:

Select Generic (recommended) manufacturer

And again, the IPP utilities package will have picked the right driver for you:

Just go with what the driver suggests

Changing the name and location is optional:

Your new printer’s almost ready to go!

Hit Apply, and you should be printing!

(Hey, printer manufacturers have been known to be evil and make good, working stuff suddenly not work. IPP is supposed to make everything sparkly again, but I can’t guarantee that something wicked won’t come this way.)

Update: After a few months of using the Brother DCP-L2550DW, I don’t recommend you buy it. It’s a perfectly capable printer, but it takes ‘chipped’ toner cartridges that:

  1. stop dead when you hit their page count limit, wasting toner and preventing you from finishing the print job;
  2. can’t easily be refilled by local technicians, so are wasteful of resources.

To get around (1), select Continue instead of Stop in the Toner Out configuration menu.

Update, January 2020: with sales and all needing a printer for work, the DCP-L2550DW will go with me to the office. I now have a MFC-L2750DW at home that scans to network, amongst other things. IPP proved it was magic yet again by the new printer being found and just worked with all my machines as soon as I added it to the network.

Thermal Printer driver for CUPS, Linux, and Raspberry Pi: zj-58


Update:build instructions have changed, 2019. If any manufacturer wants to see if their printer works, send me one (I’m easy to find) for free and I’ll check it out and add it here.

This might be my last post on mini-printers, as I’ve found a driver that just works with CUPS on Raspberry Pi. It also works on Ubuntu on my laptop, and should work (though untried) on Mac OS. You’ll have to build it from source, but it’s not too hard.

The hard part is working out if your thermal printer will work or not. There are many out there, and they’re all slightly different. If they support the ESC/POS bitmap command GS v 0 on 58 mm wide paper, they should work. The ones I’ve tested are:

  1. Catex POS5890U — USB, cheap, fast.
  2. “701” control board panel printer — fairly generic, decent quality printer with serial input. A bit slow for daily use at 9600 baud.
  3. Xiamen Embedded Printer DP-EH600 — as above.

The following should also work, but haven’t been tried:

  • Adafruit Mini Thermal Receipt Printer — again, serial, so not super fast.
  • Sparkfun thermal printer — which now appears to be identical to the Adafruit unit, and is referred to as the “A1 (or A2) micro panel printer” in the documentation.

Known not to work:

  • BTHT-V6 printer — which uses a completely different command set. (Roughly that of an Epson FX-80 for image commands, if you care.)

If you have a manual for your printer, check it to see if it prints bitmaps by sending a three byte header of 29 118 48 (or 1D 76 30 in hexadecimal). If you’re not sure, try it with a small test image, and be ready by the power switch …

Getting and building the driver

The driver is meant for a ZiJiang ZJ-58 printer, and lives here on Github: klirichek/zj-58.

Now read and follow the Building & Installing section of the README, and do what it says. I’ll wait …

Setting up the printer

This bit is much more graphical. You’ll need the system-config-printer package:

sudo apt install -y system-config-printer cups

Open up the printer settings window (Preferences → Print Settings):

2015-07-11-220946_452x281_scrotSelect the Add icon, and the New Printer window opens:

2015-07-11-221141_602x592_scrotThe POS5890U shows up as “Unknown” on my USB port, as Linux doesn’t know the name of this device from its USB ID.

Update (for the slightly desperate): In the land of “Things have changed!”, my Catex printer isn’t/wasn’t showing up at all. I had to resort to this in the Enter URI option:

thermal printer usb lp uri
(hey, this image doesn’t quite match the flow. Look only at the the “Device URI” bit please)

parallel:/dev/usb/lp0 seems to work. Another option might be looking at the output of

sudo /usr/lib/cups/backend/usb

which suggests that usb://Unknown/Printer might work too. (All of this might need to have been preceded by

sudo usermod -a -G lp pi

and a logout or reboot; I did say this was for the slightly desperate …)

If the above doesn’t apply, your printer might have an known ID, or show up as a serial port. Select the right one, and click Forward:

2015-07-11-221221_602x592_scrotHere, I’m really pleased that the driver is for a Zijiang unit, as it’s conveniently at the end of the list. Click Forward …

2015-07-11-221240_602x592_scrotNo options here, so again, Forward …

2015-07-11-221311_602x592_scrotI changed the name from the default ZJ-58 to the more unixly zj58. You don’t have to, but either way, Apply the changes.

2015-07-11-222030_452x281_scrotAnd there it is, registered as a printer!

Printer Options

Most printers expect paper wider than 58 mm, but mini-printers can’t do that. To tell the system about paper sizes, right click on the printer’s icon, and change the printer settings:

2015-07-11-222225_570x560_scrotA test page might print properly now, but you should probably go into Printer Options first:

2015-07-11-222239_570x560_scrotYou do want to set the media size to at least 58 × 210 mm. This is just the longest strip it will print in one ‘page’; if your print is shorter, it won’t waste extra paper. You can choose longer prints, but not wider. The default assume your local standard paper size which —be it A4, Letter, or whatever — will not be what you want here. Hit OK.

Printing something

You could print the self test page, but it’s long and boring. If you’re fairly sure your printer will be supported, try this scaled PDF version of the Raspberry Pi Logo: raspberry-pi-logo.  Printed and scanned, it came out like this:

raspberry-pi-logo-miniprinterNot the best rendition, but not bad for a $30 receipt printer. My test image came out like this (iffy scan, sorry):

zj58-driver-testI haven’t covered the intricacies of setting up serial port connections here; maybe another time. Also, there’s a short delay (maybe 10–20 s) between selecting Print and the printer coming to life. CUPS is pretty complex, and is doing things in the background while you wait.

(Seeing as I use their logo prominently up there, I should totes acknowledge that “Raspberry Pi is a trademark of the Raspberry Pi Foundation”. Also, I couldn’t have done all this without the support of Reed Zhao. Though Reed has moved on to bigger things and doesn’t sell printers any more, his help — not to mention the generous gift of a couple of printers — was very welcome.)

→ you might also be interested in my notes on mini-printers and Linux – it has some manuals too.

Oh no, he’s messing about with thermal printers again …

Instagram filter used: Lo-fi

View in Instagram ⇒

Scored this cheapo USB printer on eBay: “High-speed 58mm POS Dot Receipt Paper Thermal Printer USB”. It identifies itself as a CATEX Technolog [sic] POS5890U, with a USB vendor:product ID of b000:0410. After a bit of random fiddling, it shows up as /dev/usb/lp0 on a Raspberry Pi. After turning off CUPS (as it nabs the device, not even letting root near it), you can print images up to 384 dots (48 mm at 8 dots/mm) wide using the ESC-POS GS v 0 command. You can use my esc-pos-image.py script if you wish, and if you need a test image …

(The photo is of Marie Doro; proto-goth 1902 style.)

Just in case you were needing a thermal printer test image …

Thermal Test Image

Here you go, then. It should print perfectly on an 58 mm thermal printer. It features:

  • 12½% grey scales (clockwise, from right) — ordered, Hilbert (clump=5), Floyd-Steinberg, and halftone (4 pixel/cell).
  • Vertical and horizontal test lines.
  • Classy woven background.
  • Roughly 50% grey overall, so shouldn’t cause your printer too much grief.
  • Entirely free of licence restrictions.

very simple python image printer: scruss/esc-pos-image.py

Notes on mini-printers and Linux

miniprinter galleryOver the last few weeks, I’ve been playing with a few small thermal printers. Meant as POS or information booth printers, they make a diverting project for the lo-fi printing enthusiast. While they all have common features — 58 mm/2¼” paper width, 8 pixel/mm resolution, 48 mm print width, serial connection — they all have their quirks. You may have seen these sold as the Adafruit Mini Thermal Receipt Printer or Sparkfun’s Thermal Printer, but there are many others. I’m going to write more on interfacing these directly to Raspberry Pi, Arduino, and (if I can navigate the documentation) a CUPS driver.

Update, July 2015: Here’s a CUPS driver: klirichek/zj-58, and my writeup on installing it on a Raspberry Pi — Thermal Printer driver for CUPS, Linux, and Raspberry Pi: zj-58

For now, I’m just leaving you a list of things I’ve found helpful for the DP-EH600 and 701 printers. Note that the similar-looking BTHT-v6 printer uses a completely different command set.

  • Replacement paper is sold as 2¼” × 30′. Staples have a box of 30 rolls for under $25 (item 279096, not on their website). Longer rolls don’t fit.
  • You’ll need a USB→TTL Serial adaptor, preferably one with DTR control. I use one from JY-MCU. In a pinch, you can use a simpler  Debug / Console Cable for Raspberry Pi, but you risk serial overruns and dodgy results. Remember that RX on the adaptor goes to TX on the printer, and vice versa.
  • A good solid power supply is needed; these printers draw ~8 W when printing. Some printers only support 5 V (for which a 3 amp adaptor would be ideal), others 5-9 V. The higher voltage makes text printing faster. You can’t drive these directly from your Raspberry Pi/Arduino power supply.
  • Linux serial ports are set to some defaults which may have been historically useful, but now corrupt 8-bit data. A trick I picked up here is to first issue the command
    stty -F /dev/ttyUSB1 0:0:0:0:0:0:0:0:0:0:0:0:0:0:0:0:0:0:0:0:0:0:0:0:0:0:0:0:0:0:0:0:0:0:0:0
    which clears all settings, then set the device up as you need it:
    stty -F /dev/ttyUSB1 speed 9600 raw cs8
    (Most of these printers default to 9600 baud. Your device may be called something different to ttyUSB1.)
  • I’ve written a couple of Python driver stubs which take an image and produce the relevant binary output:
    • scruss / esc-pos-image.py – prints an image as a single command. May not work on the SparkFun printer. Does not work on the BTHT-v6.
    • scruss / esc-pos-image-star.py – prints the image in 24 pixel deep bands. Can sometimes cause visible gaps in the printout, but will work on almost all printers, except the BTHT-v6.
  • These Python libraries also work, as long as you address the printer properly (right device, right speed):

Notes/Credits

  1. Reed Zhao (of Tangram Software) lent me a couple of different printers for testing after I bought a different one from him. He’s put a lot of work into sourcing these printers direct from the manufacturers. Thanks, Reed!
    NB: Reed doesn’t sell printers any more. Try eBay.
  2. Image credits for print samples:

Manuals/Docs

Posted more for historical reference:

Using large format paper with Linux and the Epson WorkForce WF-7520 printer

Update: Nope, I can’t get this to work any more.

I have an Epson WorkForce WF-7520, and I really like it: excellent built-in duplex large format scanner with ADF, CIFS network storage, giant paper bins, photo quality printing up to 330×482 mm, only slightly expensive print cartridges… Under Linux, though, it’s not so well behaved, especially if you want to print on large format paper. This is the workaround I developed:

  1. Put the B-size/11×17″ paper in Tray 1 (the upper one), and the Letter paper in Tray 2. This, unfortunately, matters — the driver that can print large format can only access the upper tray. On the setup menu on the printer console, tell the printer which tray holds what size of paper.
  2. Install the epson-inkjet-printer-escpr driver; it should be in the standard Ubuntu repos. Define a printer (wf7520-lf, for example) that uses this driver. Set the paper size to “US B 11 x 17 in”.
  3. Ensure that the lsb and lsb-printing packages are installed:
    sudo apt-get install lsb lsb-printing
  4. Download and install the non-free epson-201115w driver from the EPSON Download Center. Define a printer (I used wf-7520 for the name) using this driver, making sure that the correct PPD (epson-inkjet-printer 1.0.0-1lsb3.2 (Seiko Epson Corporation LSB 3.2)) is used. Set it up to use Letter paper, and (important!) set the source to Paper Cassette 2. You might want to make this printer the system default.

To print to large format, use the command:

lp -d wf7520-lf -o PageSize=USB file.pdf

To print regular size, just send the job to the wf-7520 device.

(modified from my Ask Ubuntu question/answer: Selecting Large Format Paper: what printing options work?)

Update for the (rightly) confused: Epson appear to have hoiked US B / 11×17″ support for this printer. Here are my PPDs:

Copying PPDs from one driver to another may not work, but you’ve likely nothing to lose.

And that’s that …

There’s something satisfying when your computer tells you, “The software was installed definitely.” I’d forgotten how ropey the translations were on Epson software, and I got this as I installed my new Epson WorkForce WF-7520 printer.

Haven’t had enough time to really dig into it, but it seems quite a fun unit. Duplex printing and scanning up to A3/Tabloid. Wireless printing (including AirPrint direct from an iOS device). Scans to flash storage, which is available as a network share. All good stuff.

archival, snarkival

We live in a Scarborough neighbourhood, so that means that people use the side door. Front door’s for people who know no better. So we need a Side Door sign to guide the unschooled.

On the left is one I just printed. The one on the right — same printer (HP Photosmart C5180), same paper — has been taped to the glass on our front-facing screen door since December 2007, in full sunlight. It’s barely legible. (And yes, it has slightly different fonts/layout; the original was done on a PC in OpenOffice, the replacement in LibreOffice on a Mac.)

So whenever an inkjet crows about “Archival Inks!”, remember: four years to fade to white. Do you need your images to last longer?

Light cyan and light magenta

To echo Thomas’s post about HP light ink usage, my C5150 definitely uses them:

HP C5150 Ink LevelsI think I’m on my second light cyan and magenta, while I’m on my fourth regular cyan and magenta cartridges.

The one thing I have learned not to do is buy the six cartridge photo pack. While it looks a bunch cheaper (typically, $45 for six cartridges + 150 sheets of photo paper), the bundled cartridges have a much lower capacity than the singles – maybe 1/3 less. So you don’t really save anything, create more waste, and end up with far more photo paper than you can use.

most annoying thing ever

I have an HP Photosmart C5180 scanner/printer thingy. It works fairly well, except when the drivers are being stupid under Windows. But it has one flaw so appalling that the first time it happened, I almost trashed the printer in a blind rage (yeah, I have some anger issues).

The power supply brick has a three-prong connector; pretty much the same as the “kettle lead” you get on PCs. But this thing, whether through vibration, heating and cooling, or just plain evil, slowly works itself loose. So you go to turn the printer on one day, and … nothing. You check the cables; all are plugged in. Check the wall socket; it’s (zap! ow!) live. After tearing some hair out, you troubleshoot every cable – all looks well until you notice that the plug is just a little farther out of the power supply than it might go. Snug it in a couple of millimetres, and a working printer is you.

This happens every few months. Even when I know it’s likely to happen, it still jars me. Wouldn’t have happened in Bill & Dave’s day.

All the printers I’ve ever owned …

bird you can see: hp print test

  • An ancient (even in 1985) Centronics serial dot-matrix printer that we never got working with the CPC464. The print head was driven along a rack, and when it hit the right margin, an idler gear was wedged in place, forcing the carriage to return. Crude, noisy but effective.
  • Amstrad DMP-2000. Plasticky but remarkably good 9-pin printer. Had an open-loop ribbon that we used to re-ink with thick oily endorsing ink until the ribbons wore through.
  • NEC Pinwriter P20. A potentially lovely 24-pin printer ruined by a design flaw. Print head pins would get caught in the ribbon, and snap off. It didn’t help that the dealer that sold it to me wouldn’t refund my money, and required gentle persuasion from a lawyer to do so.
  • Kodak-Diconix 300 inkjet printer. I got this to review for Amiga Computing, and the dealer never wanted it back. It used HP ThinkJet print gear which used tiny cartridges that sucked ink like no tomorrow; you could hear the droplets hit the page.
  • HP DeskJet 500. I got this for my MSc thesis. Approximately the shape of Torness nuclear power station (and only slightly smaller), last I heard it was still running.
  • Canon BJ 200. A little mono inkjet printer that ran to 360dpi, or 720 if you had all the time in the world and an unlimited ink budget.
  • Epson Stylus Colour. My first colour printer. It definitely couldn’t print photos very well.
  • HP LaserJet II. Big, heavy, slow, and crackling with ozone, this was retired from Glasgow University. Made the lights dim when it started to print. Came with a clone PostScript cartridge that turned it into the world’s second-slowest PS printer. We did all our Canadian visa paperwork on it.
  • Epson Stylus C80. This one could print photos tolerably well, but the cartridges dried out quickly, runing the quality and making it expensive to run.
  • Okidata OL-410e PS. The world’s slowest PostScript printer. Sold by someone on tortech who should’ve known better (and bought by someone who also should’ve known better), this printer jams on every sheet fed into it due to a damaged paper path. Unusually, it uses an LED imaging system instead of laser xerography, and has a weird open-hopper toner system that makes transporting a part-used print cartridge a hazard.
  • HP LaserJet 4M Plus. With its duplexer and extra paper tray it’s huge and heavy, but it still produces crisp pages after nearly 1,000,000 page impressions. I actually have two of these; one was bought for $99 refurbished, and the other (which doesn’t print nearly so well) was got on eBay for $45, including duplexer and 500-sheet tray. Combining the two (and judiciously adding a bunch of RAM) has given me a monster network printer which lets you know it’s running by dimming the lights from here to Etobicoke.
  • IBM Wheelwriter typewriter/ daisywheel printer. I’ve only ever produced a couple of pages on this, but this is the ultimate letter-quality printer. It also sounds like someone slowly machine-gunning the neighbourhood, so mostly lives under wraps.
  • HP PhotoSmart C5180. It’s a network photo printer/scanner that I bought yesterday. Really does print indistinguishably from photos, and prints direct from memory cards. When first installed, makes an amusing array of howls, boinks, squeals, beeps and sproings as it primes the print heads.

the computer does work

Picked up the new computer from Canada Computers yesterday. High-end it isn’t, but it’s more than adequate. It’s an AMD Sempron 3000+ (on a Foxconn K8M890M2MA-RS2H motherboard), with 1GB RAM, 80GB SATA disk and a DVD±RW drive. There was change out of $400, including tax.

It’s running Ubuntu for AMD64. While there are a few things I don’t have configured, it was all installed in under an hour. It reminds me a bit of OS X. There’s one thing it does better than the Mac; it knows about duplex printers, and assumes you want to be able to print duplex. Under OS X, you have to choose two-sided every time you print. Thanks to Davey for originally putting me on to Ubuntu. My life’s too short to mess with linux configs.

Now I need to move the old hard drive over as a spare, and fit the various cards from the old machine.

pear shaped plan

I fear my plan to have the T21 as a home server has gone wrong. Looks like the mini-PCI network card has blown, leaving it invisible to the network. Since the screen backlight is dead, I can read no diagnostics … ;-(

Update: Aha! The backlight gods must’ve heard me, for the T21 actually graced me with a visible screen for a few hours. It was down to:

  • A bad line in my fstab which was trying to mount an unattached USB drive. This drops OpenBSD into single-user mode.
  • no dhclient configuration, so the machine would not automatically appear on the network. Since I swapped out the purportedly faulty mini-PCI network card for a spare (what?! you mean you don’t have spare mini-PCI network cards about the house? Tsk.) I had to tell the system that this was the new card to get a DHCP address.

So all works now, and I’m happy. Now to attack the LaserJet 4 duplexer, and swap it onto my refurbed printer …